Hi everyone! It's Irene Tan here!
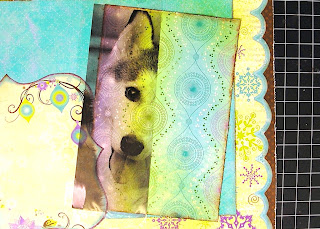
Today, I would like to share a little tutorial on "Packing Tape Transfer" with you all. It's a simple technique where you can transfer your image to any surface via the use of packing tape.
Here are the steps.
Step 1
Print your image on top a normal paper and get yourself a roll of clear packing tape.
Tip: Your image need to be printed using a toner based printer.
Cover your image with strips of packing tape. Do not overlap the strips.
Step 2
Cut out the image and soak it in a bowl of water for about 3 minutes.
Try separating the strips after that.
Step 4
Then, pick a strip up and turn to it's back.
Use your finger and rub off the paper from the packing tape.
Tip: Start by picking the very first strip on the image and work on the rest accordingly. It would be great to have a towel nearby.
Step 5
After rubbing off the paper on the first strip of packing tape, immediately attach it onto the surface you want.
The tape will still have some stickiness to it and will stick onto the surface easily.
If not, try using adhesives.
Tip: Attach each strip immediately after you finished rubbing off the paper from it's back.
Do not wait till you finished rubbing all the strips.
Here's the finished layout using this technique.
Winter Warmth
Designer: Irene Tan
Supplies Used: Winter Joy Awe Die Cut, Winter Joy Snow Angel, Winter Joy Stripe, Winter joy Bundled,
12" Winter Joy Chipboard, Winter Joy Cut Outs, Winter Joy Combo Sticker, Winter joy iCandy Brads, Winter Joy Clearly Stamp, Glitter Winter Joy iCandy Stickers, Winter Joy The Gift Of Giving Sticker, Winter joy Rub-ons, Chocolate and Coffee Dot Cardstocks, Concord and Clover ribbon, Bo Bunny buttons.
Other Supplies: Floss for stitching, Ink, Stickles, Glossy Accents
Thanks for stopping by!


.JPG)


OMG, how did you ever think of that? WOW, love the effect, you're incredible!
ReplyDeleteWhat a great idea. I'm going to have to try this on one of my wedding pages. Thanks for sharing
ReplyDeleteWhat a cool idea! I will have to try this! Thanks for the tutorial!
ReplyDeletewow tfs!
ReplyDeleteI love this technique, been using this for some time now, but it was great to see it again.
ReplyDeleteVery cool tutorial Irene!
ReplyDeleteclever idea
ReplyDeleteThat's amazingly beautiful. I love that effect.
ReplyDeleteHow totally cool, I am soo going to give this a try!!!
ReplyDeleteTotally cool! Love the funky page too :)
ReplyDeleteCyndi
What a fun technique!
ReplyDeleteThat is totally cool!! I've always wanted to try this!
ReplyDeleteSimply Stunning!Thanks for sharing this interesting technique!
ReplyDeleteReneex
That is just amazing!! I have *got* to try this!
ReplyDeletewow! that LO is gorgeous! love how that photo turned out!!
ReplyDeleteHow cute! So - if I have a black and white Laser printer, that would work?
ReplyDeleteOH! That is so cool Irene!!!
ReplyDeleteI am amazed. I have never seen this technique before.
ReplyDeleteThat is so cooooolllll.Like it..
ReplyDeleteRight on Irene - thats awesome!
ReplyDelete"Sandy said...
ReplyDeleteHow cute! So - if I have a black and white Laser printer, that would work?"
Yes Sandy! Laser printer should work.
You continue to amaze. I will be trying this soon. Love Love Love It.
ReplyDeleteThat is absolutely stunning, it amazes me how you would come to think of that. Truly inspiring!
ReplyDeleteIrene, you never disappoint!! Your work is amazing!! Thanks for sharing this fun and beautiful idea!!
ReplyDeleteOh wow, this is so fun.. I have to try that.. thanks for sharing !
ReplyDeleteHow cool is that!
ReplyDeleteI've never heard of doing that--thanks for sharing
absolutely fantastic!!! thanks for sharing!
ReplyDeleteoh man, girl! this is awesome!
ReplyDeleteYou are amazing Irene !!!!!!!
ReplyDelete