


I made this whimsical hairband using one of the beautiful new
BoBunny Petals (Cream Gardenia Petals)
I love these new petals because you can use them,
as is, or change them up with a little color tints.
These are some of the supplies you will need to make up this hairband:
*BoBunny Cream Gardenia Petals
*BoBunny Cream Gardenia Petals
*brown or green heavy gage florist wire
(can be found at Michaels, I got mine at our local dollar store)
*some alcohol ink to tint the petals
(I used Tim Holtz alcohol ink in Pink Sherbert)
*Q-tip (to apply the ink to the petals)
*some small paper or silk 'extra' blooms,
small floral sprays/branches
(check dollar store for these items),
fabric leaves (I used some leaves from old silk
flower arrangements...also can be found at dollar stores)

Step 1
Begin by tinting the center of your Gardenia with some alcohol ink using a
Q-tip as an applicator. I like to tint just the base of the petals so it fade's
out to white at the edges. I did this to a few of the layers starting
from the center (you don't need to tint every petal, just a few center petals).....


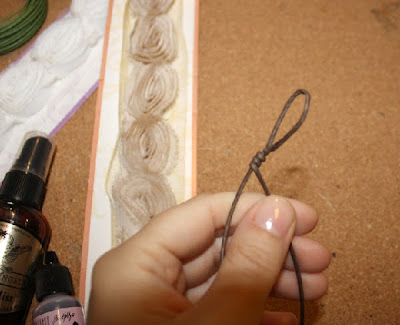
Step 2
Measure the circumference of the person's head you are
making this headband for.
Double it and then add about 6 inches extra to give you some
wiggle room when making the headband. That will be the length
of the florist wire you will use. Fold the wire in half and wrap
one piece around the other a few time's to form a loop.....

Step 3
Now just begin making long twists in the floral wire
for a few inches in length (about 2-3 inches)....

Step 4
Now begin adding in bits of the branches and small blooms,
twisting the floral wire around it as you go (leave a couple
inches of the branches sticking out from the main twist of the headband)....

Step 5
When you are about 1/3 of the length of the wire in, it is time
to add the larger BoBunny Gardenia. The flower has a nice little
cardboard tab at the back of it, tightly wrap you
wire around it to hold the bloom in place.....

Step 6
Continue as you did in Step #4 twisting bits of small blooms and
little branch pieces into the main twist. At the end, twist the end
into a hook that will fit into the loop to secure the headband when on.
(remember to check placement of your blooms on the person you
are making this for, the last few inches can be just plain twisted wire)
When you are done just use a hot glue gun to add on a
couple of leaves to the main large flower...

So there you have it, give it a go, it's easy!
Or have fun experimenting with different tints on the
BoBunny blooms for a fresh different look.
Thanks Gabrielle for that great tutorial.
Also...
Luzma, one of our Design Team Members
shared with us some images of her Scrap Space,
so we thought we'd share it with you...
I want to share some photos of my scrap room to show
how I organize my supplies to get
and remember everything I have and need.
The first two photos are a general view of my room.


Here I have my Cricut and all the cartridges, plus my Copic Markers.
Under the table I have the kit's clubs I receive, and the latest collections.
 Here I have the sewing machine,sizzix and some embellies.


Here you can see something very important for me :"PUNCHES"

Here you can see how I organized my amazing BoBunny supplies.
I separeted them by collections and by supplies (every collection)

Here you can see how I store the ribbons and the buttons in the jar behind.
Thanks Gabrielle and Luzma!
Wow, your daughter will be so happy having such a creative mom, who's also on the Bo Bunny team. You did an amazing job on this headband. Your DD looks like a little fairy.
ReplyDeleteAnd Luzma, I totally love your scrap space. Seems like you've got a wonderful and inspiring place to spend your scrappy time:)
What a lovely headband - I wish my daughter would wear them but she's 14 and wouldn't be caught dead in it. I'm totally loving Luzma's scrap space.
ReplyDeleteLOVE, LOVE the headband Gabi...it is stunning, and Luzma can I come scrap?
ReplyDeletewow,look at that room,beautiful!!!!!i understand where the mojo comes from...
ReplyDeleteAnd wow,the headband is amazing....i love it!!
Have a wonderful day,Jolanda
Luzma, it's no wonder you are able to produce so many beautiful l/o's as you do, your scrapspace is so inspiring, full of creative things!
ReplyDeleteErika, my dd is 12 and wouldn't go out with a fancy headband on either (maybe if she were in a wedding)...but my 9 year old would!LOL! ....Chloe was kind enough to pose with it (I thought her curly hair would show it nicely :)
Beautiful headband! I absolutely love it!! You're right, it looks so pretty with your daughters curls!
ReplyDeleteThat headband is the most beautiful thing ever!!!
ReplyDeleteGabi this headband is absolutely precious my friend and should be perfect fo a bride too!!
ReplyDeleteThat headband is just soooo gorgeous I wish I had a daughter to make one for! I love your scrap space Luzma!
ReplyDeleteThe headband is just gorgeous!!!
ReplyDeleteLuzma, your space is simply inspiring!!!!
I love how you organize your items! Congrats on the design team!!!!!
Gabrielle....That headband is ultra feminine and classy.....!
ReplyDeleteYour creativity is a true talent...! Your family must be very proud of your accomplishments; Especially your daughters...!
And Luzma...Your Scrap World there Is extremely inspiring....! I have my scrap space all around me here, and I really dig some of your storage areas as well as how you have your things not only organized but set out so pretty too...! It's giving me ideas as to re-arranging some of my supplies and materials into a more "creative" looking space...
Thanks for your inspiration, Both of You...! So Motivational...!
Serena xx
Absolutely love this headband! Gabi, you always come up with incredible projects! And Luzma, you have the scrap room of my dreams!!
ReplyDeletewow, beautiful headband! I love your craft room! It's so amazing, looks like a small store!
ReplyDeleteThat headband is adorable.
ReplyDeleteThe scrappy room is awesome. I got many ideas for mine but one question... How do you store your 12 x 12 paper. I would like ideas from all or anyone.
wicked tutorial as always Gabi!
ReplyDeletelove your scrap space luzma!
Wowwwwwwwwwww that is an amazing headband!! Thanks for the tutorial...and loving your scrap space Luzma! :):):):):):):):):):):):):):):):):):):):):):):):):):):):):):):):):):):):):):)
ReplyDeleteShe looks gorgeous Gabi - beautiful headband too!
ReplyDeleteAwesome tutorial Gabi! ... and wow that is such an organized scrap space. Cleaver idea for the punch storage Luzma!
ReplyDeleteBeautiful job, Gabrielle
ReplyDeleteOh Gabrielle...the headband is so beautiful...your work is so much fun to see...i think your work is amazing...
ReplyDeleteHey I loved this so much I featured it on my blog... come over and take a look!!!
ReplyDeletehttp://dragonflyfeathers.blogspot.com/2010/09/featuring-my-favorites-friday-2.html
That headband is beautiful!! And love your space Luzma!!
ReplyDeletethis is an amazing headband and tutorial!!
ReplyDeleteand i love luzmas space!!
wow, what an awesome scrap space!
ReplyDeleteWhat a neat tutorial! Thanks! :)
ReplyDeleteWhat a beautiful headband! I can't wait to try this headband with my niece! YAY! She really loves hair accessories and this one will be a great addition in her collection. Thank you so much for sharing this tutorial!
ReplyDeleteThis comment has been removed by the author.
ReplyDeleteThank you so much for all the wonderful inpiration I always get when I visit your blog.
ReplyDeleteGabi another wonderful creation and she looks beautiful in it.
Luzma such a wonderful scrapspace. I love how organized it is. I bet you spend alot of time there.