
1. Gather your supplies. (Bo Bunny Whoo-ligans Patterned Paper (of course), Whoo-ligans Embellishments, trimmer, corner rounder, Tombo Adhesive, border punch, scissors, and Halloween Treat Bag Template (see below). 2. Print Halloween Treat Bag Template on a piece of cardstock and cut out. You may have to resize it to get it the right proportion.

3. Using your favorite Whoo-ligan's patterned paper, trace template and cut out.

4. Fold patterned paper toward the center of the small square.
 5. Using your corner rounder, clip all of the outside corners.

6. Using a really tough permanent adhesive (I used Tombo Mono Roller Adhesive), glue flaps to the back of the treat pocket.
 7. They should look like this...

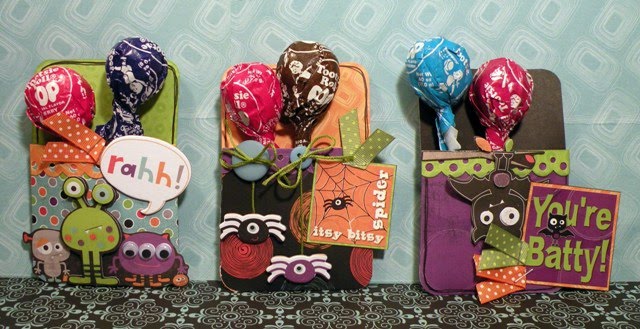
8. Embellish to your liking and add treats!! Here are a few of the ones that I created...
 Supplies Used: Whoo-ligans Dot, Whoo-ligans Batty, Whoo-ligans Boo, Whoo-ligans Combo Stickers, 12" Whoo-ligans Chipboard, Whoo-ligans iCandy Dimensionals 3D Cardstock Stickers, Bo Bunny Double Dot Ribbon, and various Bo Bunny buttons.
 5. Using your corner rounder, clip all of the outside corners.
6. Using a really tough permanent adhesive (I used Tombo Mono Roller Adhesive), glue flaps to the back of the treat pocket.
 7. They should look like this...
8. Embellish to your liking and add treats!! Here are a few of the ones that I created...
 Supplies Used: Whoo-ligans Dot, Whoo-ligans Batty, Whoo-ligans Boo, Whoo-ligans Combo Stickers, 12" Whoo-ligans Chipboard, Whoo-ligans iCandy Dimensionals 3D Cardstock Stickers, Bo Bunny Double Dot Ribbon, and various Bo Bunny buttons.
 See...easy!!! Hope you have a wonderful weekend. And if you give this a try, I would sure love to take a peek...tootles!!
oh wow these are super fun i must make some for my nieces thankyou xx
ReplyDeleteCute. Nice idea for my pre-schoolers. Thanks.
ReplyDeletegreat job today Frances! Love the little pockets! Too cute!
ReplyDeleteVery fun Frances! Thanks for the tutorial!!!
ReplyDeleteFrances,
ReplyDeleteWhat a darling idea. Makes me want to pull out my goods and start playing.
Thanks for such a fun treat idea!
Kris
Those are so cute!!
ReplyDeleteSuch a cute idea! I might have to make some of these "special" for some of my boys daycare friends. Fun!
ReplyDeleteThanks everybody...you are just the sweetest!!
ReplyDeleteToo cute Frances!! I need to make a few of these! Thanks for the inspiration!
ReplyDeleteI love these little parcels - too cute
ReplyDeleteThese are super cute! Can't wait to try it!
ReplyDeleteWTG Frances!!!! Such a cute Tut!!
ReplyDeleteWow, Frances!! These are cool!!! And oh so simple!! I am going to have to make some of these!!!
ReplyDeleteGREAT idea...these little pockets couldn't be any cuter!! Just love how you dressed 'em up! TFS!
ReplyDelete~Sharon C.
How perfectly darling!
ReplyDeleteEeeeek! I'm absolutely LOVING these!! So so cute. also I always appreciate the chatty kathy types - great tutorial, and thanks for sharing!
ReplyDeleteThis is oh, so cute! Thank you for the tutorial!!
ReplyDeleteToo CUTE Frances!!! Thanks for sharing them!!
ReplyDeleteThese are awesome!!!
ReplyDeleteToo cute! This is a great idea! Thanks for the inspiration!
ReplyDeleteSimple adorable and so easy to make Frances! Awesome Chickie!
ReplyDeletevery cute treat holder - and a skinny candy bar could slide in there too I bet (thinking hersheys) - thanks for sharing!
ReplyDeleteSO ADORABLE! ans so easy to make. tfs!
ReplyDeletefab wee treat pockets Frances - my kinda girl, quick and easy :)
ReplyDeleteDebbi
x
super duper adorable. love your chatting. thanks.
ReplyDeleteOh my goodness! these are the cutest. SURELY you're not gonna really give them to little kids that might not appreciate them???? Oh, i hope they appreciate them and cherish them forever. too too dang cute!
ReplyDeleteThese are soooo super cute!
ReplyDeleteTotally super cute Frances!!!
ReplyDeleteCool tutorial! Love it!
ReplyDeleteThese are so adorable!! I'm going to have to wing the corner rounding part since I don't *gasp* have one yet!!! Great project :)
ReplyDeletevery cute! Thanks for the ideas!
ReplyDeleteI also have 4kids 10, 9, 3 and 2mo plus I am a full time online student so I completely understand!
ReplyDeleteI love this and will be using it on my own kids and their teachers but I have 100 classmates between the first three then staff and trick or treaters but not enough time.
Thank you!!!!!
Oh my, those are adorable Frances! :)
ReplyDeleteFrancis thank you for sharing this awesome idea. I love these little Halloween treat containers. And by changing the papers and embellishments they will work for any occasion. Thanks again!
ReplyDeleteI love the idea! They are cute for any occasion. Thanks
ReplyDeleteThese are cuuuuute!!!
ReplyDeleteSuch cute ideas!
ReplyDeleteSo lovely.
ReplyDeleteThis Halloween collection rocks!
I love what Frances did with these papers and stickers!
ReplyDeletewonderful tutorial - these are soo cute
ReplyDeleteSuper cute. Thanks for the tut.
ReplyDeleteWonderful idea is that. I actually adopted it to make an advent calendar. Just take a look at my blog.
ReplyDelete