Hey BoBunny friends!
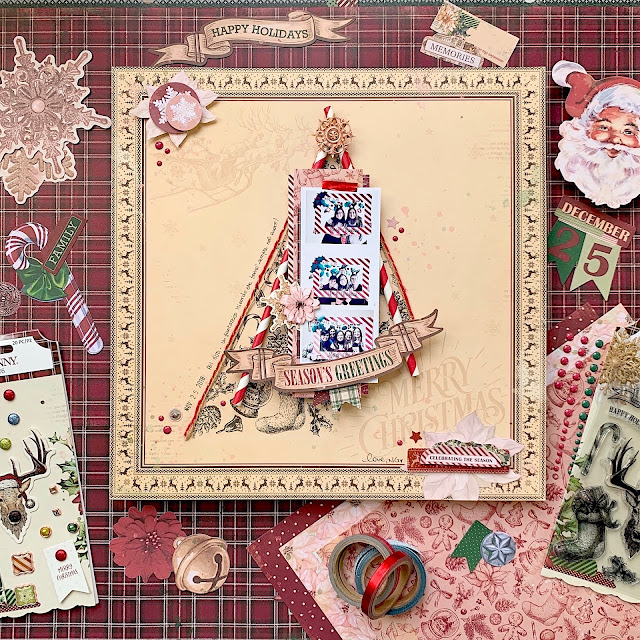
Angela here sharing my first layout using Christmas Treasures collection. I am really happy on how this turned out because the layout is a mix of fresh look and vintage feeling.
Using a pencil, I drew a triangle in the centre of the paper. I filled in the inside of the triangle stamping the smallest icons of Christmas Treasures Stamps, being careful not to cover the beautiful 'Merry Christmas' printed on the right of the paper. Here, my intention was to create a stylized Christmas tree as a focal point.
At this point I tried to emphasize the tree using two paper straws I had in my stash. Between the two straws, I placed the photos. It's a trio of pics took last year at a crop meeting. So much fun!
I decorated all around the tree with cardstock stickers and die-cuts from Christmas Treasures collection. On top of the tree a places a sticker of a star and a gorgeous flourish brad.
Also, I adhered two pieces of twine around the tree, to simulate Christmas garlands and I wrote the journaling on one side, just above the twines.
Last, I added two other clusters of embellishments on top and bottom of the layout. I simply wanted to include the beautiful poinsettias of the Noteworthy pack.
I really had a blast putting this page together and I am so proud of myself because I was able to make it in less than one hour!
Thank you so much for stopping by. Have a great day!
Patterned Paper: Christmas Treasures Dear Santa
6 x 8 Paper Pad: Christmas Treasures
Noteworthy: Christmas Treasures
Cardstock Stickers: Christmas Treasures
Brads: Christmas Treasures
Candy Dots: Christmas Treasures
Stamp: Christmas Treasures
Washi Tape: Count The Ways
Other Supplies:
Sticky Thumb sticky dots 0.25
Sticky Thumb solid adhesive 0.313
Scissors Cut It Up 5.5 in


No comments:
Post a Comment