Friday, June 22, 2012

FIELD TRIP FRIDAY

Time for another Field Trip Friday where our DT steps
outside their comfort zone and amazing things happen!!

Get ready to be WOWED! 
Gabi has stepped into the world of mixed media and made an adorable canvas
that makes you feel empowered and artistic!  She also made a fun video tutorial
and gave us all the pattern for her adorable lil miss.

Mixed Media Canvas
by: Gabrielle Pollacco

 check out the detail.... 
 seriously so much fun!

Supplies:
11 x 14 inch canvas
Patterned Paper; Little Miss Brenna, Little Miss Maree, Little Miss Jaquoya, Little Miss Cut Outs, Gabrielle: Cameo, Dot
6x6 Paper Pad: Little Miss
Stamps: Midnight Frost
Rub-on's: Country Garden

I've seriously got that UTZ in my tummy that says I have to go home and try this.

Next up... ROMY
Here's what she had to say...
"Since each Bo Bunny collection comes with many gorgeous papers and beautiful coordinating embellishments, it is pretty tempting to stick to one collection on a layout. I sometimes mix up two collections that look a lot alike, but I have never combined two very different ranges of paper on one layout. 
But the Ambrosia collection inspired me to use a mixture of vintage and colourful on my layout. The muted, vintage tones in the background will make the beautiful colours stand out even more. I used one sheet of the Welcome Home and one sheet of Et Cetera for my background. I also incorporated a sheet of music note paper from an old book. On top of those vintage layers I added papers and embellishments from the Ambrosia collection to create a colourful 'frame' for my photo. 
I had a blast mixing up these collections that I normally wouldn't use together and I hope you will give it a try too."
The little things are not so little after all
Romy Veul

Bo Bunny Supplies:
Patterned Paper: Flowers, Marigold, Primrose, Roses, Stripe, Cut Outs/Ambrosia; Extra/Et Cetera; Stripe/Welcome Home
Chipboard: Ambrosia 12 x 12
Stickers: Ambrosia Cardstock Sticker, Ambrosia Dimensional Stickers
Jewels: Ambrosia
Rub-ons: Ambrosia

Every single time I read that the girls mix up lines, I think I want to try it...
however, I have yet to do it, but Romy made it seem so easy!

And last but certainly not least....  
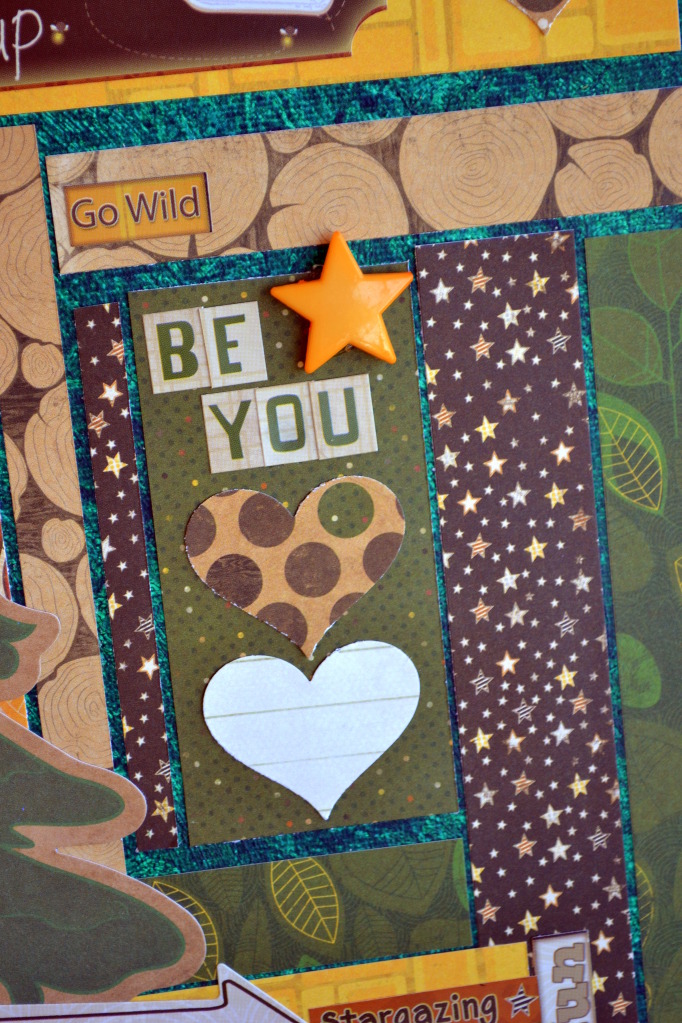
Juliana says,
"I knew immediately that using rub ons would be stepping outside my comfort zone. I hate to admit this, but I rarely use them. I also hate to admit this...I am afraid of them! I am not a stick it down and move on kind of scrapper. I like to move things around before I commit to their final placement. And as you all know, rub ons can't be moved around at all. Recently one our very own designers, Tara Orr, shared a tip about putting them on cardstock and then cutting around them. Why had I never thought of that?! This is the technique I used and I combined them with stickers from the 12 x 12 Combo Stickers to embellish my layout. If you are interested in more step by step details on how I used them on my layout, please feel free to stop by my blog: 17turtles."

Make A Wish
Juliana Michaels


What a fun idea and new way to play with all those rubons you've been storing up!


Emma makes me wanna get down and make sand angels!

Today you've gotten lots of fun inspiration and ideas that will last you all weekend!
Make sure you leave us a comment and post your layouts and projects on facebook.
We love to see what you all come up with!!!

Thursday, June 21, 2012

Last day of 20K & keep reading for quick and easy pages!

This has been such a fun celebration! Thanks to all who have participated! Here are our winners for today!

1)
      Year subscription to Canadian Scrapbooker Magazine

2)
      Hello Sunshine album set

3)       Hello Sunshine album set


If you’re a winner, email your mailing address to thebobunnyblog@gmail.com Prizes for all winners will ship at the end of this week.

TODAY IS YOUR LAST CHANCE TO WIN!!! Comment on this post for a chance to win a GRAND PRIZE! Get the coveted BoBunny Pink Purse filled with BoBunny goodies. Thanks so much for participating! We love BoBunny fans! 


Not allotta time or cash????

I'm so ecstatic to show you guys these fun and easy layouts 
our DT pulled together in no time at all.

We gave them a formula that looked something like this...
JUST KIDDING!!!!

It really looked something like this:
(you choose your own papers, these are just examples)

Carin starts us off with this darling layout made with Hello Sunshine... This page is just a bit of happiness right here on the blog. 
I love that she spotlighted the kids with the open circle sticker!

Lazy Days of Summer
by Carin McDonough

Bo Bunny Supplies Used :
Patterned Paper : Delight, Daydream, Dot/Hello Sunshine
Cardstock : Journal Dot in Turquoise
Stickers : Lazy Days Cardstock Stickers/Hello Sunshine
Petals : Hello Sunshine

and just for fun.... check out how much product she still has left after making her page...


Carin also has a great tip for those of us who like to take LOTS of photos... she says:
" I am a someone who takes loads of photos and has a really hard time narrowing down what photos I want to use! I often have too many to even do a double page that I would be happy with and I am mostly a single page girl anyway! So my soloution to my problem is to use these page protectors with 4x6 slots. You can do your single page with as many photos as you like and then slot the rest into the page protectors and use one of them for journalling or just to decorate. Quick and simple! I have kept this one really simple with just a journalling box and a strip down the side to help tie it in with my single page but you could go as fancy as you like! "

Carin also added a sketch will be in the sketch tab at the top of the blog....   (this is new, check it out)

Daddy's Girls
by Sarah Eclavea
Journaling: These are daddy's two little princesses. Frances and Isabel, Father's Day, June 2012
Bo Bunny Supplies Used :
Patterned Paper: Little Miss, Little Miss Allie, Cut Outs/ Little Miss
Stickers: 12x12 cardstock/ Little Miss
Chipboard: 12x12 chipboard/ Little Miss
Cardstock: Coffee Flourish

Sarah gives us a great tip when she says... 
"I like to make the photos the stars of my layouts so I usually scrap with 4x6 photos. Since I don't have to crop my photos and bigger photos take up more space I save time and product too. I only used half of my cardstock sheet and less than half of two of my patterned papers. I also only used a few stickers and two chipboard pieces from the set. I have tons of product left over to make several more layouts and cards. And time too since I didn't spend hours on this layout!"
Sarah also made you all a sketch... don't forget to check out the sketch tab at the top of the blog.

Lazy Days of Summer
By Luzma

Luzma gives us great advice and tells us...
"When you have few materials and supplies to make a layout, it's easy to play with punches,
you can make such great embellies with them."

Bo Bunny Supplies Used :
Patterned paper: Hello Sunshine Breezy,Busy Bee,Hello Sunshine
Lazy Days Cardstock Sticker: Hello Sunshine
Petals: Hello Sunshine

Can you stand how easy yet amazing today's layouts are??? 
Take a few minutes this week and play with our formula!
Be sure to share your layouts with us on facebook!

Wednesday, June 20, 2012

3 CHEERS for Local Scrap Stores!!!!


We’re so excited to begin featuring some of our fabulous local scrapbook stores here 
on the blog! These stores are the best of the best! They carry tons of BoBunny product and they’re never short on creativity. If you live nearby any of these featured retailers, 
they’re totally worth a visit!  If not, check out their website, blog, and Facebook 
page to be inspired by their ideas.  

First up is Cat’s Creations in Mineral Wells, TX! 

Here’s what Cat says about her store and then keep scrolling for some awesome projects!!

Our store is 3200 square feet of bright colors and FUN! FUN! FUN! We carry all the latest and greatest in product to keep the ladies happy. We carry full collections of the lines, not just pieces and parts. We offer a wide variety of collections & vendors with Bo Bunny being our top fave! We have, a ribbon wall to die for, lotsa bling and we will try most anything on our pages, albums and craft projects. We offer classes, Kids Kamp, crops (each cropper gets her own table), retreats, and we’ve even done a few cruises.

We pride ourselves on our custom albums that use a combination of our Accucut dies and my husband's ability to cut album covers from wood for me and Nanci Holtsford. These turn into beautiful show pieces for your coffee table. We encourage our ladies to think out of the box and add their own personality & creativity to our classes. It is so much fun to see how different all the projects turn out. We try to teach several new techniques with each custom album class. Nanci and I create all the classes for the store and sometimes they are an all-day affair because we don’t know when to stop creating and adding to the books!

I love to create and I love to teach others how to turn their creativity loose. I have been blessed to find a partner in crime, Nanci! We can always come up with something that makes my husband groan because that means more work for him with the saw. This is such a wonderful hobby that is shared by so many wonderful ladies. In the past 8 years, I have seen it bring so many family members together in a special bond. That is what makes owning the store the best--my wonderful customers!

Find all our fun ideas, schedule and pics on our website: www.catscreationsscrapbooks.com and on Facebook under Cat’s Creations Scrapbooks.


Cute Cat!
Partner in crime... Nanci
 Our Awesome Store
 Part of our crop area
 Beach Bottle Album with Paradise
 Snowfall Album
 Snowfall 2 page LO
 Camp-a-lot Album (Check out the detail...)
 Inside of Camp-a-lot Album
Priceless Album with Weekend Market

Thanks for all the fun projects Cat & Nanci!!  We love our stores and are
so excited for everyone to see and love you as well.


Tuesday, June 19, 2012

Party On!!!


Thanks so much to all of you who are still partying with us! There are a few winners we haven’t heard back from yet, so be sure to scroll through the past entries to make sure you’re not one of them!

Our Camp-A-Lot album winners from yesterday are:
1) 


2) 


3) 


Winners, please email us your mailing address at thebobunnyblog@gmail.com.  Congrats! 


One of the prizes we’re giving away tomorrow is a year subscription to Canadian Scrapbooker magazine!!!  Thanks to our Canadian friends for offering to celebrate with us!
Our other two winners will get a Hello Sunshine album with coordinating embellishments!  Comment on this post for a chance to win! 

SuBWaY aRT

Hey, Howdy & Hello!!!
Today's post is brought to you by "Subway Art"
I searched and searched to find the definition of 
Subway Art and couldn't really come up with much.

So here is my definition
subway art, n. 1. placing and arranging related words, in random fonts to form art.

Our FAB DT has been playing with this topic and I can't wait to show you what they've come up with.

BE YOU
Julie made this adorable  Camp-A-Lot Canvas.  
She says she loves Subway Art and the personal meaning behind it.  
What a fun project to display and brighten up your home this summer!!
Julie also gives us a GREAT TIP and said...
"Don't always grab the unused papers in your scrapbook stash! For my canvas, I mostly made this using scraps I had left-over from a layout and cards I had made using this collection!"

Supplies Used
Pattern Paper: Camp-A-Lot 6x6 paper pad, and
Camp-A-Lot 12" Fireflies,  Sunset, Squares, Starry Night 
Noteworthy: Camp-A-Lot
Stickers: Fireside Fun, 
Nature's Playground, Combo
Buttons: Camp-A-Lot

GIRLS OF SUMMER

Robbie said, "Although this layout has a lot going on, it is really quick and easy to put together."
See below for tips to making this layout quick and easy....

1. To start, I used an electronic cutter to cut out my title. I wasn't really picky about where it ended up, because I planned to just work around it. I did make a point to leave the center of my layout empty.

2. Using lots of stickers makes layouts quick and easy to put together. To add intrest and make layering easy, just use lots of foam dots. You can see this in the close-up pictures.

3. Use the cut outs to add instant shapes. Since they already have such neat shapes printed, 
just choose one and cut along the edges.

4. The yellow banner piece of paper was one that I had cut to small for another layout. I save my large scraps, so I just pulled it out and added it to this layout.

5. Finally, to get the look of stitching or bordering without taking much time, just add holes at the corners and stopping points instead of actually making a lot of stitches.


Supplies Used:
Patterned Paper: Hello Sunshine Little Things, Daydream and Cut Outs
Cardstock: Double Dot Designs Chiffon Dot
Ribbon: Double Dot Designs Burnt Orange
Stickers: Hello Sunshine Combo, Lazy Days and Hot Hot Hot
Petals: Hello Sunshine

I hope you all enjoyed the layouts today as much as I did.  Show these cute girls some love with a comment and be sure to share your SUBWAY ART layouts with us on facebook!!!


Monday, June 18, 2012

More Winners for 20K!

This party is so much fun! We just love to share BoBunny goodies with our fans! Thanks so much for participating!

Here are the winners for today:

1)
      Weekend Market


2)
      On the Go

3)
      Hello Sunshine 

Congrats Ladies!! For a chance to win a Camp-A-Lot album with matching embellishments, comment on this post! We’ll announce these winners tomorrow!
  

June Blog Class Week 2

Welcome back for week 2 of our June Blog Class and the Little Miss Collection!
Are you loving this album as much as I am???
I haven't decided what pictures I want to put in it...
What are you guys doing with it?


Here is where you can find the tutorial for the beautiful roses... 

Wine and Chiffon: 2 3/4 x 3 3/4" 

Wine: 3 1/8 x 4 1/2

Here is a picture of the butterflies... Gabi says: Ambrosia Stamp will be used on the cream paper and butterflies on a scrap piece of the cream paper (tint center of butterflies with some pink ink, I used Tim Holtz Victorian Velvet Distress Ink and then cut them out).

That will do it for this week!  Enjoy and we'll see you week 3!