Showing posts with label Angela Tombari. Show all posts

Tuesday, October 1, 2019

BoBunny Boxed Cards Project Inspiration


Hey BoBunny friends! 
Angela here. Do you know what Boxed Cards are? It is a box that contains forty pre-cut cards and envelopes. BoBunny has recently included this new item for some of its collections and I am so happy to play with it today.

Boxed_Cards_Harmony_Angela_Oct1_01.jpg

The Boxed Cards collection I used for my project is the romantic and floral Harmony.
Of course, I made a bunch of cards but before that, I started decorating the envelops that come in the box!

Boxed_Cards_Harmony_Angela_Oct1_02.jpg

I had this idea in mind for a while. I used the envelope Stamps from Boulevard collection to decorate the white envelops. I tried several colors of embossing powders and gold is definitely my preferred.

Boxed_Cards_Harmony_Angela_Oct1_03.jpg

Then, I started decorating the cards. The process is really fast and the possibilities are endless.
I mainly used Harmony die-cuts, from Noteworthy pack and Chipboards. In the card below, I used the foam Alphabet from Harmony collection for the sentiment, plus a Foil Transfer word on a banner. I added a few flowers and a couple of white Double Dot Jewels as a finishing touch.

Boxed_Cards_Harmony_Angela_Oct1_04.jpg

On my second card again, I used a Foil Transfer sentiment on a vellum banner. The focus of the card here, is a couple fo flying birds, one is a die-cut and the other, the smaller one is cut out from In The Air paper.

Boxed_Cards_Harmony_Angela_Oct1_05.jpg

The same scheme follows the other cards, just a few embellishments, a sentiment and the cards are ready to be sent.

Boxed_Cards_Harmony_Angela_Oct1_06.jpg

Can you believe this card is made with just 4 elements? A piece of vellum, a few pink Jewels, a big floral die-cut and a Layered chipboard!

Boxed_Cards_Harmony_Angela_Oct1_07.jpg

This is the card I prefer. It is fun and colorful. I adhered a Double Dot Jewel for each dot of the paper. Isn't it cute?

Boxed_Cards_Harmony_Angela_Oct1_08.jpg

VoilĂ , all the cards together!
Boxed_Cards_Harmony_Angela_Oct1_10.jpg

Thank you so much for stopping by. I hope you liked the cards and feel inspired to create your own with BoBunny Boxed Cards.


BoBunny Supplies:
Boxed Cards: Harmony
Noteworthy: Harmony
Chipboard: Harmony
Layered Chipboards: Harmony
Stamps: Boulevard Stamp
Patterned Papaer: 12" Harmony In The Air
Thickers: AC Harmony foil foam stickers
Double Dot Jewels: Blue Hues, Emerald, Think Pink, Citrus, Tuxedo
Double Dot Pearlescents: Silver
BoBunny Sentiments Silver Foil Transfer

Saturday, June 1, 2019

Summer Fun Mini Album with Angela

Hello BoBunny Friends!
It's Angela here with you today with a mini album made with the new BoBunny collection Celebrating Freedom. It's a small mini album that I made for my boys with a few photos we took last summer during a weekend event called The Pink Night.

Celebrating_Freedom_Mini_Album_Angela_Jun01_01.jpg

Even if this is manly a male album, the little accents of pink of this collection are simply perfect for my pics.

Celebrating_Freedom_Mini_Album_Angela_Jun01_02.jpg

For making the album I used two pieces of chipboard measuring 4 x 5 1/2 inches that I covered with 12 x 12 inch papers. For the binding I used two rings embellished with polka-dot ribbon in the same colors of the pages, pink, red, yellow, mint and blue.

Celebrating_Freedom_Mini_Album_Angela_Jun01_03.jpg

As you can see in the picture below, the album is colorful and pretty chunky and I love this so much!

Celebrating_Freedom_Mini_Album_Angela_Jun01_04.jpg

The pages are small in dimension but full of details. I played with any sort of stuff I had on hand. I used a glassine envelop to hold a tag with the journaling; I created a page with a piece of acetate and I sticked on it a title made with chipboard to overlap to the photo.

Celebrating_Freedom_Mini_Album_Angela_Jun01_05.jpg

I also used many stripes of washi tape here and there, to hold in place some thread or to create a decorative border to the tags.

Celebrating_Freedom_Mini_Album_Angela_Jun01_06.jpg

Celebrating_Freedom_Mini_Album_Angela_Jun01_07.jpg

Here is another way I used washi. I sticked a couple of stripes underneath some sticker phrases, to emphasize them.

Celebrating_Freedom_Mini_Album_Angela_Jun01_08.jpg


Celebrating_Freedom_Mini_Album_Angela_Jun01_09.jpg

Another pages are more clean, with just a sticker or a chipboard, while others have overlapping of elements.

Celebrating_Freedom_Mini_Album_Angela_Jun01_10.jpg

 I like to vary the pages of a mini with different materials and also with different sized. Here, I punched a hole on a die-cut and I wrote the journaling straight on it.

Celebrating_Freedom_Mini_Album_Angela_Jun01_12.jpg

This is something odd. The banner Best Friends is the leftover of a transfer foil sheet. It was so cute that I decided to cut it in a stripe, decorate it and give it a reason inside the mini. Isn't is beautiful on my boys pic?

Celebrating_Freedom_Mini_Album_Angela_Jun01_13.jpg

 To add movement to the mini, I sticked a couple of photos on tags and I created also interactive pages, like the one with the butterfly.

Celebrating_Freedom_Mini_Album_Angela_Jun01_15.jpg

When you open it, there is a photo and on top of the photo, a page made of acetate. For the touch of gold I used a Foil Transfer Sheet, very easy to use.

Celebrating_Freedom_Mini_Album_Angela_Jun01_17.jpg

Celebrating_Freedom_Mini_Album_Angela_Jun01_18.jpg

Celebrating Freedom is a collection full of summery accents and these littles slices of watermelons are the cutest!

Celebrating_Freedom_Mini_Album_Angela_Jun01_20.jpg

 My tow adorable boys in blue and red t-shirts, perfectly matching Celebrating Freedom collection ;P

Celebrating_Freedom_Mini_Album_Angela_Jun01_22.jpg


Celebrating_Freedom_Mini_Album_Angela_Jun01_24.jpg

Thanks for stopping by. I hope you enjoyed this chunky mini album and feel inspired to create with the new beautiful and versatile Celebrating Freedom Collection.

Love,
Angela

BoBunny Supplies:
Patterned Papers: 12" Celebrating Freedom Watermelon/Friendship/Beauty; 6x8 Celebrating Freedom Paper Pad
Cardstock Stickers: Celebrating Freedom
Chipboard: Celebrating Freedom
Noteworthy: Celebrating Freedom, Sweet Clementine
Washi Tape: Celebrating Freedom
Alpha Stickers: Sweet Clementine
Foil Transfer: Sentiments Gold
Pearlescent: Gold

Other Supplies:
AC ribbon
Sticky Thumb Adhesives


Wednesday, March 20, 2019

Harmony: Layout with Angela

Hello BoBunny friends!
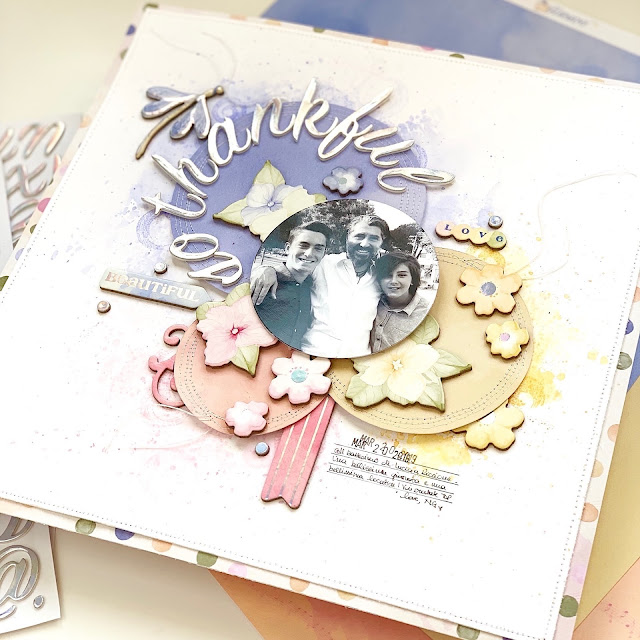
It's Angela here sharing a scrapbook page featuring the new charming Harmony collection. It's a fresh and tender collection with mainly pastels and lots of birds and flowers, perfect for spring projects for the coming sunny days.

Harmony_ScrapbookPage_Angela_March20_01.JPG


I started my layout choosing the color combo and I went for this trio: slate blue, light ocher and salmon. They match beautifully together. I love these shades also because they aren't perfectly solid, they have a soft watercolor effect. So, I cut 3 circles, one from each color, using the We R Memory Keepers Circle Spin & Trim. I cut a 5" circle in blu, a 4" circle in ocher and a 3" circle in salmon. I also cut my photo in a circle shape of 3" and 1/2. Then, I arranged the circles so that they slightly overlap each other and I put the photo in the center.

Harmony_ScrapbookPage_Angela_March20_02.JPG

Before adhering the circles, I stitched each one with my sewing machine. Then, I prepped the background. I used a smooth heavy white cardstock and I marked the position of the different circles on it. I colored and splattered the cardstock using Distress Inks that matched my circles, it means shaded lilac, scattered straw and spun sugar. To add more interest, I also stamped a few circles with the Painted Circles stamp set by BoBunny using the same Distress Inks colors.

Harmony_ScrapbookPage_Angela_March20_03.JPG

When everything was dry, I sticked in place the circles and started embellishing the page.
My idea was to keep everything inside the circles creating a kind of color clusters. So, I placed the title on the blue circles, because it was the biggest.

Harmony_ScrapbookPage_Angela_March20_04.JPG

According to my initial idea, I added yellow flowers on the yellow circles, pink flower on the salmon circle and so on. 
For the journaling, I added a brief description of the photo by hand, but before doing it I drew a few lines for being sure to write straight.

Harmony_ScrapbookPage_Angela_March20_05.JPG

Here is a close up of the clusters. As you can see, I used dimensional foam adhesive to have different height. In some places, like in the photo, I even used two pieces of foam tape, one on the other.
Last, I trimmed 1/4 of inc all around the page, I sewed all around and adhere it to a multicolor polka dots paper for framing the layout.

Harmony_ScrapbookPage_Angela_March20_06.JPG


That's all for today my crafty friends. Thanks for stopping by, I hope you feel inspired by my layout and by the beautiful Harmony collection.

Love,
Angela


BoBunny Supplies:
Patterned Paper: Harmony and Harmony Perfection/Abounds/Everywhere
Chipboard Stickers: Harmony
Stamps: Painted Circles

Other Supplies:
Bazzil Marshmallow
WRMK Circle Spin & Trim
AC foil foam stickers Armony
AC Sticky Tumb adhesives


Friday, March 8, 2019

Make Handmade Cards Under an Hour with Angela

Hey dear crafty friends! It's Angela here with you today. I have a quick project to show you, that I made using the new gorgeous Bee-utiful You collection by BoBunny. It's a bunch of cards I made in less than one hour, simple but beautiful and no measuring is required! Are you ready? Let's start! 

Bee-utiful_You_DIY_Cards_Angela_Mar08_01.jpg


My first step to save time was the paper. I alway struggle to measuring paper sizes, card bases and things like that. This time, I figured it out using te 6" x 8" Bee-utiful You paper pad! It has twelve different patterned papers, perfect for card making. I grabbed my preferred designs and I folded each one in half and I ended up with a 4" x 6" card. How simple is it?

Bee-utiful_You_DIY_Cards_Angela_Mar08_02.jpg

Then, I chose a few die cuts from the Bee-Utiful You Noteworthy pack and for the first card I went with this flower which has a hole in the center. It was perfect to create a tiny shaker flower. I used a die from All Occasion Senentiments dies set and I cut the word Thanks and a couple of hearts out from a piece of gold foam.


All the cards I made have a sentiment also inside. Here I used a stamp from the Expressions Stamps, stamped it in black Versafine and added a little glitter heart.

Bee-utiful_You_DIY_Cards_Angela_Mar08_04.jpg

For the first card I chose a honeycomb pattern and a bee cut out. To move to the next level, I sewed by hand the design of the fly of the bee and added the word Hugs from the same All Occasion Sentiments die set. If you can't sew or you don't have time enough to do it, you can simply draw it using a black liner.

Bee-utiful_You_DIY_Cards_Angela_Mar08_05.jpg

To cover the back of the stitch visible in the inside of the card, I cut a piece of white paper slightly smaller than my card and adhered it with some adhesive. On the same paper I stamped the sentiment this time from the Quotations Stamp set.

Bee-utiful_You_DIY_Cards_Angela_Mar08_06.jpg

Based on the same stitching idea of before is the second card. The patterned paper is a cream polka dots patterned on which I stitched the stems of three flowers. I added the word Celebrate in glitter, using the All Occasion Sentiments dies and a few Pearlescent dots in Sugar color.

Bee-utiful_You_DIY_Cards_Angela_Mar08_07.jpg

Inside the card, I chose another beautiful sentiment from the Quotations Stamps, stamped on the white paper I used to lining the inside.

Bee-utiful_You_DIY_Cards_Angela_Mar08_08.jpg

Again bees for my forth card and a layer of pieces form the Noteworthy pack like the honeycomb. I cut the word Enjoy from the Charcoal Double Dot paper and from a piece of black fun foam. I glued the two pieces together to make the sentiment stand out.

Bee-utiful_You_DIY_Cards_Angela_Mar08_09.jpg

Since in this card there's no stitching, I didn't need to lining so I stamped directly on the card. In fact, the papers from the 6" x 8" paper pad which is another plus for card making!

Bee-utiful_You_DIY_Cards_Angela_Mar08_10.jpg

The fifth and last card is definitely the quickest. I only used die cuts, a doily and a sticker and glued all together. I love the quote of the banner and even more the quote I stamped in the inside of the card.

Bee-utiful_You_DIY_Cards_Angela_Mar08_11.jpg

Thank you so much for stopping by today, I hope you liked my quick and easy cards and you feel inspired to create your own.
Love,
Angela


BoBunny supplies:
6" x 8" Paper Pad Bee-utiful You
Double Dot: 12" Charcoal
Noteworthy: Bee-utiful You
Layered Chipboard: Bee-utiful You
Combo Stickers: Bee-utiful-You
Doily: Small size
Pearlescent: Sugar, Butterscotch, Brilliant Blue
Stamps: Expression, Quotations
Dies: All Occasion Sentiments

Friday, October 26, 2018

Beautifully Brisk Cards with Angela

Hello my dear crafty friends! Angela back with you today with a new project featuring this week theme: Cards! My preferred patterns are leaves, in any shape or color. Beautifully Brisk is a Fall collection and has a lot of leaves. So I decided to use leaves as star of the show in my card.

Beautifully_Brisk_Cards_Angela_Oct_02.jpg
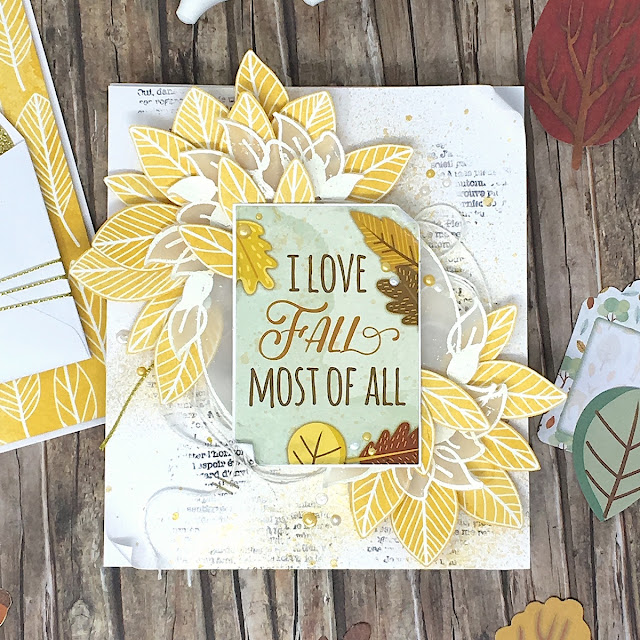
I started fussy cutting the white leaves from the paper called exactly Leaves and set them aside. Then, with the help of a circle die, I traced a circle on a piece of vellum using an embossing pen and I heat-embossed the circle with white embossing powder.  I stamped a few leaves from Perfect Petals Stamp set and heat-embossed the same way.
Beautifully_Brisk_Cards_Angela_Oct_03.jpg

I took the yellow leaves and arranged them around the circle using foam dots to give dimension. In the middle of the circle I placed the sticker 'I love Fall most of all'.
As a base of my card, I prepared a piece of white cardstock and I created my own background with stencils, random stamps and a few spurts of Gold Glimmer Spray. Then, I adhered the circle whreat of leaves in the center of the card. Last, I added a few dots of  Pearlescents here and there.

Beautifully_Brisk_Cards_Angela_Oct_04.jpg

At the bottom of the page you can find the process video for this card but before, I would like to show you another card, simple and very quick to make.

Beautifully_Brisk_Cards_Angela_Oct_05.jpg

First, I prepared the card base with the left-over paper of the previous card. I adhered on it an open envelop that holds the sentiment, a poem by Jon Bishop. The inside of the envelop is embellished with a gold lining and wrapped with a gold twine. Last, I added a few embellishments made of brads and leaves. VoilĂ , the second card is done!

Beautifully_Brisk_Cards_Angela_Oct_06.jpg

Here are the two cards together and I hope you enjoy them.

Beautifully_Brisk_Cards_Angela_Oct_07.jpg

Below is the process video of the first card where you can see how I made the wreath. If you like it, please don't forget to give me a thumb up :)


Thank you so much for stopping by.
Love,
NG

BoBunny Supplies:
Patterned Paper: Beautifully Brisk / Leaves, Autumn
Stickers: Beautifully Brisk
Stamps: Perfect Petals, It Is Written
Brads: Beautifully Brisk
Pearlescents: Sugar, Gold
Glimmer Spray: Gold
Stickable Stencils: Whimsy
White Gesso