Showing posts with label Hidden Journaling. Show all posts

Thursday, May 30, 2013

All about Journaling! + A Fun Tutorial

I'm so in love with today's layouts and the idea behind them.

Have you ever been at the point where all you're doing is putting the 
who, what, when & where on your layouts?

It's a rut that a lot of us tend to get stuck in.

Many years ago (like15ish) I read an article by Rebecca Sower. (I think that's how you spell it)
In this article she talked about more meaningful journaling.
Here are just a few examples of what you could do:

~ Tell the story behind the photo.
~ Quote the person in the photo.
~Write your hopes & wishes for the person in the photo.
~ Journal through the hard times.


Head over heels
Romy Veul
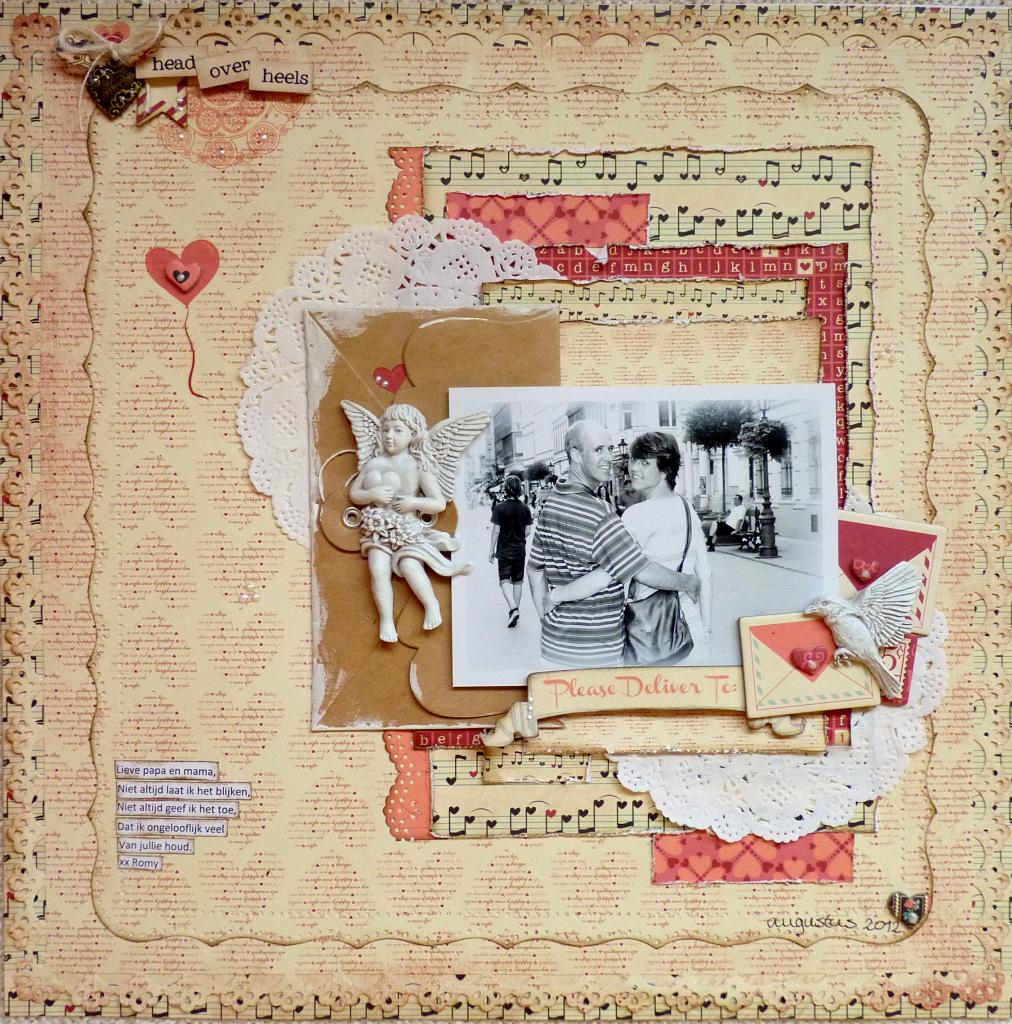
"The Love Letters collection inspired me to write a little note to my parents on one of my lay-outs. Saying how much I love them is something I would love to do much more. But saying it to them face to face is not something that feels very natural. So I figured making a lay-out and journaling about my love for them would be a nice alternative. My journaling is in the left below corner and says:
'Dear mom and dad,
I don't always show you,
I don't always admit,
That I love you
Incredibly much.
Love, Romy'"

BoBunny supplies:
Patterned paper: Flowers, Journal, Keys, Notes/ Love Letters
6x6 paper pad: Love Letters
Chipboard: Love Letters 12x12 Chipboard
Rub-Ons: Love Letters
Stickers: Love Story Cardstock Sticker
Buttons: Love Letters
Doilies: 4 in Small Doilies

Family
Gabrielle Pollacco
 Last month a friend of ours invited our family to join in a little photo contest, we were given 6 photo catagories to enter our photos into, one of which was 'Words'. I saw this cute idea of using laces to create a word on Pinterest, so we made our own 'Family' photo using the laces from our running shoes (and the girls even coaxed our puppy to add her paw to the family photo.)

Nest Tutorial
I created a nest embellishment using some burlap, twine/hemp, and some Bo Bunny Adhesive Pearls (Jewels). Here are my steps to make this easy-peasy nest!


 NOTE: I used Tombow liquid adhesive here, you just apply it to the burlap and let it begin to dry and get tacky, when it starts to get clear you can add the next step without getting your fingers covered in a lot of wet glue.
Add BoBunny Adhesive pearls as 'eggs' and your nest is ready to apply to your page as an embellishment. 

BoBunny Supplies:
Patterned Paper - Anthem (Celebration, Nation), C'est La Vie (Panache)
Cardstock - Island Mist Dot (matting and for butterfly)
Jewels - Prairie Chic, Blitzen
Trinkets - C'est La Vie
Brads - Welcome Home
Blossoms - Denim Blue Zinnia
Other - Hemp twine, burlap, texture paste & mask

When...
Tara Orr

 To the left of the photo there is actually a pull out tab with journaling/a special message to my daughter for her to read when she gets a little older.
BoBunny Supply List:
Patterned Paper: Divine, Opulent, Eloquent, Isabella, Delicate/Isabella
Patterned Paper: Oh Snap, Darkroom: Mama-razzi2
Noteworthy: Isabella
Noteworthy: Mama-razzi2
Trinkets: Isabella
Layered Chipboard: Isabella
Dimensional Stickers: Isabella
Combo Stickers: Isabella
Scripted Cardstock Stickers: Isabella
Chipboard: Isabella
Doilies: Medium

Hopefully this will inspire each of us to make sure we journal on our layouts,
and include the stories we want passed along to our families.
Happy Thursday & Happy Journaling!!

Tuesday, July 6, 2010

Your own private hideaway...

Do you ever want to journal on your layout, but feel it is too personal and you don't want to share it with everyone? Or maybe you just don't like the look of your own handwriting? Whatever the case may be, if you don't want everyone to see or read your journaling, then I have a technique you are going to want to try! I am going to share with you today a way to place hidden journaling on your layout using the Bo Bunny Cut Outs! Nearly every collection contains a set of these fun double sided cut outs that can be used in so many fun and creative ways on your layouts. I choose to use the Petal Pushers collection for my project. Don't the colors in this line just put a smile on your face?!
Supplies: Petal Pushers Doodles, Petal Pushers Bloomers, Petal Pushers Dots, Petal Pushers Stripe, Petal Pushers Cut Outs, Petal Pushers Chipboard, Petal Pushers Combo Stickers, Petal Pushers iCandy.

Start by selecting the Cut Out you want to use and then cut it out.
I like to use images with similar designs as this one because by cutting out the top part of the image you create a tab that can be lifted and pulled on to reveal the journaling piece.Cut along the scallop edge and make a clean cut across the top of the other piece.
Cut a piece of coordinating Double Dot Cardstock to mat the 2 pieces you just cut out giving the images about an 1/8 inch border. Score the edge for the scalloped strip.
Adhere the scalloped strip. This will become the tab that will fold over your layout.
Fold this piece over like so.
Then adhere the other piece of the Cut Out on the inside of the cardstock.
This is what the finished journaling piece will look like.
I find this works best with a layout in which you start with a 12 x 12 piece of background paper and then layer a smaller piece of paper on top of it. On with this layout the journaling piece will slide between the yellow and black paper and the tab will fold over the top of the yellow paper. Between these 2 layers you will create a pocket for the journaling piece to slide between.
Once you have determined the placement of these papers, then determine the placement of your journaling piece.
Here you can see it sliding in/out.
Place adhesive around the outside of the journaling piece on the back side of the paper. This will create a pocket to hold it in place.
Adhere this paper to the 12 x 12 background paper and put the journaling piece in place.
The tab will be held down better once placed in your page protector.
Now the journaling piece is ready to add your journaling and it is time for you to complete the rest of your layout.
.....................................................................
Here are some details images of the embellishments I used on my layout.
I added a little chipboard flower to the journaling tab strip to dress it up a bit.
I cut out the centers for the flowers from the patterned paper and layered them on top of the chipboard flowers using double sided foam tape to give them even more dimension.
And finished them off with a little iCandy!For the strip on the bottom I re-created a longer version of the strip on the journaling piece, complete with staples to match!

I hope you all enjoyed this tutorial and will give hidden journaling using the Bo Bunny Cut Outs a try on your next layout!

Happy Hugs!
Juliana

PS... Leave a comment, tell us what you thought about this little tutorial and you will be entered in a drawing for some Petal Pusher goodies!