Showing posts with label thick stencils. Show all posts

Tuesday, January 30, 2018

Only You Mixed Media Canvas with Irit


Hello my dear crafty friends and welcome to my  second blog post made with BoBunny new and gorgeous Only you collection.

This time I decided to make a Mixed Media canvas as this is one of my most favorite ways to show the paper collection and to add more of BoBunny different products.

Only you Mixed Media Canvas by Irit Shalom


 The background was made in two parts. The right side was made with a piece of thin fabric glued over the canvas and then covered with gesso and crackle paste.

The left side was made with BoBunny stencils and texture paste.

Then the whole piece was misted and painted and some gold wax was added over the texture.


The main cluster was made with mostly hand cut cardstock pieces that were arranged into this composition full of hearts and love.


One big Mandala die cut was added on the back of the cluster and one smaller Heart die cut was arranged in 6 layers on the bottom of the cluster.


BoBunny Supplies List:

Only you collection 12x12'' cardstocks: Only you, Kisses, Cupid, Happiness, Darling, Noteworthy

Mandala die

Sweetheart die

Hearts wood shapes

Lots of Love Stickable stencil

Mandala Garden stencils

White 2 step crackle paste

White gesso
Double Dot Ruby Red jewels
Sugar Glimmer mist

Thanks for being here with me today and see you !


Thursday, January 25, 2018


Hello Everyone and Happy New Year, I wanted to share a wintry page with you all using some of the beautiful papers from Winter Playground


There is a video at the end which goes through all the different layers in this page, but I will talk you through it too.  I started with the paper Frolic as the base and then pulled some of the colours out using some paints for behind my photo.  The next layer was some turquoise glitter paste and the Winter Fun stencil, they give such clear and pretty images.  I then built up the page with some different layers of papers from Snowball and Frosty and Fun.  I added some gauze with silver confetti paste and sugar glitter paste, then inked some of the laser cut snowflake chipboards with silver ink and tucked these around the page.


I added the snowman from the Noteworthy paper, complete with his hat being knocked off by a snowball, you can also see some of the glittery snowflakes a little closer here.


I created a cluster of flowers using the Denim Blue Dahlia Blossoms, which perfectly pick out the colours in the papers.


I used some layered chipboard from the Winter Wishes line to add the title, and teamed it with one of the snowflakes in on the Noteworthy paper.  

I hope you enjoy the video.


BoBunny Supplies

Patterned Paper: Winter Playground - Frolic, Frosty, Fun, Noteworthy and Snowball
Stamps: Take Note
Glitter Paste: Sugar and Turquoise
Confetti Paste: Silver
Stickable Stencils: Winter Fun
Jewels: Aqua Hues
Blossoms: Denim Blue Dahlia
Lasercut Chipboard: Snowflakes
Layered Chipboard: Winter Wishes


Tuesday, November 28, 2017

Christmas Carousel-An Altered Holiday Layout - with Marilyn


Hello everyone! It's Marilyn here to share a layout that I made using the beautiful Carousel Christmas collection.


I worked with both sides of the "Wishes" paper in this page.  I applied gesso to the paper then I applied textures with the Backsplash stencil and Primer Paste. After dry, I made white paint splatters over all the textures, to give it more depth and dimension.


Then, I matted the the sweet photo with doilies that I made using the Darling Doily Die.


I made two openings to the papers and tear the edges, then I adhered a piece of the same paper Wishes but I used the back side.


I made white leaves from the Lovely Leaf Dies and a white cardstock and did little fussy cutting of  the  lovely images from the Wonder paper. I added some snowflakes laser chipboards that I sponged a bit with gesso to make them stand out.


I gave more textures with 3D powder and express glue then I added some pearls.


Bo Bunny Supplies:
Pattern Paper- Carousel Christmas- Wonder, Wishes, Greetings
Dies- Lovely Leaf Die, Darling Doily
Snowflakes cut laser
Backsplash Thick Stencil
Double Dot Brads- Think Pink
Double Dot Jewels- Tuxedo

Pentart Supplies:
Primer Paste
3D Powder
Express Glue

Monday, October 30, 2017

Mixed Media Holiday Cards featuring Carousel Christmas - with Ayumi


Hello BoBunny friends!!
It's Ayumi here. 
Today I'll share with you two cards using the beautiful Carousel Christmas collection!  

Christmas Cards By Ayumi Iwashita.


First,  I prepared the background for the card using stencils and structure paste for the texture on basic white card stock.
Then,  after the stenciled pattern was dry, I applied a few colors of glimmer spray for this nicely marbled look
Then, I made some tiny polka dots by using Sparkling Gold, Copper and Transparent Pentart Contour Liners at the edge of the card.


Then I fussy cut  the Christmas tree, bell and other elements from the paper to finish these cards. GORGEOUS!


The cut-out poinsettia has been layered over other poinsettias to give depth and visual appeal.


Enjoy your happy day!

Thank you.


BoBunny Supplies:
Patterned Paper: Carousel Christmas/ Wonder, Floral, Magic, Greetings
6×6 Paper Pad: Carousel Christmas
Jewels: Think Pink, Mocha Jewels, Glaze Jewel Flourishes
Glimmer Sprays: Tutu, Mint, Gold
Thick Stencils: Timeless, Fancy Flourishes

Pentart Supplies:
Contour Liner: Copper, Transparent, Sparkling Gold
Structure Paste

Wednesday, October 25, 2017

Carousel Christmas MIxed Media Layout-with Denise

Hello BoBunny Fans

It's Denise here today, with a mixed media layout, using the Christmas Carousel collection.


Carousel Christmas_Mixed Media Layout_Denise_11 Oct_01

I kept the background fairly simple here.  To start, I just used some Mandala stencils with some Gesso to add to the large doily die cut.  I then did some watercolour effects with distress ink. I also added some star stamping, but faded it out a bit as I got closer to the edge of the paper.

Carousel Christmas_Mixed Media Layout_Denise_11 Oct_02

I fussy cut quite a few elements and especially thought that the reindeer would be great to use, since the kids were sitting with a reindeer/moose in the photo.


Carousel Christmas_Mixed Media Layout_Denise_11 Oct_03

The little white flowers I handmade.  These were flower die-cuts that I cut from white cardstock and layered together and then shaped for added depth and dimension.

Carousel Christmas_Mixed Media Layout_Denise_11 Oct_04

This photo was taken 5 years ago at Christmas and I cannot believe how the kids have grown!

Thanks so much for stopping by the BoBunny blog today.  I hope that you found a little inspiration and perhaps the Christmas bug has bitten!!

We hope to see you back tomorrow.

Denise x


BoBunny Supplies:

Patterned Paper: Carousel Christmas/ Wishes, Wonder, Greetings

Jewels: Double Dot Mocha

Stickable Stencils: Love

Stamps: I Heart Stars

Friday, October 20, 2017

Mixed Media Canvas featuring Carousel Christmas-with Ayumi


Hello BoBunny friends!!
It's Ayumi here. 
Today I'll share with you a canvas mixt media layout using the beautiful Carousel Christmas collection!  

Joy by Ayumi Iwashita.


I applied texture to the canvas using our Thick Stencils.
After drying, I sprayed Glimmer Sprays (TUTU, MINT, GOLD).


Fringe flowers are big and very beautiful.


I uploaded how to make it to video.


Please enjoy!


Enjoy your happy day!


BoBunny Supplies:
Patterned Paper: Carousel Christmas/ Wonder, Floral, Magic
Jewels: Think Pink, Ruby Red Jewels
Dahlia Blossoms: Natural Earth
Pearlescents: Gold
Glimmer Sprays: TUTU, MINT,GOLD
Stencils: Timeless, Fnacy Florishes

Pentart Supplies:
White Primer Paste: Gesso
Structure Paste
Gel Paste: Shiny

Delicate Acrylic Paint: metallic

Friday, September 22, 2017

Dreams of Autumn and a GORGEUS Mixed Media with Marilyn

Hello Everyone! It's Marilyn here with you today! I'm going to share a Mixed Media layout with the beautiful Dreams of Autumn collection. Let's take a look...


I adore this paper called "Fall" with the knitting design.  It goves so much texture and depth to this.  Yum! I started applying a light coat of gesso to the paper. I gave textures with the Primer Gesso and the Backsplash Thick Stencil.


I cut out all these pretty leaves and nuts from the Noteworthy paper. I cut by half a brown handcrafted blossom and adhered it behind the photo and the other half near the title.


I adhered 3D Powder with the Express Glue to give more textures on the background. I painted a piece of cheesecloth in green and brown colors to bring an organic look to the page, I cut it to pieces and adhered around the leaves and photo.


I cut the pennant with the beautiful word from the Noteworthy paper and used it as my title. Finally, I added some gems, brads and pearls.


You can see from this angle the dimension and textures on the page. 

Thanks for stopping by, I hope you find some inspiration.

Until next time!

Marilyn Rivera


Bo Bunny Supplies:

Patter Paper- Dreams of Autumn: Noteworthy/ Fall

Stencil- Backsplash

Double Dot Brads- Emerald

Blossoms- Natural Earth Bouquet

Double Dots Jewels- Emerald, Citrus


Pentart Supplies:

3D Powder

Paste Gesso

Creamy Acrylic- Brown/Blue/ Red

Express Glue


Sunday, September 3, 2017

Altered Composition Notes with Rhonda

Altered Composition Notebook by Rhonda Van Ginkel


Altered Composition Notebook featuring Family Recipes Collection by BoBunny designed by Rhonda Van Ginkel

Greetings and welcome to the Bobunny Blog today. it's Rhonda here to share an altered composition notebook featuring the new Family Recipes collection. It's such a charming collection full of fabulous culinary designs to spark your creativity.

Altered Composition Notebook featuring Family Recipes Collection by BoBunny designed by Rhonda Van Ginkel

I used the Mandala die to anchor the clock sentiment which was hand cut from the "So Good" paper. There are several embellishments cut from that paper including the chef's hat, the spoon and spatula and canister.

Altered Composition Notebook featuring Family Recipes Collection by BoBunny designed by Rhonda Van Ginkel

A few DoubleDot Jewels in Ruby Red were a nice extra touch on the clock. I also cut the rolling pin and adhered with some pop dots and tucked the cherry behind it.

Altered Composition Notebook featuring Family Recipes Collection by BoBunny designed by Rhonda Van Ginkel

I've used a bit of drywall tape for texture and layered a strip on top with a torn edge. As you can see, the Black patterned washi tape provided a nice accent on the binding.

Altered Composition Notebook featuring Family Recipes Collection by BoBunny designed by Rhonda Van Ginkel

A very simple accent on the upper right corner gives this book a finishing touch. I'm going to use this to keep notes about all of the new recipes that I am trying out and the settings for my electronic pressure cooker. Look for a recipe album of those coming next with this collection from me.


BoBunny Supplies:
Patterned Paper: Cuisine, Delicious, Pantry, Paprika, So Good and Thyme / Family Recipes
Dies: Fanciful Dies and Mandala Die
Washi Tape: Black and White Patterned Washi Tape
DoubleDot Jewels: Ruby Red and Tuxedo
Stencil: Timeless
Pentart Stencil Paste: Vanilla (pearl)

Wednesday, August 23, 2017

Life in Color Altered Mixed Media Canvas with Irit


Hello my Dear Crafty Friends!

Welcome to my new BoBunny post. Today I am going to share a pretty big altered Mixed Media canvas.  I am still waiting for my new BoBunny collections to come from the US and thanks to our very " fast" postal service it will take  a few more days or even weeks. So I decided to make a project with the Life in Color collection using BoBunny products which are just perfect for any Mixed Media project.
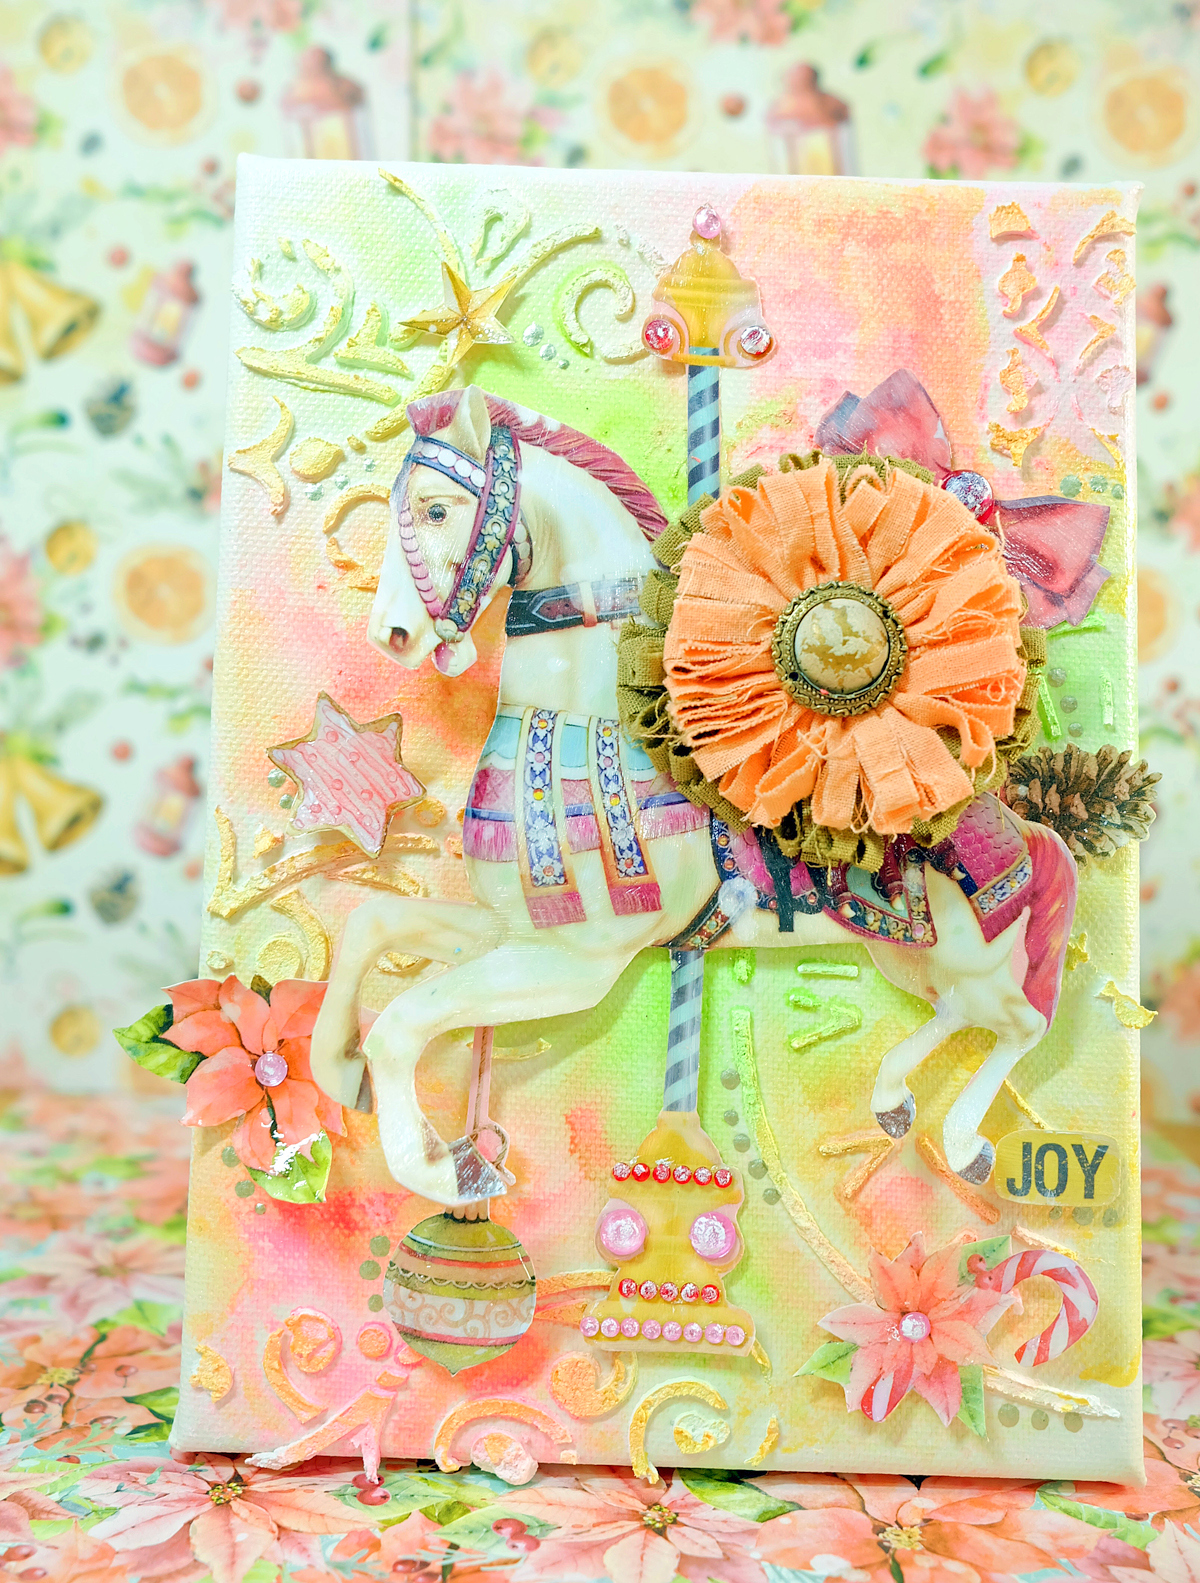
"Trust Your Journey" an Altered Mixed Media Canvas by Irit Shalom


The base was made over the flat 13.5*9.5'' canvas, but if you don't have any you  can use a thick chipboard piece as this is just a base for those chipboard rectangles glued over the canvas.
I used old recycled chipboard and just arranged them to fit the canvas size. Four brads were added in each and every  piece,  the very simple small craft store brads for the background. The larger, decorative ones are from BoBunny.
Then the background was first painted with black gesso, misted with bronze spray and waxes were added randomly.
Three BoBunny stencils were used with glitter paste mostly on the outer spots of the project with large clock added partly in the middle.
I used a couple of chipboard sets for the main spot in the middle as the background and the sentiment.
Die cuts were made from BoBunny Double Dot Cardstocks and painted to this vintage patina look with a combination of Pentart Paints.  BoBunny flowers were painted and misted too to achieve this metallic look (originally green).
 Now let me show the whole project again and then to show you some close-ups.


 This is the central spot from the front:


And here how it looks from the side:


 And my altered flowers :


 More close-ups to background:


 On this photo you can see the white stamped background and 3D powder mixed with gel paste and acrylic paint.
Also you can see the gold transfers, stenciled part and different mediums over the background.


I hope that you liked my Mixed Media project today.  Everything here is BoBunny or Pentart, except the recycled chipboard and small brads.  So you don't need to scroll a lot of shops, but to go to BoBunny shop and to get whatever you need to make the similar project.

BoBunny Supplies:
Double Dot cardstock Licorice
Double Dot cardstock Sugar chevron
Life in Color chipboards
Bella Rosa chipboards
Alphabet gold foil transfers
Backsplash Stencils
Timeless Stencils
Take Note stamp set
Congratulations card dies
Flourish dies
3x4 Ornate frames dies
Tick Tock die
Mandala die
Licorice Glitter Paste
Turquoise Glitter Paste
Bronze Glimmer Spray
Gold gGimmer Spray
Double Dot Aqua Brads
Double Dot Aqua Flourish Jewels
Zinnia Blossoms Clover Zinnia

Pentart Supplies:
Baroque Gold Creamy Acrylic Paint
Graphite Metallic Creamy Acrylic Paint
Teal Metallic Creamy Acrylic Paint
Iron Paste
Black Gesso
Gel Paste
Coarse 3D Powder
Crackle Medium Component 1
Wax Paste Metallic Copper
Wax Paste Metallic Gold
Purplish Silver Delicate Metallic Acrylic Paint
Greenish Gold Glamour Metallic Paint
Dark Gold Delicate Metallic Paint

 Thanks for reading this post and see you in a week!

Tuesday, August 22, 2017

Be the Light-Mixed Media Layout-with Elena O


"Be the Light" Layout

Hello BoBunny friends. Elena is here today.

August is one of my favorite months, and I like it for the colors it is filled with - mostly bright colors like tan, gold, yellow and  orange.

However I love these colors in my daily life and for my today's post it was a bit of fun to use them for my layout.

faith_layout_elena_Aug22_01

  I used Faith collection and it is bold and bright, full of expression.

faith_layout_elena_Aug22_02


  I started with creating the layers over my 2 pictures, and since my youngest holds the large ball in his hands, it has determined the shape for the most part of my embellishments


faith_layout_elena_Aug22_02

  I cut out some of the scalloped circles from the papers, as well as some doodled flowers.

faith_layout_elena_Aug22_03

  Then I followed the circle theme and stenciled some of them with the glitter paste

faith_layout_elena_Aug22_04

I also played with coloring some spaces with Pentart acrylic paints.

faith_layout_elena_Aug22_05


But the main focus was this light bulb, and the phrase within it.


BoBunny Supplies:

Patterned Paper: Faith/Faith*, Happiness, Rejoice

6x6 Paper Pad: Faith

Stencil: Backsplash

Glitter Paste: Lavender

Gesso: White


Pentart Supplies:

Delicate Metallic: Rose Gold

Glamour Metallic: Rich Gold

Acrylic Paints: Semi Gloss/ Red, Trumpet Flower, Blue, Nimbus