Showing posts with label Lattice Frame Die. Show all posts

Monday, May 11, 2015

Misc Me & Krazy Kraft Gift Bags


Hello everyone! Today, I'm going to share with you a fun and colorful misc me project featuring the "#ForeverYoung" collection. First up, I've altered a Misc Me Gold Kraft Binder to store these misc me pages which I'm going to show you later on.

Great Adventures Binder by Irene Tan
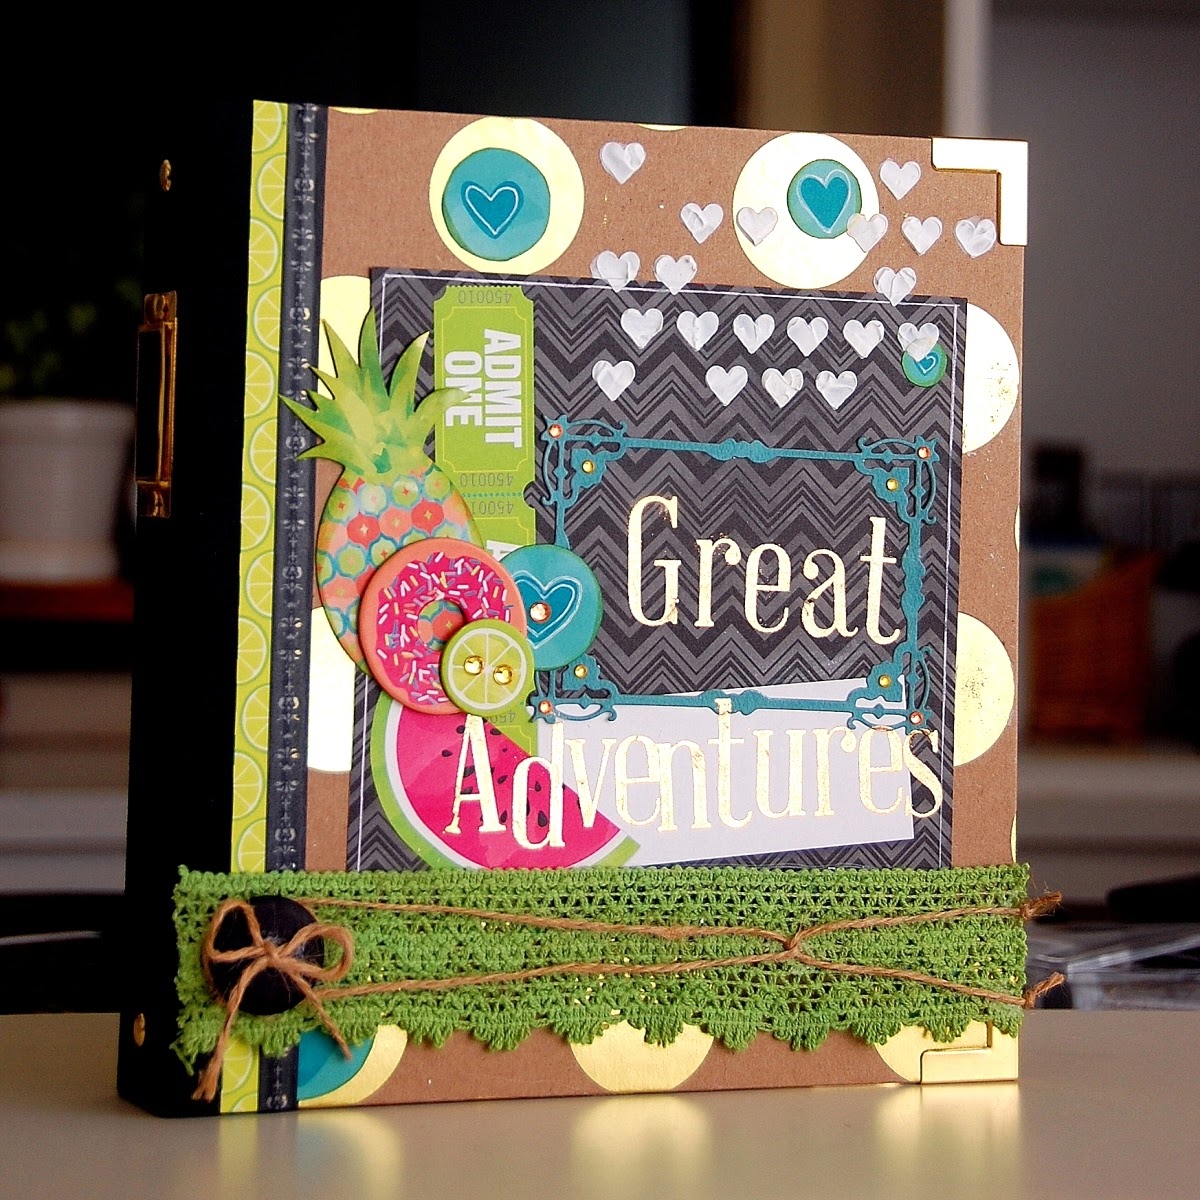
Great Adventures Misc Me Pages by Irene Tan Using BoBunny #ForeverYoung collection

I've used some papers and embellishment from this collection to embellish it. To add some textures and dimensions to it, I've used the Cascade stencil with some texture paste to create part of the background. Besides that, to frame part of the title, I've used the Lattice dies.

Great Adventures Misc Me Pages by Irene Tan Using BoBunny #ForeverYoung collection

Great Adventures Misc Me Pages by Irene Tan

Great Adventures Misc Me Pages by Irene Tan Using BoBunny #ForeverYoung collection

Great Adventures Misc Me Pages by Irene Tan Using BoBunny #ForeverYoung collection

Great Adventures Misc Me Pages by Irene Tan Using BoBunny #ForeverYoung collection

Great Adventures Misc Me Pages by Irene Tan Using BoBunny #ForeverYoung collection

These are the Misc Me pages which I've created using "#ForeverYoung" collection. It documents the fun adventures we had while climbing a hill behind a cave. I did not do much of mixed media this time. Just some stamping and layering.

As for my assignment today, I'm asked to include a Kraft Gift bag in my project. Therefore, I've added an extra page among these pages using a kraft gift bag. I've cut off the top part of the gift bag and use it as a pocket page where I could keep more pictures and momentos from this trip.


Great Adventures Misc Me Pages by Irene Tan Using BoBunny #ForeverYoung collection

Great Adventures Misc Me Pages by Irene Tan Using BoBunny #ForeverYoung collection

I cut out the cork board from the pattern paper to attach in the front of the gift bag and use it as a cork board page. I've added a picture of the trip and another cut out on top of the cork board.

BoBunny Supplies:
Patterned Paper: Besties, Sweet, Blue Skies, Heart/#ForeverYoung
Double Dot: Aquamarine Dot
Stickers: #ForeverYoung Fild Sticker
Noteworthy: #ForeverYoung
Buttons: #ForeverYoung
Rub-Ons: Alphabet Gold Foil
Chipboard: #ForeverYoung Chipboard
Stamps: Captured, On This Day
6 x 6 Paper Pad: #ForeverYoung
Lace: Clover
Misc Me Binder: 8 x 9 Gold & Kraft
Misc Me Page Protector: 8 x 9 Binder Page Protector Variety Pack, 8 x 9 Pocket Squares Page Protectors
Misc Me Contents: #ForeverYoung Journal Contents
Kraft: Gift Bag Dots
Washi Tapes: Black & White Patterned
Dot Jewels: Citrus
Ink Pad: Licorice
Stickable Stencils: Cascade
Dies: 3 x 4 Lattice Frame

Wednesday, April 8, 2015

Life's A Circus Wagon!


Hiya Bo Bunny Fans Tracee with you today on Off The Page Wednesday!

Life Is A Circus by Tracee Provis

Circus Carousel off the page project Tracee Provis Bo Bunny Carnival 01

I fell in love with the fun animals in the Carnival Collection coupled with my love of making balloon ornaments, I created this Circus Wagon being pulled along by a giraffe. I incorporated some of the new dies and stencils both on the balloon and the Wagon. The Wagon also holds a little surprise that will be revealed on a later date.

Circus Carousel off the page project Tracee Provis Bo Bunny Carnival 02

I used the Elegant border die and the 3 x 4 Lattice Frame die to add details along the front and the top of the Wagon, the fine details in the dies add a delicate and almost magical touch to the project.

I cut out some circles of Cardstock and added some buttons from the same Carnival Collection to create some wheels on the Wagon.

I used the Aqua Double dot Alphabet, to spell out a title, in the frame on the front of my project.

Circus Carousel off the page project Tracee Provis Bo Bunny Carnival 03

I simply adhered the large giraffe, from the Noteworthy pack, to some corrugated cardboard and glued that to a base of the same cardboard covered with patterned paper, I added a leash for him to pull the Wagon along.

Here you can also see where I used the cascade stencil and some Bronze Glitter paste to the bottom half of the balloon form. As they are peelable they are great for sticking to curvy surfaces.

Circus Carousel off the page project Tracee Provis Bo Bunny Carnival 04

For the main balloon for I used strips of paper from the 6 x 6 to cover it I cut the film strip piece out of the Carnival sheet and used it as a centre piece on the balloon, the bunting was added by cutting small triangles and attaching them to some string.

I cut the smaller animals from various sheets in the collection and popped them onto the top of the wagon... "How cute do they look?".

Circus Carousel off the page project Tracee Provis Bo Bunny Carnival 05


Finally to the top added a fussy cut masquerade mask and a banner piece from the Button pack. It adds that final theatrical touch to my fun circus themed project.

I hope you enjoyed it and are inspired to create your own projects using this fun BoBunny Carnival Collection.

BoBunny Supplies Used:
Patterned Paper; Carnival, Balancing Act, Calliope, Levitation, State Fair, Sideshow, Big Top/Carnival
6 x 6 Paper Pad; Carnival
Buttons; Carnival
Noteworthy; Carnival
Stickers; Double Dot Aqua Alphabet
Jewels; Licorice Double Dot
Cardstock; Wine Double Dot
Glimmer Paste; Bronze
Stencils; Cascade
Dies; Lattice Frame, Elegant Border


Wednesday, February 25, 2015

Lovely Lattice Dies!


Hello everyone! I will be first to admit with minus 20 outside I have a perfect weather to scrap . Having all new toys from Bo Bunny and so many photos from several  family trips makes my life perfect!

Sweet Life by Agnieszka Bellaidea


If you are not aware yet BoBunny has also beautiful dies! I used some of them on my page.
I have to add a word about new stamps, new stencils, new chipboards and 6 new collection....they are gorgeous! I used the new collection Sweet Life for my layout.


I could not stop playing with all the new yummy products,  so I made couple cards, I am going to show you one on my blog today  - HERE


BoBunny Supplies:
Patterned Paper: Sweet Life / Sweet Life
Noteworthy: Sweet Life
Buttons; Sweet Life
Stamps: Floral stamps
6x6 Paper Pad; Sweet Life
Blossoms: Buttercup Pansy
Dot Jewels: Citrus Jewel
Pearlescents: Gold
Ink Pad"Pink Punch
Glimmer Spray: Frost, Mint, Tutu
Glitter Paste: Sugar
Stencils: Cascade Stickable Stencils
Dies: Lattice Frame Dies, Flutter Dies

Thank you for looking, have a great day!

Sunday, February 22, 2015

Fabulous Flutter Die Tutorial!


Be You by Gabrielle Pollacco
Be You by Gabrielle Pollacco using Bo Bunny's Garden Journal papers and embellishments along with their new dies, Glitter pastes, Stencils and Shimmer Sprays

Did you know that Bo Bunny now has metal dies that can help you create intricate and beautiful accents for your scrapbook pages and craft projects?  Today I made up this scrapbook page using the new Garden Journal paper collection and used a variety of the new dies, including my favorite new butterfly design to create accents and embellishments that help give a light, airy feel to the page. Here is a video tutorial I made up to show step by step how this page was made, including a really fun technique when cutting your dies that help release the paper from the die quickly and easily. Enjoy!


I hope you enjoyed this video tutorial and will feel inspired to try out some of Bo Bunny's new dies and mixed media products.  Here are a few close-ups you can view at your leisure...

Be You by Gabrielle Pollacco using Bo Bunny's Garden Journal papers and embellishments along with their new dies, Glitter pastes, Stencils and Shimmer Sprays

One of the tips I shared in this video is how you get the cardstock to release from the die in a quick and easy way.  I don't know the science behind it but it works beautifully.  I found this tip on Pinterest, and the basic idea is to sandwich your cardstock between a layer of wax paper and a layer of dryer sheet (yep, those pretty smelling little sheets you throw in your dryer, a fabric softener sheet).  So basically you have your die, the next layer is a piece of wax paper, then your cardstock piece, then a dryer sheet.  Then the piece of plastic that you use with your die cutting machine (I used the Quickutz Revolution for mine).  Just roll it through like you usually do, when you pull it out, the cardstock piece releases very easily from the die, and the tiny bits and pieces with pretty much fall out of the intricate little cuts.  I didn't have to use any tools to poke out my bits, they just fell out as I ran my fingers over the piece!

Be You by Gabrielle Pollacco using Bo Bunny's Garden Journal papers and embellishments along with their new dies, Glitter pastes, Stencils and Shimmer Sprays

I also used one of the awesome NEW stickable stencils called Love on this page.  I took the clock design and using a palette knife laid down a thick layer of NEW Blush Glitter Paste to add this shimmery design to the background of my photo cluster.  I also used the Blush and Sugar Glitter Pastes on my Flutter die cut pieces to create these little butterfly accents for my page.

Be You by Gabrielle Pollacco using Bo Bunny's Garden Journal papers and embellishments along with their new dies, Glitter pastes, Stencils and Shimmer Sprays

For my floral accent on this page, I combined the coordinating chipboard pieces for the Garden Journal collection with a Bo Bunny Daisy Blossom from the Blush packet.  I made a quick fun little nest using some Spanish Moss and a chipboard egg design from the coordinating chipboard for Garden Journal collection.

Bo Bunny Product used in this project:
Patterned Paper: Garden Journal/Sketch, Wonder
6x6 paper pad: Garden Journal 
Sticker Sheet/Garden Journal
Chipboard/Garden Journal
Glitter Paste: Sugar, Blush
Stickable Stencil: Love
Dies: Flutter Dies, Ornate Frame, Lattice Frame
Glimmer Spray: Bronze 
Blossoms: Blush Daisy
Wood accents: Iron Works

Thanks for stopping by the Bo Bunny blog today, we hope you are inspired to include some intricate and pretty die cuts in your scrapping projects!

Sunday, February 15, 2015

Sunday Fun Day Mini Tag Album!


Hello, Lisa here to share with you a 6x3 mini Tag album using the gorgeous Garden Journal Collection. The new metallic Pearlescent Pens are really versatile. I chose to use the Graphite to color my die cut frame and the tag holes to make them look like metal.


The new dies from BoBunny are fabulous!! I used one part of the Lattice frame for my front and back covers. Once the die cuts were finished with the Graphite, I then dotted it to make it look like rivets. I used the Blush Daisy Blooms, and created the leaves by punching them out from leftover paper. I inked the leaves, rolled them for texture and tucked them under the flowers.


Inside each page there is  a pocket that contains a small folder for notes or pictures. 
I adhered each die cut tag to a piece of die cut chipboard and backed it with white card stock and a piece of Note Paper cut from the Misc Me. This made each page sturdy to stand on its own.  I used the 6x6 Butterfly stencil on the note paper, so there is  more room for journaling.

  
This is a view of the front and back covers. I punched holes using my Cropodile and used book rings to hold the tag book together.


BoBunny Products:
Patterned Paper: Garden Journal, Pastel/Garden Journal
6x6 Paper Pad: Garden Journal
Chipboard: Garden Journal
Blossoms: Blush Daisy
Stencils: Cascade
Dies: Lattice Frame
Jewels: Double Dot Think Pink
Pearlescents: Graphite
Misc Me: Notepaper