Showing posts with label Gabrielle Pollacco. Show all posts

Thursday, July 9, 2015

Phone Cover with Penny Emporium!


Re-vamped Phone Cover by Gabrielle Pollacco
Mixed Media Phone cover by Gabrielle Pollacco using Bo Bunny Penny Emporium collection and mixed media products

Hi all, it's Gabrielle here with you today to share a makeover I gave to an old phone cover.  My youngest daughter got a brand new phone a few months back and promptly lost/got it stolen when she was using a public washroom.  So she then inherited my oldest daughters cast off phone.  To cheer her up, I thought I'd fancy up the old phone case that was on it for her.  


Here is a pic of the old phone cover....I think it even has a few bite marks in it from our naughty dog! But that was no problem, I just gave the phone case a quick brushing with some Gesso....when that dried I used some heavy gel paste with BoBunny's 'Brocade' Stickable Stencil over random sections of the surface. I left part of it flat/untextured so that I could add a bit of the Penny Emporium patterned paper as well.  


Once the texture paste was dry, I gave the whole thing a coat of Chocolate Pearlescents, adding a streak of Graphite Pearlescents here and there, to give a nice brushed metalic look to it.  The decorating was easy-peasy, I just added a few chipboard cogs and then layered on some pieces from the Penny Emporium Layered Chipboard packet.  The final touch was to add some gems from the Double Dot Mocha Jewels packet.   The phone cover put a big smile on my daughters face!

Bo Bunny Products used in this Project:
Patterned Paper: Penny Emporium (6x6 paper pack)
Layered Chipboard: Penny Emporium
Stickable Stencils: Cascade
Pearlescents: Chocolate, Graphite
Double Dot Jewels: Mocha

Wednesday, June 10, 2015

Shabby-chic Juliet Wall Art


Hi all, it's Gabrielle here with you today to share some Shabby-chic wall art that I made using the new (and gorgeous) Juliet collection!

Shabby-chic Wall Art by Gabrielle Pollacco

Wall art by Gabrielle Pollacco using Bo Bunny's Juliet collection and mixed media products

I've had this chipboard frame in my stash for quite some time now and when I saw the beautiful Misc Me pocket squares that coordinate with the Juliet collection, I knew I'd finally get to using it.   The pocket squares fit perfectly into the little windows, so I didn't have to mess around with measuring anything....the hardest part was choosing which of the pretty designs I was going to feature in each square.  For the frame, I just painted the whole thing with a cream color acrylic paint and then stamped on it randomly with an older BoBunny stamp (Enchanted).


Once I had decided where I would place each little vignette, I got down to the fun part of adding little bits of ephemera to each of the windows.  I began by choosing a couple of the new laser-cut chippies that BoBunny came out with at the last CHA.  I did a little bit of machine stitching to each of the pocket squares (give's a nice homespun feel)...glued down my accent and added some dots of BoBunny Glitter paste.


Another new laser-cut chipboard pack is the clocks designs, I added some Glitter paste as well to this one (Gold, Wasabi....love that green color!) and added a pearl accent, then applied the piece with some foam adhesive dots to create a nice 3D effect. In this close-up you can see a floral sticker strip I used from the coordinating Juliet sticker sheet, that I used to frame the outside of my wall art.


I added snippets of cheesecloth and some old mother of pearl buttons for a aged tattered look in the corner of one of the pocket square designs.


I chose a cool wood accent from Bo Bunny's Iron Work wood designs for another of my squares, and topped up the design with that eye-catching brad from the coordinating brads packet.


I just love the vintage images on these pocket squares, so I left this particular one, as is....just above that design, I used a floral piece from the layered chipboard at a topper for my wall art.


In the bottom corner I used another wood piece, a flourish from the Clockworks collection.  I gave this piece the same finish (as well as the piece in the top right corner) as I gave the frame, some painting with cream color acrylic paint and some random stamping with a scripty word stamp from the older Enchanted collection.  Finally I added some finishing touches like dots of pearls all around the framework using BoBunny's Butterscotch Pearlescents.

I hope you enjoyed today's Bo Bunny project and hope you will give the gorgeous Juliet collection a try on your next home decor project!

Bo Bunny Products used on this project:
Misc Me Pocket Squares: Juliet
12x12 Combo Stickers Sheet: Juliet
Layered Chipboard: Juliet
Wood Embellishments: Iron Works, Clockworks
Stamp: Enchanted
Jewels: Mocha Double Dot Jewels
Pearlescents: Butterscotch, Chocolate (on key)
Glitter Paste: Gold, Wasabi, Frost
Brads: Juliet

Thursday, May 21, 2015

Marvelous Mixed Media!


Mixed Media Eye-glass Case Tutorial by Gabrielle Pollacco
Mixed Media Glasses Case tutorial by Gabrielle Pollacco using Bo Bunny Ironworks wood accents, Pearlescents, Glitter Paste, Lasercut chipboard and Stickable stencils.


Hi everyone!  Gabrielle here with you today to share a Steampunk style eye-glass case I made using a variety of Bo Bunny's gorgeous mixed media products and one of my favorite wood embellishment collections called Ironworks.   

Mixed Media Glasses Case tutorial by Gabrielle Pollacco using Bo Bunny Ironworks wood accents, Pearlescents, Glitter Paste, Lasercut chipboard and Stickable stencils.

Have you tried these beautiful new lasercut chippies?  I was lucky enough to get my hands on this stunning butterfly chippie, they have such intricate cut-work, love them! So I decided to make this, and a lovely scroll from the Ironworks wood accents collection the centerpiece of my OTP project.  I thought it would be nice to make a video tutorial up to show how this thing went together....so grab a cup of coffee (or tea) click on the arrow below and enjoy!


I just love the way the Pearlescents adhere so well to almost any surface, I didn't even have to pre-coat my piece with Gesso!  Here are a couple of views of this project from other angles...

Mixed Media Glasses Case tutorial by Gabrielle Pollacco using Bo Bunny Ironworks wood accents, Pearlescents, Glitter Paste, Lasercut chipboard and Stickable stencils.

This is the backside of the glasses case, you can see the nice texture I got using the Cascade Stickable Stencil with a combination of  Licorice, Graphite and Chocolate Perlescents streaked across it.

Mixed Media Glasses Case tutorial by Gabrielle Pollacco using Bo Bunny Ironworks wood accents, Pearlescents, Glitter Paste, Lasercut chipboard and Stickable stencils.

I finished my design with some Bo Bunny Trinkets and Mocha Jewels. 

Mixed Media Glasses Case tutorial by Gabrielle Pollacco using Bo Bunny Ironworks wood accents, Pearlescents, Glitter Paste, Lasercut chipboard and Stickable stencils.

A view of the left side.  I also added some little hits of the Bronze Glitter Paste to the wings o the butterfly and on the metal flowers.  This project came together quick and easy and now I have a pretty eye-glass case to keep on my night table.

Product used in this project:
Bo Bunny Stickable Stencil/Cascade
Bo Bunny Pearlescents/Licorice, Graphite, Chocolate
Bo Bunny Glitter Paste/Bronze
Bo Bunny Laser cut chipboard/Butterfly
Bo Bunny Wood Accents/Iron Works
Bo Bunny Double Dot Jewels/Mocha
Bo Bunny Trinkets/Apple Cider collection

Hope you enjoyed my tutorial and hope this has inspired you to use Bo Bunny's fabulous wood accents and mixed media products!


Sunday, April 12, 2015

The Very Versatile Safari Collection!


Hello Bo Bunny fans, it's Gabrielle here with you today to share my latest layout using Bo Bunny's Safari collection and featuring their brilliant Aqua Jewels! 

Inside Your Heart by Gabrielle Pollacco
Scrapbook page by Gabrielle Pollacco using Bo Bunny's Safari collection papers and embellishments

 So, you bought the Safari collection to scrap all those photos you took with the kids at the Zoo or on a special vacation.  But now you've got some leftover paper.  What I love about BoBunny's themed collections is that they can be used for everyday photos as well!  I was just crazy about these grungy wall papers, so I started with these as my base for this page of my dear husband and me.

Scrapbook page by Gabrielle Pollacco using Bo Bunny's Safari collection papers and embellishments

I took the grunge look a little further by tearing out sections of the turquoise wall paper and exposing the aged brick paper behind it. Before I glued it together I sandwiched some tattered cheesecloth between the layers.  I used the Chocolate Pearlescent to add 'rivets' to the edges of the paper.

Scrapbook page by Gabrielle Pollacco using Bo Bunny's Safari collection papers and embellishments

I began creating a background for my photo area by first dry brushing some Gesso on the area, then I used the NEW Cascade stickable stencil with some texture paste on the same area.  Then I added some richness to the design by adding a bunch of the small gems from the Aqua Jewels pack at the cross sections of the Moroccan.design.

Scrapbook page by Gabrielle Pollacco using Bo Bunny's Safari collection papers and embellishments

I tucked a wood piece from the Ironworks Wood designs package behind the photo, removing the center disc (to be used in my floral cluster - below), and then filled the cavity with a variety of gems from the Aqua Jewels packet. 

Scrapbook page by Gabrielle Pollacco using Bo Bunny's Safari collection papers and embellishments

Finally, I wanted some rustic looking blooms for this page so I used a daisy floral punch on some neutral color papers from a 6x6 paper pad from the Heritage collection.  I layered a few of the punched blooms and added a circle of burlap to the center.

Bo Bunny products used in this project:
Patterned Paper: Safari/Corrugated, Jungle, Outback
6x6 Paper Pad: Heritage
Combo Stickers:  Safari, Star-Crossed (title alphas)
Stickable Stencils: Butterflies, Cascade
Wood Accents: Ironworks, Kraft wood Keys & Butterflies
Jewels: Aqua
Stamps: Floral Stamps

Thanks for stopping by the BoBunny Blog today, hope you enjoyed this project and feel inspired to give these yummy products a try!

Sunday, March 8, 2015

Whimsical Garden Journal Party Favors!


Whimsical Party Favors by Gabrielle Pollacco

Party Favors by Gabrielle Pollacco using BoBunny's Garden Journal collection and new Flutter stamps.

Hello everyone! It's Gabrielle here with you today to share with you a fun party favor project I made using the NEW Bo Bunny Garden Journal collection and their NEW Flutter Stamps!  We have a big wedding anniversary party coming up for my parents next weekend (their 57th anniversary!) and I thought it would be fun to prep some whimsical party favors (Chocolate flavoring spoons for stirring into coffee or hot chocolate) using the new Flutter Stamps and the Garden Journal collection.  


Party Favors by Gabrielle Pollacco using BoBunny's Garden Journal collection and new Flutter stamps.

I started out with this empty Panko tin I had saved (I don't throw out these nice smooth sided tins, I find they are great for off the page projects).  I began by painting the rim of the tin with some Gold Pearlescents to give a nice shimmery edge to the tin.  Then I glued a section of the Garden Journal 'Wonder' paper directly to the tin using a combination of white craft glue and water. I then cut out a piece of the Garden Journal 'Notebook' paper to perfectly fit around the tin.  I really wanted the curled out part of the paper to be green (the reverse of that paper is blue) so I first glued on a little section of the green floral paper from the Garden Journal 6x6 paper pad....then I curled back the two top corners.  I added 6 metal eyelets and then adhered this paper panel to the tin, tying up the corset design with some crinkle ribbon.  

Party Favors by Gabrielle Pollacco using BoBunny's Garden Journal collection and new Flutter stamps.

I added some lace (and a chipboard zipper) as well as some pearls and topped the design with a butterfly embellishment I made using the new Flutter stamps.

embossed butterflies using Bo Bunny Flutter Stamps

I made my butterfly embellishments by stamping one of the butterfly images onto one of the green floral papers from the Garden Journal 6x6 paper pad, and the pink one's were made by stamping onto the Garden Journal 'Wonder' paper.  I added a shimmery black, gold and amethyst embossing powders.  I added a little jewel from the BoBunny jewel packets for the heads and cut out each embellishment.


Next I prepared my favors by laying out some plastic spoons, melting some semi-sweet chocolate and a couple drops of oil and pouring it into the spoons.  I decorated with some colorful sprinkles....


I then wrapped each spoon with some plastic wrap and decorated with one of the embossed butterfly embellishments

Party Favors by Gabrielle Pollacco using BoBunny's Garden Journal collection and new Flutter stamps.

I set them all in my embellished tin and my little project is finished!

Bo Bunny Products used in this project:
Patterned Paper: Garden Journal/Wonder, Notebook
6x6 Paper Pad: Garden Journal
Pearlescents: Gold
Stamps: Flutter Stamps
Jewels: Think Pink, Emerald, Mocha

I hope you enjoyed my 'off the page' project today and hope I've inspired you to play with the new Flutter stamps!

Sunday, February 22, 2015

Fabulous Flutter Die Tutorial!


Be You by Gabrielle Pollacco
Be You by Gabrielle Pollacco using Bo Bunny's Garden Journal papers and embellishments along with their new dies, Glitter pastes, Stencils and Shimmer Sprays

Did you know that Bo Bunny now has metal dies that can help you create intricate and beautiful accents for your scrapbook pages and craft projects?  Today I made up this scrapbook page using the new Garden Journal paper collection and used a variety of the new dies, including my favorite new butterfly design to create accents and embellishments that help give a light, airy feel to the page. Here is a video tutorial I made up to show step by step how this page was made, including a really fun technique when cutting your dies that help release the paper from the die quickly and easily. Enjoy!


I hope you enjoyed this video tutorial and will feel inspired to try out some of Bo Bunny's new dies and mixed media products.  Here are a few close-ups you can view at your leisure...

Be You by Gabrielle Pollacco using Bo Bunny's Garden Journal papers and embellishments along with their new dies, Glitter pastes, Stencils and Shimmer Sprays

One of the tips I shared in this video is how you get the cardstock to release from the die in a quick and easy way.  I don't know the science behind it but it works beautifully.  I found this tip on Pinterest, and the basic idea is to sandwich your cardstock between a layer of wax paper and a layer of dryer sheet (yep, those pretty smelling little sheets you throw in your dryer, a fabric softener sheet).  So basically you have your die, the next layer is a piece of wax paper, then your cardstock piece, then a dryer sheet.  Then the piece of plastic that you use with your die cutting machine (I used the Quickutz Revolution for mine).  Just roll it through like you usually do, when you pull it out, the cardstock piece releases very easily from the die, and the tiny bits and pieces with pretty much fall out of the intricate little cuts.  I didn't have to use any tools to poke out my bits, they just fell out as I ran my fingers over the piece!

Be You by Gabrielle Pollacco using Bo Bunny's Garden Journal papers and embellishments along with their new dies, Glitter pastes, Stencils and Shimmer Sprays

I also used one of the awesome NEW stickable stencils called Love on this page.  I took the clock design and using a palette knife laid down a thick layer of NEW Blush Glitter Paste to add this shimmery design to the background of my photo cluster.  I also used the Blush and Sugar Glitter Pastes on my Flutter die cut pieces to create these little butterfly accents for my page.

Be You by Gabrielle Pollacco using Bo Bunny's Garden Journal papers and embellishments along with their new dies, Glitter pastes, Stencils and Shimmer Sprays

For my floral accent on this page, I combined the coordinating chipboard pieces for the Garden Journal collection with a Bo Bunny Daisy Blossom from the Blush packet.  I made a quick fun little nest using some Spanish Moss and a chipboard egg design from the coordinating chipboard for Garden Journal collection.

Bo Bunny Product used in this project:
Patterned Paper: Garden Journal/Sketch, Wonder
6x6 paper pad: Garden Journal 
Sticker Sheet/Garden Journal
Chipboard/Garden Journal
Glitter Paste: Sugar, Blush
Stickable Stencil: Love
Dies: Flutter Dies, Ornate Frame, Lattice Frame
Glimmer Spray: Bronze 
Blossoms: Blush Daisy
Wood accents: Iron Works

Thanks for stopping by the Bo Bunny blog today, we hope you are inspired to include some intricate and pretty die cuts in your scrapping projects!

Sunday, January 18, 2015

Star-Crossed Cards!

Hello BoBunny fans! It's Gabrielle here with you today to share with you a couple of cards I made up using  Star-Crossed paper and embellishments.  I've been enjoying seeing all the peeks of the new collections and can't wait to get my happy little hands on them!  But in the mean time I thought I'd have some fun with my stash at hand and make up some love cards!

Star-Crossed Love Card by Gabrielle Pollacco
Love Card by Gabrielle Pollacco using Bo Bunny's Star-Crossed paper and embellishment collection

I really love the neutral colors with the deep red in this collection. So for a base I used Bo Bunny's Vintage Decaf paper. I just love using these vintage cardstock papers as the base of my cards.

Love Card by Gabrielle Pollacco using Bo Bunny's Star-Crossed paper and embellishment collection

 First I cut out a heart from the cute red and white dot paper, then did a little fussy cutting from the feather paper in the 6x6 paper pad.  I layered in some of the die-cuts from the coordinating Noteworthy pack, added a little hemp twine and some burlap and Presto! my quick little card is ready!

Bo Bunny Products used in this project:
Patterned Paper: Star-Crossed/Vanity, Star-Crossed
6x6 Paper Pad: Star-Crossed
Cardstock: Vintage Decaf
Noteworthy: Star-Crossed
Layered Chipboard: Star-Crossed
Patterned Washi-tape: Kraft Wood


Heart Card by Gabrielle Pollacco using Bo Bunny's Star-Crossed paper and embellishment collection

For my second card I used Almond Dot paper as my base.  I thought I'd do a kind of loose mixed media style card for this one. Lots of stamping with Bo Bunny's Distressed Textures and It Is Written Stamps. I added some paint spatters and some Bo Bunny Washi tape for some vertical interest to the card design.

Heart Card by Gabrielle Pollacco using Bo Bunny's Star-Crossed paper and embellishment collection

I again cut a heart out of the dot paper and added some sheer sparkle glue to give the heart some shimmer. I added a little hemp twine and some coordinating Layered Chipboard, and my 2nd card was complete.

Bo Bunny Products used in this project:
Patterned Paper: Star-Crossed/Vanity, Star-Crossed
Cardstock: Double-Dot Almond
Layered Chipboard: Star-Crossed
Noteworthy: Star-Crossed
Stamps: It Is Written, Distressed Textures
Patterned Washi-tape: Kraft Wood


Thanks for stopping by the Bo Bunny Blog today! xo

Thursday, December 4, 2014

Perfectly, Beautifully Sweet Layout!

Hi all, Gabrielle here with you today to share my second layout using the beautiful Rose Cafe collection! There are so many lovely color combinations in this collection.  For today's post I went with the blues and warm golden yellows.  The patterns and colors make me think of the French countryside, in Provence.

'Sweet' by Gabrielle Pollacco

Scrapbook layout by Bo Bunny design team member Gabrielle Pollacco using the Rose Cafe collection papers and embellishments

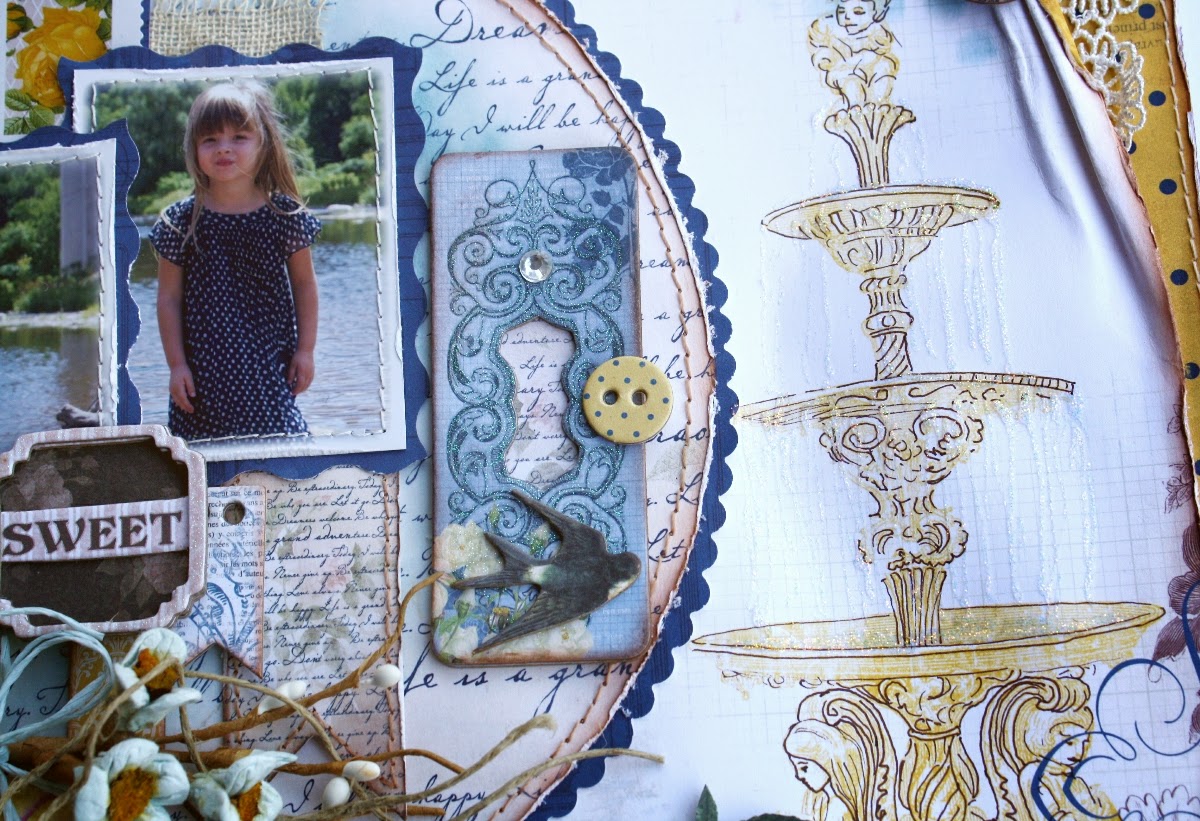
I've had this photo of my little great-niece Kierra in a cute little blue and white polka dot dress, and was happy to have this collection to scrap these two photos.

Before I added my photo and paper layers, I did a little work with one of the Bo Bunny Stickable Stencils and some blue ink on the background paper.  I used the Brocade Stencil set and applied my ink using a soft makeup sponge, fading the color out as I move away from the photo cluster.

Scrapbook layout by Bo Bunny design team member Gabrielle Pollacco using the Rose Cafe collection papers and embellishments

I really liked the pretty fountain design on the Rose Cafe Villa paper, I thought it fit well with the photos of my great niece, but I wanted the fountain to pop forward more, so I took a brown ink pen and just outlined some of the details of the fountain to make it pop.

Scrapbook layout by Bo Bunny design team member Gabrielle Pollacco using the Rose Cafe collection papers and embellishments

I chose blossoms from the Bo Bunny Buttercup Zinnia's collection and rounded out the design by fussy cutting some of the yellow roses and buds from the Rose Cafe 'Garden' paper.

Once I had my photos and paper layers attached, it was easy to add more interest to the page by using some of the coordinating embellishment packages, like the Stamp Stickers, Layered Chipboard and Buttons.

I hope you enjoyed checking out my project today.  I can't decide which of the color combinations are my favorite....pink and burgundy, yellow and blue, green and gold...they are all so pretty!  What is your favorite?

Bo Bunny Products used in this project:
Patterned Paper: Rose Cafe/Dot, Dreamers, Villa, Heirloom, Garden, French Roast.
Stamp Stickers: Rose Cafe
Buttons: Rose Cafe
Stencil: Brocade
Layered Chipboard: Rose Cafe
Blossoms: Buttercup Zinnia's

Thursday, November 13, 2014

Mini Album Madness!

Hello Bo Bunny fans, it's Gabrielle here with you today to share with you my latest project using the Bo Bunny Souvenir collection and new Bo Bunny Glimmer Mists.

Travel Mini Album by Gabrielle Pollacco

Travel albumn by Gabrielle Pollacco using Bo Bunny chipboard album, papers, chipboard accents, stickers and Noteworthy die cuts from the Souvenir collection as well as Bo Bunny Blooms and Glimmer Mist

 While I'm a scrapper that has created a large varieties of projects over the years, mini-albums is something that I've not often done.  You know how sometimes you have a bunch of photos from a trip or outing that you'd like to get scrapped?  Mini albums are the perfect solution.  And they don't come any easier that using one of the Bo Bunny mini's.  They already have beautiful background designs, all you have to do is get out your coordinating embellishments and some papers from a 6x6 paper pad (for matting), and you can quickly and easily put together a beautiful keepsake. 


Mini Album by Gabrielle Pollacco using Bo Bunny Souvenir collection papers, chipboard album, blooms, inks, buttons, stickers and Noteworthy die cuts

I love these pic's of my two daughters and their cousin the last time they were at their cottage.  They always have fun things to keep them busy.  I liked the vivid colors in the Souvenir collection, I thought they were a nice compliment to the photos.

Mini Album by Gabrielle Pollacco using Bo Bunny Souvenir collection papers, chipboard album, blooms, inks, buttons, stickers and Noteworthy die cuts

My family cannot travel anywhere without taking detours to, check out a waterfall, or check out a little shop or street fair.  Takes us a while to get there but we have fun along the way.  Here I used some pre-cut die pieces from the coordinating Noteworthy set for Souvenir.

Mini Album by Gabrielle Pollacco using Bo Bunny Souvenir collection papers, chipboard album, blooms, inks, buttons, stickers and Noteworthy die cuts

It's so nice that my brother's place is on the water, they can spend their time boating, wake-boarding, tubing, water skiing. The girls have so much fun with their cousin at the cottage...me?  I like to relax on the dock, soak in some sun and take the photos!

Mini Album by Gabrielle Pollacco using Bo Bunny Souvenir collection papers, chipboard album, blooms, inks, buttons, stickers and Noteworthy die cuts

They also have a nice time when we are having rain and downtime.  Playing cards, games, watch movies, or just play games on their phones.  I used these to pages to add a little journaling.

Mini Album by Gabrielle Pollacco using Bo Bunny Souvenir collection papers, chipboard album, blooms, inks, buttons, stickers and Noteworthy die cuts

Most of our little walks and outings as a family will end up in some cafe or little out of the way coffee shop.  Here I used some of the new Bo Bunny ink pads with a soft make-up sponge to create some background designs for behind my photos.  I love to add a little texture as well with some snippets of fabric/burlap.  Then add some Bo Bunny Jewels, buttons, stickers and blooms and your book is done!  I literally got this album done in one evening!

Travel albumn by Gabrielle Pollacco using Bo Bunny chipboard album, papers, chipboard accents, stickers and Noteworthy die cuts from the Souvenir collection as well as Bo Bunny Blooms and Glimmer Mist


Travel albumn by Gabrielle Pollacco using Bo Bunny chipboard album, papers, chipboard accents, stickers and Noteworthy die cuts from the Souvenir collection as well as Bo Bunny Blooms and Glimmer Mist

When I completed my album I used Bo Bunny's new Gold Glimmer Spray on all the blooms and embellishment clusters on the cover and throughout the album.  I love this stuff!  It adds a subtle yet magical tough to your page embellishments!

Bo Bunny product used in this project:
Mini Album: Souvenir
Patterned Paper: Souvenir/Explore
6x6 Paper Pad:  Souvenir
Buttons: Souvenir
Noteworthy: Souvenir
12x12 Sticker Sheet:  Souvenir
Chipboard: Souvenir
Layered Chipboard: Souvenir
Blossoms: Daisy/Clover, Wildberry
Double Dot Jewels: Citrus, Emerald
Ink Pads: Licorice, Wildberry, Blueberry, Pink Punch.
Glimmer Spray: Gold

Thanks for stopping by the Bo Bunny blog today and checking out my mini-album!  I hope this has inspired you to take an evening and create your own little keepsake book!