Showing posts with label Tags. Show all posts

Monday, October 21, 2019

DIY Halloween Tags with Denise

Hello BoBunny Fans

It's Denise here and today I want to share some really fun tags with you for Halloween.
I took a walk back in time and used the Wonderfully Wicked and Fright Delight collections.

Wonderfully Wicked & Fright Delight_Halloween Tags_Denise 21 Oct 01

Here is a look at the first tag. I used an acrylic paint and stencil to create the background and then layered up papers and chipboard pieces, along with gauze and beads.

Wonderfully Wicked & Fright Delight_Halloween Tags_Denise 21 Oct 02

Wonderfully Wicked & Fright Delight_Halloween Tags_Denise 21 Oct 03

On the second tag I did some distress oxide inking and water effects for the base and then stencilled over that. I then fussy cut some bits and added some chipboard pieces, beads and gauze.

Wonderfully Wicked & Fright Delight_Halloween Tags_Denise 21 Oct 04

Wonderfully Wicked & Fright Delight_Halloween Tags_Denise 21 Oct 05

For the last tag I also stencilled on the background with paste and a stencil and then layered up various things, along with the beads and gauze for texture.

Wonderfully Wicked & Fright Delight_Halloween Tags_Denise 21 Oct 06

Wonderfully Wicked & Fright Delight_Halloween Tags_Denise 21 Oct 07

I really had so much fun creating these scary and spidery tags and love the end result.

One can certainly still use older collections and still make beautiful projects and mixing and matching these collections was easy and fun.

Thanks for stopping by the BoBunny blog today! We really look forward to seeing you back tomorrow.

Have a super day!
Denise x


BoBunny Supplies:
Patterned Paper: Wonderfully Wicked, The Daily Curse, Creepy/ Wonderfully Wicked
Cardstock: Licorice Flourish
Chipboard Stickers: Wonderfully Wicked & Fright Delight
Noteworthy: Wonderfully Wicked & Fright Delight
Stencils: Brocade

Thursday, June 14, 2018

Traveler Tags with Marilyn

Hello Bo Bunny fans! 
It's Marilyn here with you today to share a couple of tags and the video tutorial that I made using the new World Traveler collection.

I love to travel so I had fun creating with this collection. I tried to highlight the vintage look of this collection using brown, copper inks. But let me start from the beginning, I cut two pieces 3 1/2" x 6 1/2" from two different ivory papers from the collection. I gave textures with the Backsplash stencil and modeling paste.

In my first tag,  I adhered some clocks and gears that I cut out  from the Bo Bunny's craft dies with a brown paper from the collection. To give dimension and interest I adhered some die cut from the Noteworthy package with adhesive foam dots.

In the second tag, I used the same elements but created a different composition.

These are three of the products that I used to create the tags. The Noteworthy package with all the fantastic die cuts pieces so easy to work with them, the brads that I added to my first tag to bring the metallic look. And for my second tag I gave a sparkle look with some jewels.

You can see here from this angle the dimension and layers that I created on the tags with the different die cuts and elements.

You want to see how I made them, don't miss my video tutorial below!


Thanks for stopping by...until next time!! xx

Marilyn

BoBunny Supplies:
Pattern Papers- World Traveler collection- Roam, Foreign, Postage, Journey,Wanderlust
Paper Pad 6 x 6- World Traveler
Noteworthy- World Traveler
Stickers- World Traveler
Stencil- Backsplash
Double Dot Brads- Ruby Red
Dies- Tick Tock Die, Gearing Up
Jewels- Mocha

American Craft:
Sticky Thumb Adhesives
Sticky Thumb Adhesive Runner


Tuesday, May 15, 2018

Once Upon A Lifetime Tags and Door Hangers with Irit

Hello my dear crafty friends! Irit here!

I decided to use BoBunny's new and gorgeous collection Once upon a Lifetime for two similar vintage style door hangers.

Actually it can be used as tags, door hangers or vine bottle embellishments too.

Cherish the past door hangers!


Both hangers were made in the same mixed media way. First, I hand/die cut them from a thick recycled chipboard. Then I made a cardstock layer and glued it with the Sticky Thumb glue runner. Next, I covered them with a thick layer of crackle paste using the BoBunny stencils. Then, when dry, they were misted a bit to get this vintage look. Both front embellishment circles were made in the same way. I layered cardstock, stickers, and more cardstock over one large die cut circle.


On this hanger I used BoBunny tags die to make a tag and then die cut two crowns for the upper layer.
Both crowns were heat embossed with gold powder.


On the second hanger I added one more die cut layer (a clock) and heat embossed the die cut key and a key hole with copper embossing powder.


This is the fine example of this versatile collection. A bit of mediums make it very grungy and vintage and you can make any mixed media project using parts of this collection.


 One last look at both tags:


 Product list BoBunny:
 Once Upon a Lifetime collection:
12''*12'' cardstock:Once upon a lifetime, Ancestors, Generations, Grandparents, Pedigree, Relatives, Traditions
Once Upon a Lifetime Combo stickers
Nested Terrific tag dies
Tick Tock die
Royal Dies
Fancy Flourishes stencils
Mandala Garden Stencils
BoBunny Crackle paste Primer
BoBunny Crackle paste White
Double Dot Mocha Jewels

American Crafts:
Sticky Thumb adhesive runner
Sticky Thumb foam dots

 I hope that you like my small Mixed Media creations today and would try to make something similar with our best ever Once upon the Lifetime collection!


Thursday, September 17, 2015

Merry, Merry Mixed Media!


Although Christmas is actually not just around the corner yet, the brand new BoBunny products totally got me in the mood for making a Christmas project. I absolutely love the new 'Celebrate' laser-cut chipboard from BoBunny and figured they would look nice if I combined them with the Dear Santa collection and some BoBunny mixed media essentials. 

Santa Tag by Romy Veul

I created one large tag and a small tag, which you could use either as a gift tag for a Christmas present or as a regular Christmas card. I first covered both tags with patterned papers and then started applying gold glitter paste to the background. I used the beautiful 'Cascade' stickable stencil to create a nice gold star pattern. 


I also incorporated a laser-cut chipboard snowflake in my card, which is from BoBunny as well. I covered it with gold glitter paste and added some accents with the butterscotch Pearlescents.


Presents Tag by Romy Veul


My second tag features a more soft colour palette. On this tag I incorporated another beautiful laser-cut chipboard embellishment: the present. This present was also altered with gold glitter paste and butterscotch Pearlescents. I love the rich look that you can achieve on the chipboard with these products. 


BoBunny Supply List:
Patterned Papers: Dear Santa, Burlap/ Dear Santa
6x6 Paper Pad: Dear Santa
Noteworthy: Dear Santa
Chipboard: Dear Santa
Buttons: Dear Santa
Laser-Cut Chipboard: Celebrate
Glitter Paste: Gold
Pearlescents: Butterscotch
Stickable Stencils: Cascade

I hope I could provide you with some Christmas inspiration to get started on your Christmas cards yourself. Grab your BoBunny products and have fun!

Thank you for stopping by on the blog today! Happy crafting!

Don't forget to head on over to Facebook and enter to win our fun 60K Giveaway!


Thursday, August 14, 2014

Kraft Gift Bags, Cards and Tags

Today we have some more fun projects created with the Kraft Gift Bags. You can use the gift bags as they are, or maybe you want to jazz them up a little with some paper and embellishments! Let's go one step further. What can you tuck inside? A tag? A card? Maybe some goodies??

Hello Gift Bag by Lisa Novogrodski

I love to come up with different ways to use products. How many ways can I use the BoBunny kraft bags? Here I created a gift bag with the plain kraft bags, then I layered two bags on the front. The first bag is adhered to the front and you are able to open it as the flap wraps around the back. You can use this for a gift card or treat. The second bag I layered over the first and left it open as a pocket on the front to slip a card or tag in.


I also used the kraft bags to create a rosette in the center of my bow as well as cutting strips of the bag itself to create my bow.


Oh and few curly cues too...


This little tag fits perfectly in the layered pocket on the front of the gift bag! A simple tag that acts as a card and can be saved by the recipient.


The tag was created by tearing off pieces of the Kraft Dot Bag and mixing it up with stamps, stickers, washi tape and ink!


Here is a close up of the back of the tag. This tag slips right in the pocket to complete your gift set.

BoBunny Supplies:
Pattern Paper: Somewhere In Time, Antiquity, Timeless, Evening Mist, Elegance/ Somewhere In Time
Kraft: Dot Gift Bags, Plain Gift Bags, Wood Shapes Elegant, Wood Keys and Butterflies
Brads: The Avenues
Jewels: Pop Quiz, Mistletoe, Modern Miss
Combo Sticker: Somewhere In Time
Stamps: Captured Stamp, Stitches Stamp, To The Point Stamp


Welcome Baby Card by Juliana Michaels


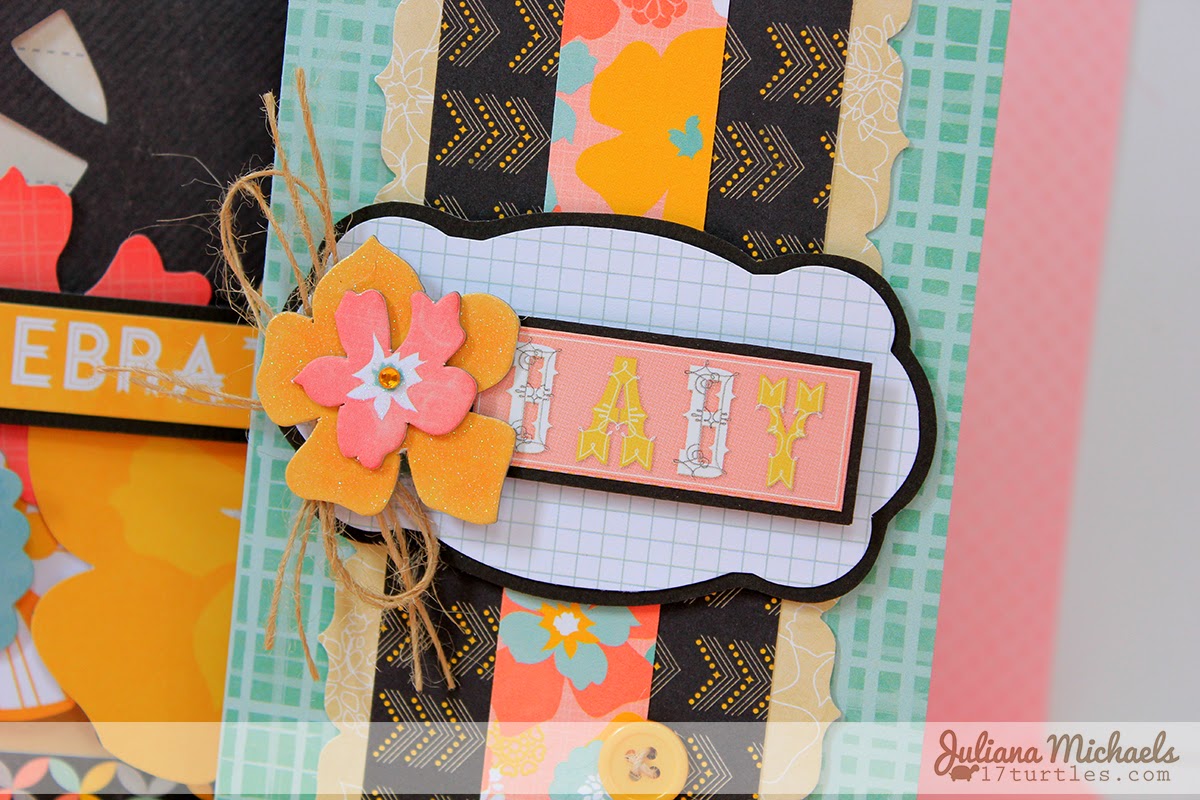
The BoBunny Kraft Bags come in a wide range of patterns, however, I thought it would be fun to pull out the Plain Kraft Bags and personalize them with some of the new BoBunny stamps. I used one Kraft bag to create an envelope and I used another one to create a gift bag. I choose to create a baby card and envelope along with coordinating gift wrap to give to my next door neighbor who is due with a baby girl in December! 


The card was created using paper from the 6x6 Baby Bump Paper Pad. I created the embellishment that I used on the front of the card by layering a Noteworthy shape and the Baby sticker on black cardstock. To create added dimension, I adhered them to my card using double sided foam tape. I then added the floral shaped chipboard, jewel, twine and buttons.


The envelope is a Plain Kraft Bag, that I stamped with one of the small button stamps from the Stitches Stamp Set. I then selected a label from the Baby Bump Noteworthy and layered it with some black cardstock before I attached it to the front of the envelope.

Celebrate Life Baby Gift Wrap by Juliana Michaels


To create my baby gift wrap, I selected the large Plain Kraft Bag. I again used the tiny button stamp to add detail to the bag. Next, I selected a variety of the Baby Bump Noteworthy shapes and layered them to decorate the front of the bag. I used double sided foam tape to give some of the flowers more dimension. The "celebrate life" die cut was layered on black cardstock before I attached it to my bag with double sided foam tape. I then cut a strip from the Bundle paper and attached it to the bottom of the bag.


I also cut a strip from the Oh Baby paper and cut it into a banner shape before attaching it to the top right hand side of the bag. To complete the embellishment of my bag, I added some jewels, twine, a chipboard button and some glitter glue. This was such a fun set to create and I really love how the stamped buttons added to the whole baby theme of my gift wrap. 


BoBunny Supplies:
Patterned Paper: Bundle, Oh Baby / Baby Bump
6x6 Paper Pad: Baby Bump
Noteworthy: Baby Bump
Chipboard: Baby Bump Layered Chipboard
Jewels: Baby Bump
Buttons: Baby Bump
Stickers: Baby Bump Combo Sticker
Cardstock: Island Mist Dot
Kraft Gift Bag: Plain
Stamps: Stitches Stamp

Saturday, July 12, 2014

Enchanted Garden Cards

We are finishing off our week of projects created using our Enchanted Garden collection with a group of cards created by some of our amazing designers. They have created a variety of cards ranging form thank you cards to gift tags. Take a look. You are sure to be inspired to use Enchanted Garden during your next card making session!

You Card by Kaori Fujimoto


I created two cards for my assignment. First is a vertical type. I used some of the Kraft Wood Shapes and thread to give it a more natural impression.


BoBunny Supplies:
Patterned Paper: Fairies, Imagine, Pixies / Enchanted Garden
Stickers: Combo Stickers/ Enchanted Garden
Jewels: Glaze Jewels
Blossoms: Natural Earth Zinnia
Doilies: 4in Small Doilies
Kraft: Wood Shapes Clock


Love Card by Kaori Fujimoto


Second is a Horizontal type. I used a Doily and Jewels on this card too. I also distressed and inked the edge of the paper.


BoBunny Supplies:
Patterned Paper: Fairies, Mosaic, Pixies/Enchanted Garden
Blossoms: Harvest Orange Daisy
Jewels: Glaze Jewels
Doilies: 4in Small Doilies


Thank You Card by Lynn Shokoples


I was so excited to play with the Enchanted Garden collection that I started looking through all the patterned papers and lost track of time. Then out came the Double Dot cardstock and the 6x6 paper pad, and again I was distracted, lol. Finally the card began to take shape. I tucked some lace behind the layers and cut out some extra petals to tuck behind the blossom. To finish up I added some bling to the card with the jewels. I just cut them apart and tucked them behind the blossom.


BoBunny Supplies: Thank You
Patterned Paper: Spellbound/Enchanted Garden
6x6 Paper Pad: Enchanted Garden
Double Dot Cardstock: Aquamarine Dot
Lace: Denim Blue Lace
Blossoms: Denim Blue Daisy
Jewels: Glaze Jewels
Stamps: Stitches


Thank You Card by Lynn Shokoples


For this card I added a touch of mixed media with some gesso, sprays and my mini mister. Then I took some grey ink and stamped all over the card. A few layers, a few blossoms and some tucked jewels and my card was complete.


BoBunny Supplies: Thanks
Patterned Paper: Imagine/ Enchanted Garden
Double Dot Cardstock: Island Mist Vintage
Stickers: Combo Stickers/ Little Miss
Jewels: Glaze Jewels
Blossoms: Plum Purple Zinnia, Plum Purple Dahlia
Doilies: Medium
Stamps: Distressed Textures, Gateway


Hello Card by Irene Tan


This is an acrylic card created using the beautiful "Enchanted Garden" collection. The acrylic allows me to create interesting layers by stamping and adding some simple details.


BoBunny Supplies:
Patterned Paper: Pixies/Enchanted Garden
Stamps: Sentiments, Stitches
6 x 6 Paper Pad: Enchanted Garden
Ribbon: Concord Double Dot
Blossoms: Plum Purple Pansy
Jewel Flourishes: Glaze


Gift Tag by Irene Tan


The images printed in this collection are perfect cut-outs to create fast and easy tags or bookmarks. In the tag above, I've cut out a cute pixie to decorate it.


BoBunny Supplies:
Patterned Paper: Pixies/Enchanted Garden
Stamps: Stitches
6 x 6 Paper Pad: Enchanted Garden
Ribbon: Concord Double Dot
Blossoms: Plum Purple Bouquet