Showing posts with label Time & Place. Show all posts

Friday, January 10, 2020

2020 Goals Journal with Elisa


Hi everyone!!!

Here is Elisa and, as you know, I love journals!!! But this is not a normal journal. It isn't a calendar, it isn't a diary, it's a Goals Journal for 2020!

It can help you divide your goals into long term, medium term, short term and daily too, of course!!
For this project I used the wonderful collection Time & Place by BoBunny.
Here you can see the cover, made with acetate. For this project I also used all my favorite thickers from the 2019 collections (on the cover you can recognize Sweet Clementine and Harmony thickers)


I made the external structure with acetate (for the front) and chipboard covered with Time & Place August and November cardstock.


Through the acetate we can see the external part of the Journal, made with a Sunflower Vintage Double Dots cardstock... All the pages made with this cardstock are dedicated to long term goals (so, maybe, the annual ones...)


This is the internal cover, when we open the acetate front part. I glue the back of the central part of Sunflower Vintage Double Dot pages to the chipboard back of the journal. 


I divided the long term goals in two sections: first of all the personal ones:


On the other side the professional ones:


Then I used the Vanilla Damask Double Dots cardstok to realize the semestral part of the journal. I use washi tape and a  clip to keep this part together with the annual section of the Journal.In this way, I also created the place for three tiny tags.


On each of the three other parts of the Vanilla Damask cardstock I adhere a piece of vellum with a tab with the name of the month. Here you can see the front...


And here you can see the back. Of course, after June we will change the cardstock (that's not a problem, because I fixed it only with washi tape!)


And now the inner parts: with Bazzill Kraft I created the weekly section, and with Bazzill Cream Puff the Daily one. These two section are not fixed to the structure, of course.... We have to change the Daily everyday and the Weekly every week. So I fixed a clip to the back chipboard (I made 3 holes: one, in the center, for fixing the clip with a brad through the upper hole in the back part; two for passing a burlap rope and fix the clip better).
I also created a stripe with Time & Place cardstock and some magnets, with the word "Week" composed with Boulevard Thickers. I glue this stripe to the back chipboard and when it is closed, it helps to keep the weekly section in the right place.


Hope this project could be useful for you!!! I think that when I have a good perception of your goals, is more simple to reach them!!

BoBunny supplies:
Time & Place 12x12 Cardstock November
Time & Place 12x12 Cardstock August
Time & Place 12x12 Cardstock January
Time & Place Cardstock stickers
Time & Place Layered Chipboards
Time & Place Noteworthy
Time & Place Brads
Time & Place Candy Dots
Time & Place Washi Tape
Double Dots Sunflower Vintage
Double Dots Vanilla Damask 

Other AC supplies:
Bazzill Kraft
Bazzill Cream Puff
Time & Place Thickers
Boulevard Thickers
Sweet Clementine Thickers
Harmony Thickers


Till next time!


Elisa

Tuesday, November 19, 2019

Gratitude Layout with Angela

Hi everyone!
Angela here with you today sharing my latest layout featuring new Time & Place BoBunny collection. I love it! It has so many beautiful things to play with.


Time&Place_Layout_Angela_Nov19_02


It's Thanksgiving theme on the blog this week. While we don't have Thanksgiving day in Italy, I certainly have many things to be grateful for.  One and the most important to me is my family. So my today layout is dedicate to the three men that hold my heart.


Time&Place_Layout_Angela_Nov19_03


To create the layout I fussy cut all the card calendar that are on the patterned papers. Then I arranged them to create a circle. I placed the arranged calendars the back of November Time & Place paper and glued them on one side only. 


Time&Place_Layout_Angela_Nov19_04


Then, I put a piece of foam adhesive on the opposite side of the cards so to have a raised up corner.  The result is a fun fan look.


Time&Place_Layout_Angela_Nov19_05


I shortened of about 1 inch each side of the background paper and created a frame using other two papers from the collection,  February and August Time & Place. 


Time&Place_Layout_Angela_Nov19_06


I decorated the page choosing carefully pieces that matched the colors of the photo. I found a gorgeous burgundi branch of roses and this cute dragonfly that I adore.


Time&Place_Layout_Angela_Nov19_07


I also added teeny details like enamel dots, brads and layered chipboard stickers here and there.


Time&Place_Layout_Angela_Nov19_08


For the title I used the alphabet stickers that comes with the collection. It has pretty multicolor letters but unfortunately they get lost on the busy background. So I decided to color half of each letter using gold glitter paste.


Time&Place_Layout_Angela_Nov19_09


VoilĂ  the result! I hope you like it as much as I do.


Time&Place_Layout_Angela_Nov19_10


Thank you so much for stopping by today. I can't wait to see what you'll create with beautiful Time & Place collection.


BoBunny Supplies 
Patterned Paper: Time & Place January/ February/ March/ April/ May/ June/ July/ August/ September
October/ November/ December
Noteworthy: Time & Place
Layered Chipboard Stickers: Time & Place
Alpha Thickers: Time & Place
Brads: Time & Place 
Enamel Dots: Time & Place
Glitter Paste: Gold
Glimmer Spray: Gold

Sunday, November 17, 2019

Desk Calendar DIY

Hi everyone!
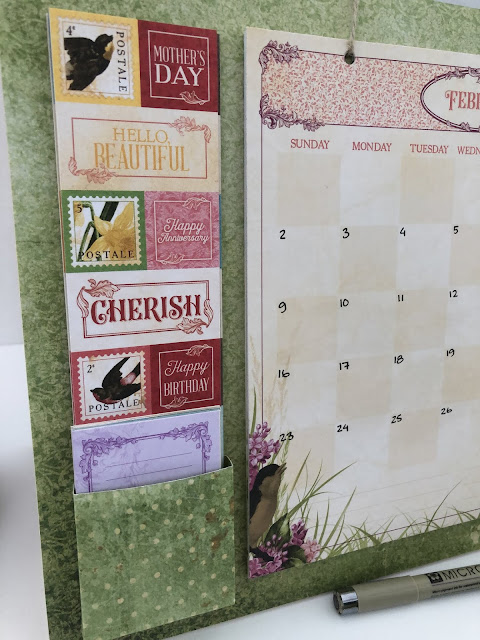
Today I want to share with you my craft room table calendar that I made. This calendar will mostly have birthdays and date for my dt missions that I have. This is only for my craftroom since when I have it on my desk I can easily see when I have t make my birthday cards and prepare projects for my dt missions. That is really nice and easy then to have control of what I have to do and when I have to do it.

I also made a little pocket besside the calender where I put the cut out "stamps" and so on that was on the sheets, this will be nice to decorate the calendar with as I go. I also cut out some of the notpads so I have something extra to write on when I really have something extra to think about when I do my work. Everything easy to reach on my desk!

I hope you will like it.


I put the sheets on with some lace. I just flip it over when the next month is about to start. Also if I want to save it when the year is done I can just use the lace to tie the calendar papers together and then save. And for next year I can easily put  new sheets on.


 I have been using:
Time and place collction
Dot papers

Have a nice day!

Wednesday, November 13, 2019

2020 Table Calendar


Hello, crafty friends!!


I'm so happy today because I can share with you my new project made using the new BoBunny collection Time & Place!! I created a Table Calendar... My idea is: plan your future, without forgetting your past!
Let me show it to you!


The calendar is similar to an album. But the front cover shorter than the back cover. So you can see "half calendar" inside it. And, you will see, there is a surprise too!!


For the cover I chose the June paper of the collection: the flowers on this cardstock are so beautiful and the mix of color is great!!
I chose also some other elements by Noteworthy and Layered Chipboard Stickers.


In the Sticker set of this collection you can find a wonderful alphabet with a lot of letters!! I used it a lot!!! Here, for the sentiment on the cover, and inside the calendar too!


When you open the structure, on the left you can find 4 golden angles where you can fix the calendar of the month (I started this project with January, of course!!!
Under it there is a notebook with five sections, one for every week of the month.


For the sections of the notebook I used the Violet Double Dots Cardstock and some white papers too. I had a lot of fun with the coptic binding (I used the WRMK Book Binding Guide: great help if you love the coptic!!!)


On the right you can find the January bigger calendar. And this is the surprise.... Plan the future, without forgetting the past... So, in the back of the calendar, you can find a mini LO, with the best picture of January 2019...


Here is it:


Clean and Simple layout... Only to remember a wonderful moment I lived.


Noteworthy, Washi Tape, Stickers and Layered Chipboard : really a wonderful collection!!


So you can choose if you want to keep the LO or the calendar on the front! I chose to put the picture on the right side of the LO, so I can see it also when the cover is closed.


BoBunny supplies:
Time & Place January 12x12 cardstock
Time & Place June 12x12 cardstock
Time & Place Noteworthy
Time & Place Stickers
Time & Place Layered Cardstock Stickers
Time & Place Thickers
Time & Place Washi Tape
Violet Double Dot Cardstock

Other AC Supplies:
WRMK Book Binding Guide
Bazzill Kraft


Hope you enjoy this project!!


Elisa


Thursday, November 7, 2019

DIY Pocket Calendars with Angela


Hello friends!

Angela here. Today I am sharing my very first project made using the new BoBunny Time & Place collection. I created three pocket calendars and if you'd like to see how to make them, there is a video too!


Time&Place_Angela_Nov07_01


These pocket calendars will be a gift to give to my friends for Christmas. Time & Place collection inspired me so many other projects and DIY to make. For example, you could make a big calendar to hung up or a teeny one, smaller than the one I am showing you, using Time & Place stamps.


Time&Place_Angela_Nov07_02


To create these, I started stamping the monthly calendar on 12 pieces of 4 x 4 inches white paper.
For extra fun, I stamped each month in a different color using Vicki Boutin Color Wheel inks


Time&Place_Angela_Nov07_03


To hold in place the calendar I used the colorful brads that are in the collection, two for each calendar.
I also wrapped washi tape around the papers for making the calendar sturdier and to embellish it, too.


Time&Place_Angela_Nov07_04


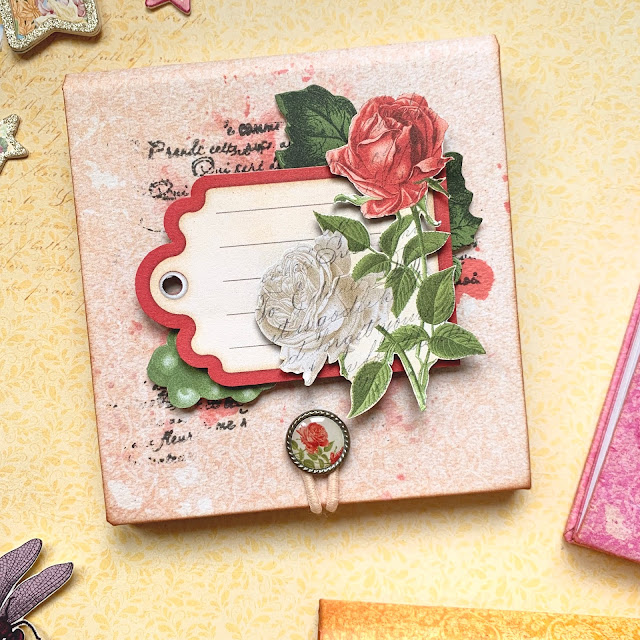
The calendars have a hard cover made of cardboard wrapped in DoubleDot Vintage cardstock. The measures of the cardboard are 2 pieces of 4,25 x 4,25 inch and 1 piece of 0,50 x 4,25 inch.


Time&Place_Angela_Nov07_05


For the closure I made two versions. One has got a brad and a piece of twine to wrap around the brad and the other has an elastic instead. 


Time&Place_Angela_Nov07_06


This is how the calendar looks like when it is open. I adhered a journaling card to write a note to my friend.


Time&Place_Angela_Nov07_07


I embellished also the cover, playing with Distress Oxide and bits and pieces from Time & Place collection. It carries such gorgeous flowers!!


Time&Place_Angela_Nov07_08


Here is a close-up of the closure made with a beautiful flower brad and the elastic. I was lucky enough to find in my stash an elastic that perfectly match the color of the paper.


Time&Place_Angela_Nov07_09


VoilĂ ! This is all for today. I hope you liked my pocket calendar idea and hopefully my friend too.


Time&Place_Angela_Nov07_10


Thank you so much for stopping by. I'll see you soon!


BoBunny Supplies 
Patterned Paper: Time & Place January/ April/ June/ July
DoubleDot Paper: Vintage Passion Fruit/ Orange Citrus/ Peaches & Cream
Noteworthy: Time & Place
Cardstock Stickers: Time & Place
Layered Chipboard Stickers: Time & Place
Brads: Time & Place 
Washi Tape: Time & Place
Stamp: Time & Place/ It Is Written