Showing posts with label Penny Emporium. Show all posts

Saturday, August 1, 2015

What Do You Do In The Summertime?


Hello everyone! We hope you've enjoyed seeing what our designers do in the summer time this week! But we still want to know.....What do you do in the summer time? Do you go on vacation, swim in the ocean, work in your garden, have BBQ’s, or maybe craft? Today we have made two cards to celebrate things we do in the summer time!


The first card is a fun summer at the beach card! It is made with our delicious Boardwalk collection and it represents the things we enjoy about the beach!


The card is cut on a diagonal to reveal little surprises inside the card!

I made an inside pocket to tuck a gift card or some cash into for your favorite person…maybe they will take you for an ice cream cone on the boardwalk?
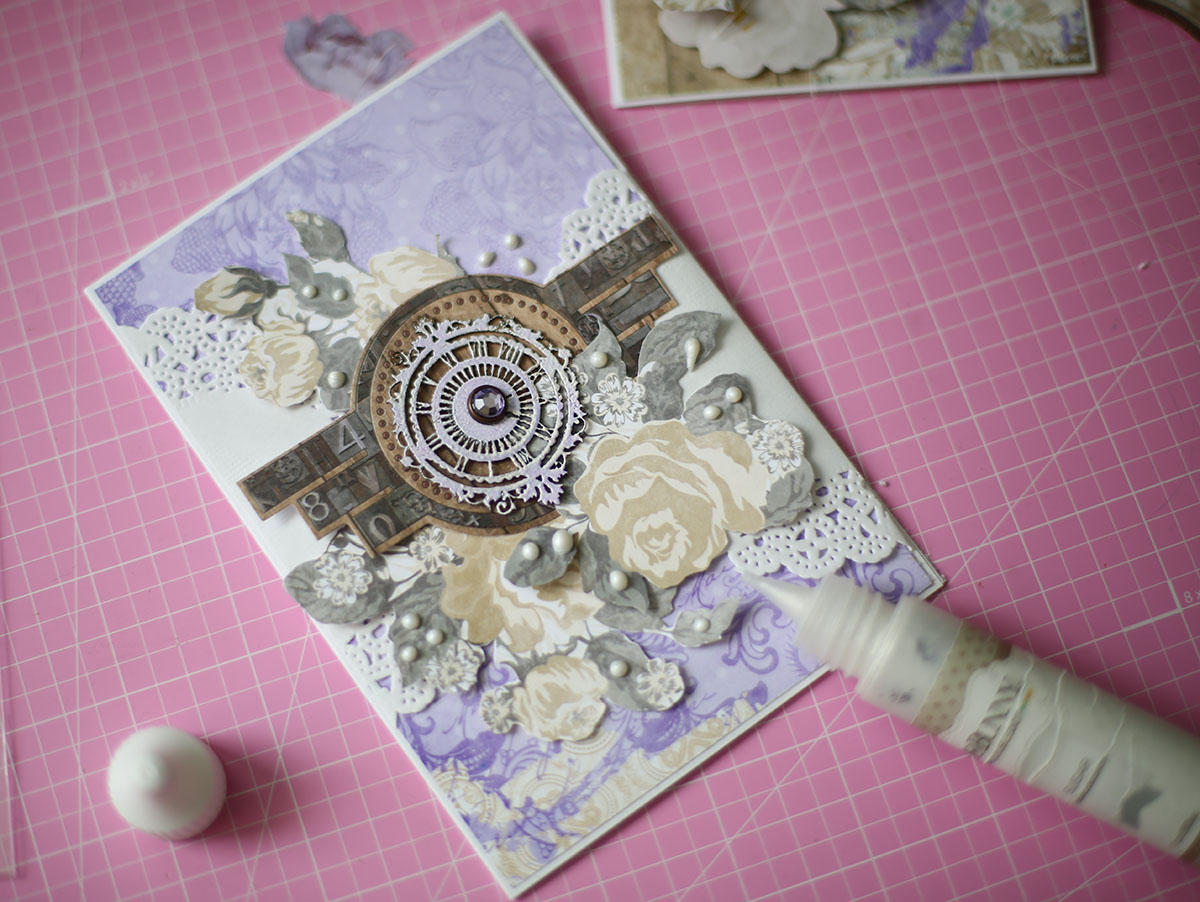

The second card is celebrating someone in your life who you enjoy spending time with; relaxing and talking, going for long walks on warm summer nights etc. The collection used is the beautiful Penny Emporium.


The card front is acetate and it makes for a beautiful full view of the inside of the card while still embellished on the outside!


Layering the flowers on the inside and the outside of the card gives it great dimension! Thank you for stopping by! We hope you are enjoying your summer....don't forget to scrap about it and share it on our Facebook page!

BoBunny Supplies:
1 Boardwalk
2 Boardwalk Sandcastle
1 Boardwalk Sunshine
1 Boardwalk Noteworthy

1 Penny Emporium Alphabet
1 Penny Emporium Noteworthy
1 Penny Emporium Layered Chipboard
1 Chocolate Jewels

Thursday, July 9, 2015

Phone Cover with Penny Emporium!


Re-vamped Phone Cover by Gabrielle Pollacco
Mixed Media Phone cover by Gabrielle Pollacco using Bo Bunny Penny Emporium collection and mixed media products

Hi all, it's Gabrielle here with you today to share a makeover I gave to an old phone cover.  My youngest daughter got a brand new phone a few months back and promptly lost/got it stolen when she was using a public washroom.  So she then inherited my oldest daughters cast off phone.  To cheer her up, I thought I'd fancy up the old phone case that was on it for her.  


Here is a pic of the old phone cover....I think it even has a few bite marks in it from our naughty dog! But that was no problem, I just gave the phone case a quick brushing with some Gesso....when that dried I used some heavy gel paste with BoBunny's 'Brocade' Stickable Stencil over random sections of the surface. I left part of it flat/untextured so that I could add a bit of the Penny Emporium patterned paper as well.  


Once the texture paste was dry, I gave the whole thing a coat of Chocolate Pearlescents, adding a streak of Graphite Pearlescents here and there, to give a nice brushed metalic look to it.  The decorating was easy-peasy, I just added a few chipboard cogs and then layered on some pieces from the Penny Emporium Layered Chipboard packet.  The final touch was to add some gems from the Double Dot Mocha Jewels packet.   The phone cover put a big smile on my daughters face!

Bo Bunny Products used in this Project:
Patterned Paper: Penny Emporium (6x6 paper pack)
Layered Chipboard: Penny Emporium
Stickable Stencils: Cascade
Pearlescents: Chocolate, Graphite
Double Dot Jewels: Mocha

Sunday, July 5, 2015

Once Upon A Time Layout!


Hello BoBunny Fans! I've created a beautiful shabby page today featuring the "Penny Emporium" collection. I love lavender and purple and paired with gray and yellow it is a show stopper!

Once Upon A Time- Lisa Novogrodski
Once Upon A Time Layout by Lisa Novogrodski for BoBunny using Penny Emporium

I planted this photo of my daughter amid a floral garden created with the BoBunny Blossoms and paper rosettes. I brought in shades of brown and yellow on my rosette florals to tie my color scheme together.

Once Upon A Time Layout by Lisa Novogrodski for BoBunny using Penny Emporium Close Up 01

The background has a tad bit of stamping with some of the "Stitches" stamped around the outside page edges and the bricks from the "Wall to Wall" textures stamp on the inside papers.

Once Upon A Time Layout by Lisa Novogrodski for BoBunny using Penny Emporium Close Up 02

I cut up some of the BoBunny Bouquet Blossoms to create smaller petals that would flow from my vines.

BoBunny Supplies:
Pattern Paper:  Alphabet, Captured, Portraiture, Mercantile, Gallery / Penny Emporium
Noteworthy: Penny Emporium
Buttons: Penny Emporium
Blossoms: Pansy, Bouquet Plum Purple, Pansy Natural Earth
Stamps: Stitches, Wall to Wall Texture Stamp
Wood: Iron Works Wood Shapes
Pearlescents: Chocolate, Island Mist
Glitter Paste: Gold

Monday, June 29, 2015

Gorgeous Misc Me Binder!


Hello BoBunny fans! It's Irene here and today, I'm sharing another Misc Me project with you all.

True Beauty Misc Me Binder Tutorial by Irene Tan
True Beauty Misc me Pages by Irene Tan using BoBunny Penny Emporium collection
This time, it's a little different. I will share a video tutorial on how to create this mixed media Misc Me binder!
True Beauty Misc me Pages by Irene Tan using BoBunny Penny Emporium collection

This binder features the new and cool "Penny Emporium" collection by BoBunny. I really love the steampunk elements in this collection. Together with it, I've used tons of wood embellishment and metal embellishment to create dimensions and textures. Without making you wait any longer, here is the video tutorial on how I've altered this binder, grungy style! Enjoy!


Besides the binder, I've also created a couple of Misc Me pages for this album. 

True Beauty Misc me Pages by Irene Tan using BoBunny Penny Emporium collection

True Beauty Misc me Pages by Irene Tan using BoBunny Penny Emporium collection


True Beauty Misc me Pages by Irene Tan using BoBunny Penny Emporium collection


True Beauty Misc me Pages by Irene Tan using BoBunny Penny Emporium collection

For this album, I've kept my Misc Me pages simple and elegant. I did however add a little shading by using a brush and some paint.

BoBunny Supplies:
Patterned Paper: Woodworks, Bazaar, Copper Tiles, Imagination/Penny Emporium
Noteworthy: Penny Emporium
Brads: Penny Emporium
Rub-Ons: Alphabet Gold
Chipboard: Penny Emporium Layered Chipboard, Butterfly Laser Cut, Timepiece Laser Cut, Lace Laser Cut
6 x 6 Paper Pad: Penny Emporium, Natural Necessities
Lace: Natural Earth
Misc Me Binder: 8 x 9 White & Kraft
Misc Me Page Protectors: 8 x 9 Binder Page Protector Variety Pack
Misc Me Contents: Black Envelopes
Doilies: 4" small
Kraft: Burlap Pleated Lace
Wood: Gears, Iron Works
Washi Tapes: Black and White Patterned
Dot Jewels: Aqua
Glimmer Spray: Gold, Bronze, Frost, Mint
Glitter Paste: Wasabi
Stickable Stencils: Lace
Dies: 3 x 4 Ornate Frame

Saturday, June 20, 2015

True Beauty Penny Emporium Layout!

Hello BoBunny Fans

Today it's Denise here to share a layout with you!

True Beauty Layout by Denise van Deventer

True Beauty Layout by Denise van Deventer using Penny Emporium

I think Marilyn Monroe was such a natural beauty and so when I saw this layered chipboard title from Penny Emporium, I immediately thought of her and so this page was born.

I created a mixed media page and started off with my background of gesso and watercolor.  I happened to take a photo and so thought I would share it here with you too.

True Beauty Layout by Denise van Deventer using Penny Emporium

I had a pretty good idea of what my design would be and so I also stamped in my leaves. Sadly, I covered up all of that gorgeous frame, but sometimes that is just how it works out.

I did lots of fussy cutting and really used the gorgeous designs and images of this beautiful collection.

True Beauty Layout by Denise van Deventer using Penny Emporium


True Beauty Layout by Denise van Deventer using Penny Emporium

I used quite a few die-cuts to cut out the little flowers, leaves and bits from card stock.  This helped build the layers and give lots of depth.

True Beauty Layout by Denise van Deventer using Penny Emporium

Thanks for stopping by the BoBunny blog today. I hope that you have found at least one little seed of inspiration. The Penny Emporium Collection is gorgeous and I know that I will certainly be creating many more projects with it!

A penny for your thoughts....what will you create with this stunning collection?

BoBunny Supplies:
Patterned Paper: Penny Emporium, Wind Up, Imagination, Bazaar/ Penny Emporium
Cardstock: Lavender Dot
Noteworthy: Penny Emporium
Buttons: Penny Emporium
Brads: Penny Emporium
Jewels: Mocha Jewels
Chipboard: Layered Chipboard/ Penny Emporium
Stamps: Floral, Distressed Textures
Petals: Natural
Stickable Stencils: Brocade
Pearlescent: Chocolate
Ink Pad: Emerald

Thursday, June 18, 2015

Penny Emporium Mixed Media Canvas!


Hello! And welcome to Mixed Media Thursday with the beautiful Penny Emporium collection! I have created a beautiful canvas today!

Penny Emporium Canvas by Kaori


I began by painting a canvas with modeling paste using Cascade Stickable Stencils.


After drying the paint with heat tool, adding some mist and stand the canvas to drip the mist.


I added matching papers and embellishments.

BoBunny Supplies:
Stickers: Penny Emporium Combo Sticker
Buttons: Penny Emporium
Brads: Penny Emporium
Paper Pad: Penny Emporium
Blossoms: Plum Purple Bouquet
Jewels: Double Dot Tuxedo Jewels, Glaze Jewels
Stencils: Cascade Stickable Stencils
Doilies: 4in Small Doilies

Wednesday, June 17, 2015

Off the Page with Penny Emporium!


Hi BoBunny Fans :) Today is OTP day - its a bit of favourite of mine ;) - and I wanted to share with you a photo frame I've altered using Penny Emporium.  If you like fussy cutting you will LOVE Penny Emporium!!
Friends Frame by Megan Gourlay
Friends Photo Frame by Megan Gourlay for BoBunny using Penny Emporium

I had this photo of my BFF and I taken at my wedding.  It was just a random shot taken by her husband I think but it needed a frame!

To me Penny Emporium spoke of friends, travel and adventures and heaven knows we've had a few in the 25 years we've been friends :), so I wanted to show that with the embellishments I picked.

Friends Photo Frame by Megan Gourlay for BoBunny using Penny Emporium

I've used the 'Alphabet' and turned it around so that the flourish design was on the opposite side, leaving the left side free for a cluster of embellishments.  The "Life is Better with Friends" banner was fussy cut from 'Captured' and the rather regal looking bird was fussy cut from 'Bazaar'.  A collection of buttons, jewels, brads and blossoms completed the cluster.

Friends Photo Frame by Megan Gourlay for BoBunny using Penny Emporium

Making the opposite side of the frame have the flourish design prominent meant I could still embellish the opposite corner, but it also meant I could make it more clean and simple, and it wouldn't then detract from the photo. Both these time pieces were fussy cut from 'Bazaar' and 'Captured'.

Friends Photo Frame by Megan Gourlay for BoBunny using Penny Emporium

I didn't want to just pop a photo into the frame, I wanted to create depth as well.  From the 'Portraiture' paper I have selected the frame, fussy cut around it and popped it up with foam squares, then popped my photo behind the foam, so it gives the appearance of window box frame.

Thanks for popping by!  I hope I've given you some inspiration to start playing with this beautiful collection :)  please share if you do on our Facebook page if you do!!

BoBunny Supplies:
Patterned Paper: Bazaar, Captured, Alphabet / Penny Emporium
Brads: Penny Emporium
Jewels: Tuxedo
Buttons: Penny Emporium
Blossoms: Plum Purple Bouquet, Plum Purple Pansy

Monday, June 15, 2015

Misc Me & Penny Emporium!


Hello there BoBunny fans! Bernii Miller here with you today to share with you the gorgeous new Penny Emporium collection used in a Misc Me format. This particular collection does not come with its own Misc Me cards, but some of the papers within the collection are perfect to cut apart to be used for your pocket pages.

1st Photo Shoot by Bernii Miller

1st Photo Shoot Misc Me spread by Bernii Miller using Penny Emporium collection by BoBunny.

 I just love pocket scrapping especially when I have random leftover photos from an event -  but those photos are not enough for a stand alone layout, or you might have just a few too many to make a single or double page layout. That is exactly what I had going on with these photos - I had too little for a traditional 2 page layout. This is where the Misc Me is perfect for those odd number of photos. 

1st Photo Shoot Misc Me spread by Bernii Miller using Penny Emporium collection by BoBunny.

To grunge up the layout a little I used my soft sandpaper to rough up the edges, then with watered down white paint I "whitewashed" the edges- and then finally went around the edges with some walnut stain ink. 

1st Photo Shoot Misc Me spread by Bernii Miller using Penny Emporium collection by BoBunny.

 I also used the fun new Borders Stickable Stencils with the gold glitter paste, in random places to add some more sparkle. This matched beautifully with the gold/copper accents that are found in the Penny Emporium chipboard pieces. 

1st Photo Shoot Misc Me spread by Bernii Miller using Penny Emporium collection by BoBunny.

1st Photo Shoot Misc Me spread by Bernii Miller using Penny Emporium collection by BoBunny.

Thanks so much for stopping by and I hope you have found some inspiration here today :) 

BoBunny Supplies: 
Patterned Paper: Portraiture, Copper Tiles , Captured / Penny Emporium 
Noteworthy:  Penny Emporium
Combo Stickers:  Penny Emporium
Layered Chipboard:  Penny Emporium
Brads:  Penny Emporium
Glitter Paste: Gold
Alpha Stickers: Double Dot aqua stickers 
Stickable Stencils: Borders
Pearlescents: Island Aqua
Kraft Wood: Keys and Butterflies 
Misc Me page protectors: 12 x 12 page Protector variety pack. 

Sunday, June 14, 2015

Fun with Cards!


Hello dear friends! Its Evgenia Petzer with you today. As you might noticed before, I am definitely more into cards, so I decided to share with you my love to cards, to show you my step-by-step process of creating them from the newest Penny Emporium. My cards measure about 10 by 15 cm.


So I usually start by defining what materials I will use, determine the main color scheme. This time I went for purple as my main accent. I also had the fimo flowers in my stash that I wanted to use. I call this step my personal mood board and I always start from here.


So I cut the base of my cards of the sizes 10 by 15 cm, and prepare the large element that will be the focal point of my card. The left one is from Noteworthy, the frame with this lady I fussy cut from the paper.


I really loved that BoBunny started to have their own chipboard, so I used the clock and covered it with a purple embossing powder, to match the initial color combo I picked


Started to build the layouts of my cards, I always try to place the elements closer to each other, not around the corners of my projects


Always loved fussy cutting, always will:) So all the roses below are fussy cut from the paper, also on this step I cut the small doily in halves and arranged it on the card as you can see on the picture below.


The dies from BuBunny are gorgeous as well, very feminine and elegant and of course I use them often on my projects.


I absolutely love the pearlescent pens, and they are perfect for adding those final touches to our projects. So I picked my favorite color- Sugar and used it around the flowers, leaves mainly.


And here is the look at our cards again, hope ypu have enjoyed my project. If you have any questions- I will be here to help you.


BoBunny supplies:
Patterned Paper: Penny Emporium, Gallery, Imagination, Woodworks/Penny Emporium
Noteworthy: Penny Emporium
Brads: Penny Emporium
Lasercut Chipboard: Timepiece
Doilies: 4'' Small
Pearlescent Pen Sugar
Dies: 3*4 Ornate Frame dies