Showing posts with label cardmaking. Show all posts

Friday, November 15, 2019

Christmas Cards with the Time and Place Collection

Hello BoBunny Friends,
it's Elena's turn to share Time and Place Collection Inspiration


I decided to make Christmas Cards using the paper sheet for December


I made a lot of fussy cutting from the both sides of the paper sheet.


But the background I made using only the paints and glitter paste


You can find my video process from start to finish here:


BoBunny Products used:
Patterned Papers: Time and Place/ December
Stencil: Winter Fun
Glimmer Spray : Gold
Glitter Paste: Gold
Jewels: Ruby Red, Emerald

Friday, October 11, 2019

BoBunny DIY Phrase Cards with Elena

Hello BoBunny Friends, Elena is here to show you some inspiration with the Boxed cards


I love creating cards and to fill them with the details. The boxed cards have ready to use background and all you need is to add the embellishments, stamping or something that you like.


Actually I do not use often alphas and letters in my projects, so this time I decided to make a try.


I combined using the punch board to create my alphas as well as the dies.
I started with die cutting from the card the word - Happy and wanted to add the words as - Birthday or something like that , but for this particular card I played mostly with the silhouette.


Then I added the silhouette on the inside part of the same word and the result is just great


For my 2 next cards I used the punch board and Lace Dot and Polka Dot papers


I also added a few embellishments from Noteworthy and Layered chipboard


and finished everything with the Jewels.


BoBunny Products used:

Boxed Cards
Patterned Papers: Double Dot/ Island Mist Lace, Dusty Rose Damask, Sugar Chevron, Aquamarine Double Dot
Noteworthy and Layered Chipboard - Boulevard
Dies: Triple Play Alpha, All Caps
Jewels: Double Dot Aqua, Think Pink

American Crafts
WRMK Mini Alphabet Punch Board
Sticky Thumb Foam Pads

Wednesday, September 18, 2019

How to Make Handmade Flowers with Denise

Hello BoBunny Fans

It's Denise here today to share how I make handmade flowers, using BoBunny cardstock. 

I created a Birthday card and used the flowers that I had handmade.

Boulevrad_Birthday Card_Denise_18 Sep 01

Here's a closer look at those handmade flowers.

Boulevrad_Birthday Card_Denise_18 Sep 02

The great thing about handmade flowers is that you can choose the shape, design and color to perfectly match any project.

I created a video of the process and I hope that you will see that it's really quite easy.


Thanks so much for stopping by the BoBunny blog today and we really hope to see you back for the next project. 

Have a marvelous day!


BoBunny Supplies:
Patterned Paper: De Belleville, Boulevard/ Boulevard
Cardstock: Blueberry VintageNoteworthy: Boulevard
Boxed Cards: Boulevard

Thursday, August 15, 2019

Christmas Treasure Dimensional Cards

Hello crafty friends!
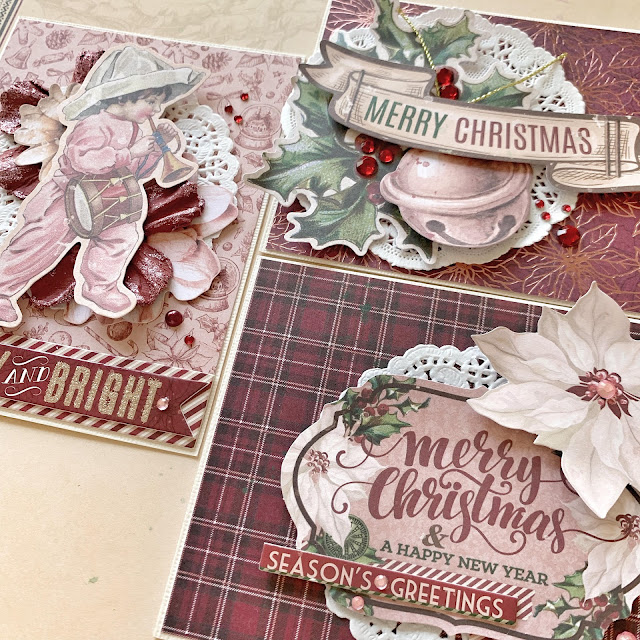
It's Angela with you to share some cards I made with the brand new Christmas Treasures collection by BoBunny. I know, maybe it's early to start working on Christmas project but this collection is totally amazing and I couldn't resist playing with it.

I love everything from Christmas Treasures, every single piece, from the papers to the die-cuts and the chipboards. It has a traditional style but with a modern twist thanks to its touch of light pink and of rose gold foil accents.

Christmas_Treasures_Cards_Angela_Aug15_01.jpg


For my today cards I use the 6" x 8" paper pad and all the cards measure 5,5" x 4,25". I also made a matching envelop for each card. To create them, I used the DoubleDot cardstocks suggested for this collection. You can find the complete list of the coordinate DoubleDot items here, in the Christmas Treasure launch post.

Christmas_Treasures_Cards_Angela_Aug15_02.jpg

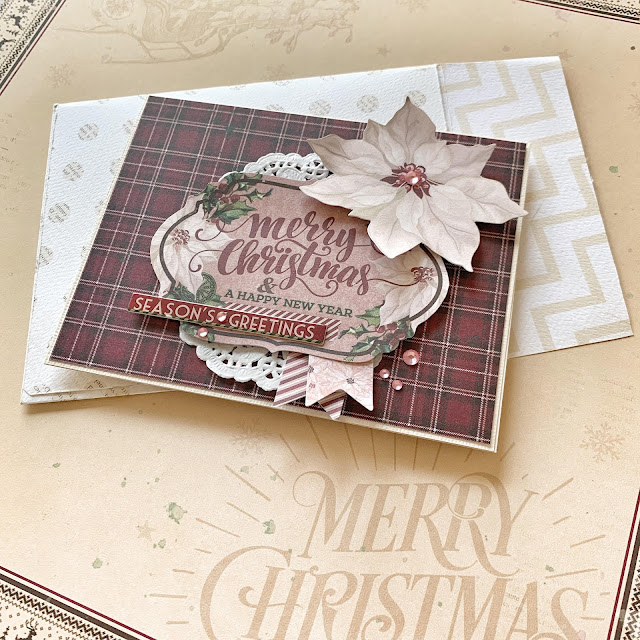
My first card is horizontal. Here, as well as in the other cards, I first created a panel out of patterned paper slightly smaller than the card base. To be precise, the front panel measures 5" 3/8 x 4" 1/8.

Christmas_Treasures_Cards_Angela_Aug15_04.jpg

I used a burgundy plaid paper for my base and in the center I placed a white doily. On top of it, I placed a die-cut with the sentiment Merry Christmas and I adhered it with foam tape.

Christmas_Treasures_Cards_Angela_Aug15_06.jpg

Then, I embellished all around with other die-cuts and layered chipboards and a few DoubleDot Jewels in pink. Last, I glued the finished card on a vanilla cardstock folded in two and voilĂ , the first card is done.

Christmas_Treasures_Cards_Angela_Aug15_07.jpg

For the envelop, I used wine vintage DoubleDot, with a faint gold damask on one side and gold polka dots on the other.

Christmas_Treasures_Cards_Angela_Aug15_08.jpg

My second card is pretty similar to the first even if the cluster of the embellishments is arranged on the left side.

Christmas_Treasures_Cards_Angela_Aug15_09.jpg

The card base is a gorgeous patterned paper in red with a design of poinsettias printed in rose gold foil.

Christmas_Treasures_Cards_Angela_Aug15_10.jpg

I placed a white paper doily on the left of the card and I layered some Noteworthy pieces. I added red strass on the berries of the hollies and a gold twine to the rose gold bell. For the sentiment I used a long banner with written Merry Christmas and I placed it on top of the composition using foam adhesive.

Christmas_Treasures_Cards_Angela_Aug15_11.jpg

The envelop of this second card is made out of a 12" sugar chevron DoubleDot cardstock. I chose a light color to match the stylish poinsettia and to make it pop.

Christmas_Treasures_Cards_Angela_Aug15_12.jpg

The third card is a bit different from the previous ones. It is vertical and the main color of the whole card is light pink.

Christmas_Treasures_Cards_Angela_Aug15_13.jpg

The vertical orientation is due to the die-cut piece I chose as main subject for the card, an old-style image of a cute baby musician.

Christmas_Treasures_Cards_Angela_Aug15_14.jpg

Underneath the musician, I created a layer of flowers. Two of these flowers are die-cuts and two are paper blossoms that I enriched with a touch of pink glitter paste spread on the surface.

Christmas_Treasures_Cards_Angela_Aug15_15.jpg

The sentiment Merry and Bright is from the layered chipboard pack of the collection. It has the traditional colors of Christmas, red and gold that match perfectly with the pinkish of the card.

Christmas_Treasures_Cards_Angela_Aug15_16.jpg

Here, I also chose pink for the envelop. I went for Dusty Rose Damask cardstock so to keep consistent with the main color of the card.

Christmas_Treasures_Cards_Angela_Aug15_17.jpg

That's all for today my friend. Thanks for stopping by. I hope you liked my cards and feel inspired to create with the beautiful Christmas Treasures collection.

Christmas_Treasures_Cards_Angela_Aug15_18.jpg

Love,

Angela


BoBunny Supplies:
6" x 8" Paper Pad: Christmas Treasures
Noteworthy: Christmas Treasures
Layered Chipboard: Christmas Treasures
DoubleDot Cardstock: 12" Wine Vintage/ Sugar Chevron/ Dusty Rose Damask
DoubleDot Jewels Strass: Ruby Red/ Think Pink
DoubleDot Blossoms: Wild berry Bouquet
Glitter Paste: Blush
AC Cardstock: Vanilla

Friday, March 8, 2019

Make Handmade Cards Under an Hour with Angela

Hey dear crafty friends! It's Angela here with you today. I have a quick project to show you, that I made using the new gorgeous Bee-utiful You collection by BoBunny. It's a bunch of cards I made in less than one hour, simple but beautiful and no measuring is required! Are you ready? Let's start! 

Bee-utiful_You_DIY_Cards_Angela_Mar08_01.jpg


My first step to save time was the paper. I alway struggle to measuring paper sizes, card bases and things like that. This time, I figured it out using te 6" x 8" Bee-utiful You paper pad! It has twelve different patterned papers, perfect for card making. I grabbed my preferred designs and I folded each one in half and I ended up with a 4" x 6" card. How simple is it?

Bee-utiful_You_DIY_Cards_Angela_Mar08_02.jpg

Then, I chose a few die cuts from the Bee-Utiful You Noteworthy pack and for the first card I went with this flower which has a hole in the center. It was perfect to create a tiny shaker flower. I used a die from All Occasion Senentiments dies set and I cut the word Thanks and a couple of hearts out from a piece of gold foam.


All the cards I made have a sentiment also inside. Here I used a stamp from the Expressions Stamps, stamped it in black Versafine and added a little glitter heart.

Bee-utiful_You_DIY_Cards_Angela_Mar08_04.jpg

For the first card I chose a honeycomb pattern and a bee cut out. To move to the next level, I sewed by hand the design of the fly of the bee and added the word Hugs from the same All Occasion Sentiments die set. If you can't sew or you don't have time enough to do it, you can simply draw it using a black liner.

Bee-utiful_You_DIY_Cards_Angela_Mar08_05.jpg

To cover the back of the stitch visible in the inside of the card, I cut a piece of white paper slightly smaller than my card and adhered it with some adhesive. On the same paper I stamped the sentiment this time from the Quotations Stamp set.

Bee-utiful_You_DIY_Cards_Angela_Mar08_06.jpg

Based on the same stitching idea of before is the second card. The patterned paper is a cream polka dots patterned on which I stitched the stems of three flowers. I added the word Celebrate in glitter, using the All Occasion Sentiments dies and a few Pearlescent dots in Sugar color.

Bee-utiful_You_DIY_Cards_Angela_Mar08_07.jpg

Inside the card, I chose another beautiful sentiment from the Quotations Stamps, stamped on the white paper I used to lining the inside.

Bee-utiful_You_DIY_Cards_Angela_Mar08_08.jpg

Again bees for my forth card and a layer of pieces form the Noteworthy pack like the honeycomb. I cut the word Enjoy from the Charcoal Double Dot paper and from a piece of black fun foam. I glued the two pieces together to make the sentiment stand out.

Bee-utiful_You_DIY_Cards_Angela_Mar08_09.jpg

Since in this card there's no stitching, I didn't need to lining so I stamped directly on the card. In fact, the papers from the 6" x 8" paper pad which is another plus for card making!

Bee-utiful_You_DIY_Cards_Angela_Mar08_10.jpg

The fifth and last card is definitely the quickest. I only used die cuts, a doily and a sticker and glued all together. I love the quote of the banner and even more the quote I stamped in the inside of the card.

Bee-utiful_You_DIY_Cards_Angela_Mar08_11.jpg

Thank you so much for stopping by today, I hope you liked my quick and easy cards and you feel inspired to create your own.
Love,
Angela


BoBunny supplies:
6" x 8" Paper Pad Bee-utiful You
Double Dot: 12" Charcoal
Noteworthy: Bee-utiful You
Layered Chipboard: Bee-utiful You
Combo Stickers: Bee-utiful-You
Doily: Small size
Pearlescent: Sugar, Butterscotch, Brilliant Blue
Stamps: Expression, Quotations
Dies: All Occasion Sentiments

Wednesday, January 30, 2019

Creative Cards: 12 Month Card Series

Hi Crafty Friends!!

Here is Elisa from Italy! Today I want to share with you my new project, realized with the wonderful Banner Year collection!! It's time for some Creative Cards!!!

All the papers in this collection are so beutiful, so I was not able to decide: Could I use June? Or May? Or December?
Well, I took the best decision!!! Why not realize a 12 months card series?? Have a look at them all together:


Well... Now let me describe you how I realize them!! I used supplies by the Banner Year Collection (12x12 papers, 6x6 pad, Noteworthy, Adhesive Layered Chipboard,Combo Stickers and Thickers). Same recipe for all the cards:
Card base realized with 6x6 paper (cut at 4" x 5 1/5");
main embellishments: I used the "not calendar elements" cut by the 12 x 12 papers (so le long stripe on the top and some of the cards on the right side of the paper... look at the picture below): I really had much fun with a lot of fussy cutting!!


Little embellishments: Noteworthy, Adhesive Layered Chipboard,Combo Stickers and Thickers, try to use the right theme for every month.

(Card size 4 1/4" x 5 1/2" realized with Bazzill Kraft)

Let me now show you all the cards:


I hope you enjoy them!! And let me know which one is your favorite!!!


Elisa


BoBunny supplies:
Banner Years 12" x 12" papers (all months)
Banner Years Single-Sided Paper Pad 6"x 6" 36/pkg
Banner Years Noteworthy Die-Cuts 69/pkg
Banner Years Combo Stickers 12"x 12"
Banner Years Thickers Stickers 94/pkg
Banner Years Adhesive Layered Chipboards 7/pkg
Stencil Whimsy
Black Gesso

Other supplies:
American Crafts Sticky Thumb
Bazzill Kraft
Bazzill Cream Puff