Showing posts with label Kathi Mann. Show all posts

Sunday, July 16, 2017

Cocoa and S'mores Goodie bags- with Kathi


Kathi here to share with you my s'mores and cocoa summer treat bags. I created these using one BoBunny's Spring Collection Weekend Adventures and Bear Necessities Dies. With summer time camping and late nights out by the fire pit  smore's and hot chocolate are a perfect match.

These treat bags are easy to create and fast to assemble. A good project to get the kids making with you.

Cocoa and Smore's Treat Bags

Cocoa Treat Bags

The treat bags were cut using a treat bag die using "Picnic" patterned paper and the large treat bag was hand cut out of butcher paper.


I cut the bear out twice one in brown and one in the patterned paper, I layered over the brown bear making sure the brown bear stayed in tact so the pattern would show through. I cut out the sentiment from the "Good Vibes" patterned paper and placed it in the upper right of the treat bag. Finishing off the cocoa treat bag with a die cut lantern that I tied on with butchers twine.


Smore's Treat Bag 

The two treat bags were then tied together using butchers twine, stuffed with goodies ready for the campfire.


BoBunny Supplies:
Patterned Paper: Weekend Adventures
         Weekend Adventures
          Picnic
          Good Vibes
Craft Dies: Bear Necessities

Thank you for spending time with us today, have fun this summer by the campfire and make lots s'mores 

Kathi

Saturday, June 17, 2017

Weekend Adventures and Cards, Cards, Cards! with Kathi


Hello Fellow Crafters,

Thanks for joining me for Paper Crafting Saturday today. I have made four cards using the paper line Weekend Adventure by BoBunny.


Four Fun Cards


Card 1 -

 The base card is using the coordinating Double Dot cardstock paper, Avocado Dot.  The next layer I used Weekend Adventures. The third layer is a dark green paper that was embossed using a tree die I had,  with the trees then lightly distressed with fine sandpaper.   Then the new craft die Bear Necessities was used to cut out the bears. The bears where layered on top of tan and brown bears.  The bears were distressed on the edges with chalking ink. The sign was created out of light brown paper then it was embossed using a wood grain embossing folder then distress with chalking ink. Then sentiment was stamped on white card stock then punched out and placed on top of the sign using pop dots. The small fish where cut out of WA picnic then distressed with brown chalking ink. Placed on the card with a brad. The small lake peaking out on the lower left  was created with blue card stock and Caribbean Glitter paste. Jute was used on the lower part of the card for the finishing touch.


Card 2-

I use Weekend Adventures "Blooms" as the bottom card base that measures 6 X 43/4" topped with a dark green card that has been embossed with a chicken wire embossing folder.   The dark green measures 5 3/4  X  4 1/4.  Weekend Adventure  Picnic was used with the new card craft die "Congratulations" was used to die cut the sentiment.


Card 3 -

I used Weekend Adventures Fly Away.  This is a 5 1/2" X 5 1/2 card. The base is a soft blue paper. layered with 5 1/4 X 5 1/4 panel, using two strips from the Weekend Adventures Bear Hug paper. The top one was fussy cut and placed at the top of the paper and the second one placed at the bottom. I used the carousel and two butterflies from the Weekend Adventures layered chipboard. The card was finished with an oval sentiment distressed with distress ink then adorned with silver confetti paste.


Card 4 -

Is a 5 1/2 X 5 1/2 yellow base card. Then layered with Weekend Adventures Swingset paper with a third layer being a soft blue. Both layers are distressed with a reddish chalking ink. A kite was created with weekend adventures papers Stripe and Road Trip. The kite tail is just some generic bakers twine.  The sentiment was stamped with archival ink with distressed edges.layered on the Stripe paper.  To finish the card, a layered chipboard banner and sentiment from the Weekend Adventures Good Vibes paper.


BoBunny Supplies:

Patterned Paper: Weekend Adventures-various

Double Dot: Avocado Dot, Powder Blue Dot (reverse)

Layered Chipboard: Weekend Adventures

Craft Dies: Bear Necessities""Congratulations"

Confetti Paste: Silver

Glitter Paste: Caribbean


Thanks for stopping by,

Kathi Mann Designer

Tuesday, May 16, 2017

Serendipity and Pentart Two Step Crackle Paint with Kathi


Kathi here today sharing with you this adorable altered wooden box with mixed media  products. I used the new Serendipity paper line, which boasts very soft pastel colors with a big hint of spring. The technique that I decided to use was a crackle paint technique. This is one of my favorite techniques.  It's quite versatile and gives such a cute, distressed look and feel.


The finished box.


Applying the crackling system in this photo.


A close up of the finished crackling technique.


I used the crackling system on the front of the box as well, as you can see the paper comes through on the crackling lines.  I layered an element from the layered chipboard collection.


Applied chipboard flourish on the sides of the box,


On this side I place the chipboard flag banner as well as butterflies. This view you can see both the crackling on the wood as well as the paper line. I hope that you will try this technique out, it is simple and fun. The box was finished with blossom flowers an cut outs from the paper line,  sugar glitter paste was placed on the eggs in the bird nest.


BoBunny Supplies Used:

Patterned Paper: Serendipity;  - Love - Songbird

Chipboard: Serendipity

Layered Chipboard: Serendipity

Crackle Paste Primer

Cracking Paint System-Victorian Pink

Blossoms: Wildberry Dahlia

Glitter Paste: Sugar


Saturday, May 13, 2017

Down by the Sea-Mermaid Card Mania with Kathi


Hello BoBunny Friends!  It's Kathi here today to share with you three
 nautical themed cards I created, each card is 6" x 6".  Here we go! 


Card #1


Card #1 
I layered two of the papers after distressing the edges with chalking ink,  I used glitter paste sea-foam on a piece of sea shells chipboard using gold confetti paste to embed the shells in sand.  The sea shells and crab was cut out of paper to make them stand out.  Then, I placed a chipboard sentiment on the top of the card.  I love how this turned out.  The Confetti paste was my favorite part. look at the chunky sparkle!


Card # 2


I had fun using the Ever After die to create  the sea weed in which the seahorses are swimming. I used a die from my stash to cut the large seahorse to go along with the chipboard seahorse. Adding a chipboard sentiment "Take me to the Ocean" to finish off the card.

Card #3


Card # 3 has layers and layers of paper from the Down by the Sea paper line.  I wanted some extra texture, so I crackle painted the middle layer. I had a fun Sun chipboard that I used the crackle primer on then used the two component Pentart crackle paint system. The color of step #2 of the crackle system is a Victorian Pink. I then cut out "Let's Be Mermaids" out of one of the 12x12 papers and layered it over the sun. I think it looks like some crazy floating sea kelp or even an octopus.  I then cut out sea life and mermaids from the paper line and used the "Ever After" die to cut the seaweed, then layered a chipboard sentiment below the seaweed and added Pearlescents to the sea-life and glitter paste to the mermaids.

Come back and see us soon!  
Kathi

BoBunny Supplies:

Down by the Sea-Life's A Beach

Patterned Paper: Down By The Sea, Mystical, Fantasy, Lagoon

Layered Chipboard: Down by the Sea

Glitter Paste: Sea-Foam

Confetti Paste: Gold

Take me to the Ocean

Patterned Paper: Plunge, Tide, Fantasy

Confetti Paste: Gold

Craft Dies: Ever After (Seahorse from my stash)

Let's Be Mermaids

Patterned Paper: Down By The Sea: Plunge - Tide - Fantasy

Layered Chipboard: Down By The Sea

Craft Dies: Ever After

Glitter Paste: Sea-foam - Sugar - gold

Cracking Paint System 1 and 2 Victorian Pink

Crackle Paste Primer

Pearlescents: Sugar


Thanks for stopping by

Kathi

Thursday, March 30, 2017

Make A Splash and Pentart Iron Paste with Kathi


Hello BoBunny Fans!

Kathi here to share my layout 3 ways, using Make a Splash patterned paper with Pentart Iron Paste, and BoBunny Glitter Paste, Glimmer Spray, and Gesso.

12 X 12 "Floating" patterned paper is the base paper for the layout, and "Happy"patterned paper was used to create the water pipe. Sentiments from the "Sayings" pattered paper were cut out and placed along the left side of the page.

On layout 1- waves were cut out from the patterned paper "Sandcastle" and layered on the bottom. A hint of glimmer spray was sprayed on to soften the waves. I created a water pipe from the patterned paper "Happy"and Iron paste was used to create the pipe connectors, I applied the iron paste using a paint brush. Gold pearlescent dots finished the pipe connectors on each water pipe.


On layout 2 - the waves were distressed with a royal blue chalking ink before placing it on the bottom  of the page.  "Frost" Glimmer spray was lightly spayed on the base layout.


On layout 3 - the waves were distress as in layout 2 , then "Caribbean" glitter paste was added to highlight the waves. Under the photo and top of the pipe I created a design to look like a chain link fence. I used the "Cascade" stickable stencil and "Frost" glimmer spray. Under the sayings I stenciled fish using white gesso and "Under the Sea" Stickable Stencil. I finished off the layout  using chipboard & noteworthy shapes


Thanks for stopping by today!

Supplies Used:

Patterned paper: Make a Splash - Sayings, Sandcastle, Happy, Floating,
Chipboard: Make a Splash
Noteworthy: Make a Splash
Stickable Stencil: Cascade
Glimmer Sprays: Frost
Glitter Paste: Caribbean
Pearlescents: Gold
Pentart: Iron Paste
White Gesso

Monday, February 20, 2017

Faith and Pentart Lasur Indoor/Outdoor with Kathi


Kathi here today share with you an altered wood case using BoBunny Faith collection. and Pentart  Indoor Lasur Gel in Blue. I am sharing with you how I made the flowers and put the rest of the shadowbox


Aerial view of the case


Front side view Faith "Blessings" is the paper used all the way around the sides of the case. Highlighting sections of the larger words on the paper.  The wooden case was prepped by mixing the Blue Lasur indoor gel with white gesso, covering the inside and the outside of the case.


The technique I used to create the flowers, I first choose the dies to be used on the flowers then cut many different sizes out of the patterned paper,  each flower was layered with 3-4 layers of flowers making sure that each one was larger than the one before it. Each individual layer was shaped by using a thin dowel or just by pinching each pedal to give the paper more texture and shape. A brad was then inserted into the center of each flower. Each flower was finished by adding glitter glue to the tips of each pedal.

The case was finished by adding layered chipboard pieces to area's on the top of the case. 


BoBunny Supplies Used:
Pattered Paper: Faith
      Faith Blessings
      Faith Fear Not
      Faith Be Still
      Faith Courage
Brads: 
     Tuxedo
     Think Pink
     Aqua
     Emerald
Chipboard: Faith
Layered Chipboard: Fatih
Craft dies:
     BoBunny - Perfect Pedals
Glitter Paste:
      Blush
      Silver
Pentart Supplies Used:
     Lasur Gel - Indoor Blue
     Creamy Acrylic-white

Thank you for joining me today.
Kathi
    

Saturday, February 4, 2017

Life in Color and Pentart Media Inks with Kathi


Kathi here today to share with you my Valentine Cards in a heart tin. I added media ink to the top of the lid with an applicator using a dabbing technique.


Both cards inside of metal tin heart.\


The fronts of the cards have three layers, card stock, light chipboard then patterned paper. The front of the cards were then prepped using gesso.  Then structure paste was used with the Cascade Stickable Stencils to create texture on the cards. At that point,  I mixed Dekor Paint Soft in Denim and Creamy Acrylic in White to paint over the texture. Olive media ink was used to color the metal butterfly and magenta media ink on the metal flower. Creamy Acrylic in Metallic Red Copper was used to color the wood chipboard words and the flowers were cut from Life in Color paper using the Perfect Petal dies with Aqua and Emerald brads. Embellished with chipboard, I then die cut a crown using Royal dies. The chipboard lock and key as well as the crown was accented using glossy accents.


Gold media ink was used to color the metal flower, then finished with an aqua brad. The chipboard lock and key was accentuated with glossy accents. Perfect Petal die was used to create all the flowers from the paper collection with varied colors of Double Dot brads in the center of each.


Using the bead paste and adding Morning Glory media ink, then mixing in the 3D powder and 3D balls.  I added this fun texture to the upper right side of one of the cards creating a cool effect and finishing it off by dabbing it with Dekor Soft in Denim paint. Dripping media ink in Olive, Morning Glory and magenta over the finished texture then positioning the word "Love" over the 3D balls.


As a final touch, Olive and Magenta media inks were used to color the metal embellishments, I hope you like this project. Such fun to play with colors and textures!


BoBunny Supplies:
Patterned Paper : Life in Color
Chipboard: Life in Color
Double Dot Brads: Aqua, Emerald
Craft Dies: Royal Dies, Perfect Petals
Stickable Stencils: Cascade Stickable Stencil
Mixed Media Products: Gesso (white),

Pentart Supplies:
Media Ink: Magenta, Olive, Gold, Lilac, Morning glory
Bead Paste
3D Powder
3D Balls
Structure paste
Dekor Paint Soft: Denim, Cream White, Cappuccino
Creamy Acrylic: Red Copper

Friday, December 30, 2016

Kiss the Cook and Pentart Chalkboard Paint with Kathi


Kathi here today to share with you my altered project, "Kiss the Cook Message Board".   I'm excited to use this in my own kitchen for messages, recipes, grocery lists or just doodles while I sit at the table chatting on the phone. 


The first thing I did was sand the board and take out the center panel, Once the center panel was removed and sanded I painted it with Pentart White Gesso then painted over the Gesso with Pentart Chalkboard Paint in Green


 I created the banner using the Kiss the Cook combo sticker page, which reads "Lets Eat".   Around the arch of the board I placed the letter stickers to read KITCHEN. I painted the frame with Pentart Dekor Paint in White.


I then embellished  the bottom of the board with the ticket stickers and cut out from the paper line along with red and yellow blossoms


BoBunny Supplies:
Patterned Paper: Kiss the Cook - "Delicious" and "Baked Fresh"
Stickers: Kiss The Cook Combo Stickers

Pentart Supplies:
Pentart Chalkboard Paint - Green
Pentart Dekor Paint -  Creamy White
Pentart Gesso - White


Thursday, December 15, 2016

BoBunny and 3L Blog Hop with Katherine, Marilyn and Kathi


 3L is joining us for our Blog Hop this week with more fabulous adhesives and darling projects! Feel free to check out what they are doing on their blog today! https://www.scrapbook-adhesives.com/blog/2016/12/15/2016-blog-hop-with-bo-bunny-day-4/

GIVEAWAY!! Be sure to leave a comment on this post for a chance to win one of three $25 prizes. Winners announced the week of December 19-23, 2016.  Good Luck!

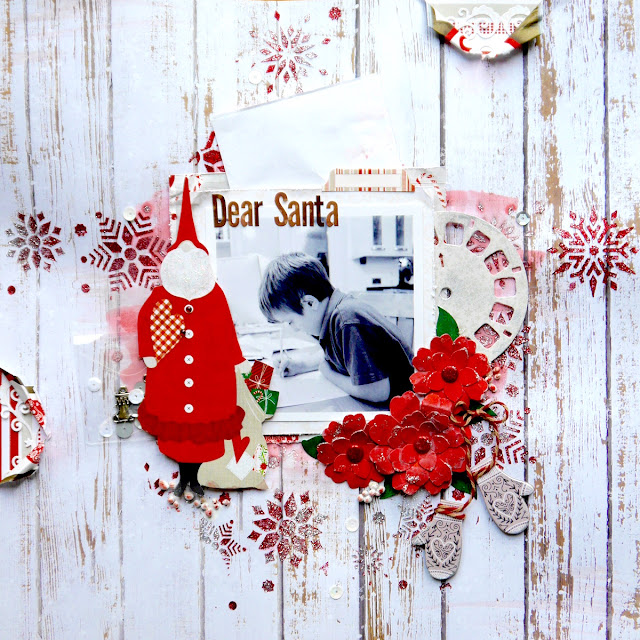
Hello and welcome to the 3L Scrapbook Adhesives and BoBunny Blog Hop.  I've created a page using Merry and Bright along featuring some of the keepsake envelopes from 3L.

"Dear Santa" by Katherine Sutton

Dear Santa Scrapbook Page by Katherine Sutton using BoBunny Merry and Bright collection

I started my page with both the Ruby Red and Silver glitter paste with the Winter Fun Stickable Stencil.  I then used some of the Pentart Creamy Acrylic paint in Red which I watered down to give a wash behind where my photos were going.  I cut down some of the Merry and Bright papers and in-between sandwiched one of the large Keepsake Envelopes as this holds the letter my son was writing - I trimmed off to the flap to the envelope and added a little tag from the stickers.

To embellish my page I used one of the smaller Keepsake Envelopes and filled it with sequins and metal embellishments, then fussy cut Santa and die cut several flowers with the BoBunny Perfect Petal Dies, I placed a brad in the middle and then added some silver glitter paste too.  I wrapped twine around my chipboard gloves so they were hanging from the flower embellishments and also added some of the Pentart 3D balls which I coated in red, silver and white acrylic.  I also added in some bead paste too for s tiny touc of iridescence.

Dear Santa Scrapbook Page by Katherine Sutton using BoBunny Merry and Bright collection

When I used my Winter Fun stencil I added a mix of silver and red glitter paste to get two-tone snowflakes

Dear Santa Scrapbook Page by Katherine Sutton using BoBunny Merry and Bright collection

I added a little bit of silver acrylic paint and then glitter paste to my die cut flowers, curling the petals and leaves.   I added some more interest to the embellishment pile with 3D balls and bead paste.

Dear Santa Scrapbook Page by Katherine Sutton using BoBunny Merry and Bright collection

This shows the letter that is safely tucked behind my photo in a protective envelope as a fun bit of memorabilia


Bo Bunny Supplies:
Patterned Paper: Merry and Bright, Reindeer Games, Father Christmas and Festive
6 x 6 Paper Pad: Merry and Bright
Chipboard: Merry and Bright
Stickers: Merry and Bright
Stencil: Winter Fun
Glitter Paste: Silver and Ruby Red
Dies: Elegant Birder Die, Perfect Petals, Picture This Die
Brads:Ruby Red

Pentart Supplies: 
Creamy Acrylic: Grey, Silver and Red, 3D Balls-small, Bead Paste

3L Scrapbook Adhesives Supplies:
3D Foam Squares
Keepsake Envelopes
E-Z Runner


"These Precious Moments" by Marilyn Rivera
Hello there! Marilyn here to share with you my project for the Bo Bunny-3L Adhesives Blog Hop.  I made a mixed media page with lot of layers and many different dimensions. I worked with the Felicity collection...LOVE!   I specifically chose the Felicity Lattice paper and with a craft knife I cut some of the flowers as you can see in the photo below. I also cut out some flowers from the Felicity  and some clocks from the Serendipity papers.
I worked with the 3L Crafty Foam Tape to create dimension in my flowers, the clocks and my photo . This foam tape is perfect-not too bulky or too flat and is the perfect dimension and the best thing is it's a strong adhesive.
You can see from this angle the dimension in the layers. I added textures in the background with the Flower Power Stickable stencil and white gesso. Then I painted with acrylic paints and added the 3D balls with gel medium from Pentart products.
"These Precious Moments" is a sticker from the Combo Stickers sheet from the same collection that I matted with a piece of paper and used as my title. 
Bo Bunny Supplies:

Felicity Collection- Pattern papers: Felicity, Lattice, Serendipity,

 Felicity Combo Stickers

Bo Bunny White Gesso

3L Scrapbook Adhesives Supplies:

Crafty Foam Tape

Pentart Supplies:

3D balls, Creamy Acrylic-blue, Primer Paste gesso white


"It's The Season" Loaded Envelope by Kathi Mann


I created the envelope using white card stock, gluing them together using 3L adhesives, covering the envelope with "Tis the Season" pattered paper.  I embellished this side with Tis the Season chipboard creating a banner with the chipboard and bakers twine. Then, I finished it off with laces and  trims. Filling the pocket with large tags and goodies.


On the front of the loaded envelope I used a vellum "Joy" then some lace and trims to dress it up. I curled over the centers after cutting a slit adding holes to lace up the front.with an organza ribbon, then filling the pocket with more large tags and goodies.


Bo Bunny Supplies:
Tis the Season patterned paper,
Tis The Season Combo Stickers
Tis the Season Layered Chipboard
Tis the Season Vellum Sheet

3L Scrapbook Adhesives Supplies
3L Foam tape


Connect with Bo Bunny Press:
Website – www.bobunny.com