Showing posts with label Noteworthy. Show all posts

Wednesday, January 16, 2019

Winter Getaway: Layout with Elisa

Hello everyone, crafty friends!!

Here is Elisa from Italy! Today I'm here for sharing with you my first project for BoBunny!! What an excited moment for me!
So, let me introduce you the Layout "Sweet Winter": I used the wonderful collection Winter Getaway. When I saw for the first time this paper collection I immediately thought about how much wonderful the colors are. These colors spoke to me about warm sweaters, cabins in the wood, hot chocolate in a giant mug and footprints on the snow.


The background of the LO is the Homestead Cardstock 12"x12": I blended some white gesso with a gauze behind the right part of the cardstock, for highlighting le place where I decided to put my picture (blend gesso with a piece of gauze is great to achieve a gentle textured effect).

I cut the other elements of the LO from Branches and Retreat Cardstocks 12"x12" (I used them to realize the picture frame, the bend on the right side of the LO and the ornament with banner on the left side).

For the title I used the Chipboard Alphabet Stickers... The Font is really nice, and the little snowflakes give them a very icy effect!!!


I gave movement to the picture frame, ripping the edges and pasting additional flowers which end outside the original square. I also chose some wonderful brads by the collection as embellishment.


I added to the frame trees other two pines by the Noteworthy pack, using some foam adhesive (Sticky Thumb):


You can find these little cabins in the Noteworthy pack too:


I really love this banner and the sentiment on it...
For the background I used the 6"x6" cardstock with multiple patterned stripes on it: I cut all those thin stripes with different lenghts and pasted them behind the little double banner with deers (I chose it, because it has the same pattern of the bigger band on the right side of the LO, but it's smaller).


As embellishmets I used some other brads and little flowers by Noteworthy:


I hope you enjoy this project!!  Till next time!!


Elisa


BoBunny Supplies:
Winter Getaway Homestead Cardstock 12"x12"
Winter Getaway Branches Cardstock 12"x12"
Winter Getaway Retreat Cardstock 12"x12"
Winter Getaway Single-Sided Paper Pad 6"x6" 36/pkg
Winter Getaway Noteworthy Die-Cuts 55/pkg
Winter Getaway Brads Die-Cuts 23/pkg
American Crafts Chipboard Alphabet Stickers 188/pkg
BoBunny White Gesso

Other Supplies:
American Crafts Sticky Thumb

Thursday, December 20, 2018

Pockets Full of Christmas Treasures with Irit

Hello my dear crafty friends!
Irit is here today and I welcome you to my new Christmas in September post.
I know that Christmas is still far away, but new BoBunny adorable Christmas collections are here and now and this is a time to share our new Christmas projects with you all.
So today I made this card full of pockets added on the card front and filled with topper and tags.
 I used this Christmas in the Village collection and I am really in love with  this collections lovely graphics and non- traditional Christmas colors.


I used this collections cardstocks, Combo stickers, Layered chipboards and Noteworthy die cuts and added a few die cut pieces made with BoBunny dies. Some more BoBunny embellishments were added over the tags and toppers.
You can see the whole " collection" that fits three card pockets here.
You can use some to go with your presents or to add them to your other Christmas decorations; you can also use the tags as your Christmas tree ornaments.


Here is the pocket card with 3d pockets that were made with Double Dot cardstock and covered with Christmas in the Village collection cardstocks.
I added some Combos stickers and Layered chipboards over the  pockets front and this can be kept as an organiser for the later use.


 Here are the oval toppers made with Double Dot cardstock and patterned cardstock on the top.


 Two large tags for the upper pocket are here:


And three medium sized tags here:


 And the last, but not least- three small tags that were added inside the lower pocket.


 So here is this beauty full of treasures again- full standing as  it is actually the standing card.


Product list:


Double Dot Wasabi 12'' cardstock
DoublE Dot Pink Punch 12'' cardstock
Double Dot Blue Vintage 12'' cardstock
Double Dot Brilliant Blue 12'' cardstock
Christmas in the Village collection 12'' cardstock: Merry, Ornaments, Square, Houses, Christmas in the Village
Christmas in the Village Layered chipboards
Christmas in the Village Combo stickers
Christmas in the Village Noteworthy die cuts
Nested Terrific tag dies
Banner tag dies
Darling Doily die

Congratulations card dies
American Crafts Sticky thumb glue runner
American Crafts Sticky thumb 3d foam glue

Saturday, December 8, 2018

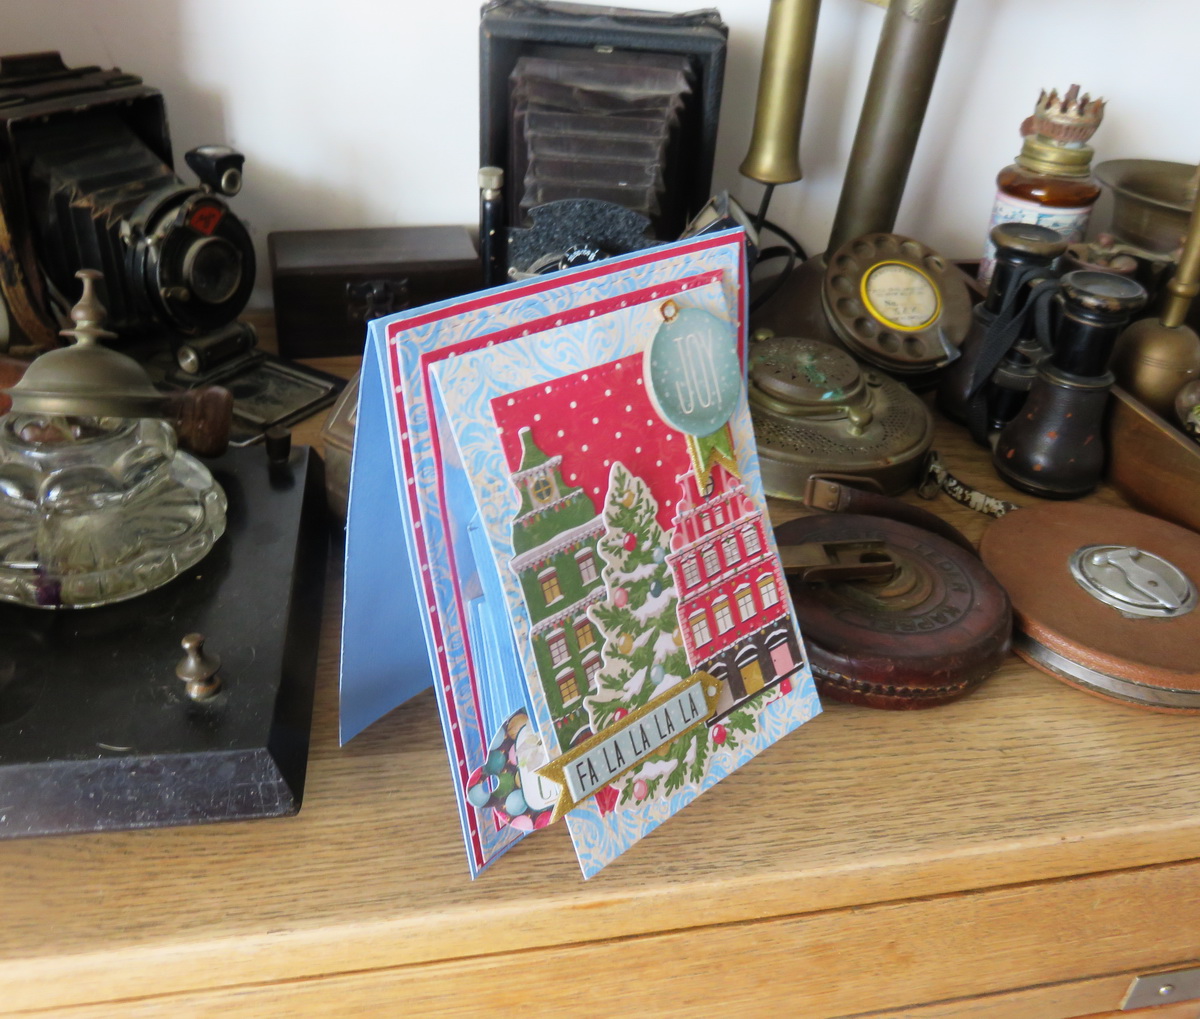
Fa La La La Christmas Card with Irit

Hello my dear crafty friends!
Irit is here today and I welcome you to my first Christmas in August post.
The new BoBunny adorable Christmas collections are here!
So today I made an interactive and very fancy card and there is a full video tutorial too, so you can recreate my card if you like it. I used this Christmas in the Village collection and I am really in love with this collections lovely graphics and non- traditional Christmas colors.
My card this time has no Mixed Media add- ons, it's easy to make, and fits each and every crafter.
This is how it looks when standing as a regular card:


But wait- you are going to be amazed!
Let's open the topper :


 And now it's full opened!


Usually this kind of a card is made without  all bottom layers; the pop- up part is the actual card where you write the greetings.
I made it in a bit more layered style: the pop- up part is just the card topper/front and then there are a few more cardstock layers and the actual light blue card where you add your greetings/sentiments/ thoughts or whatever you wish.
 So here you can see all the layers on this standing card:


And if you want to try to make this  kind of card- HERE is a video tutorial for you to use.
Just a word about it: in the video the final part was mis- glued upside down and there were no way to change it in the video. But the final project was re- done and the pop- up part is glued in the correct direction.
As the video is mostly to teach the mechanism of this card the inside ornaments direction is not the issue and you can see the finished re- done project without any mistakes.


Product list:

Christmas in the Village 12'' cardstock Ornaments, Countdown
Chriastmas in the Village Combo Stickers
Christmas in the Village Layered Chipboards
Christmas in the Village Noteworthy die cuts
Double Dot Powder blue Damsk 12'' cardstock
American Crafts Light blue texture  solid cardstock 12''

I really hope that you like my card and my tutorial and see you in a week with more wonderful BoBunny Christmas projects

Irit


Tuesday, July 31, 2018

Adventure This Way Layout with Marilyn

Hello everyone!!

Marilyn here with you today to share a layout with the video tutorial that I created with the Jungle Life collection. I'm an animal lover and one of my favorites things to do is visiting the zoo. I made this page about this adorable giraffe.
I started my page cutting a 5" by 12" piece of the giraffe paper. I cut out some images like leaves and animals from the papers and adhered foam tapes behind of each image, it gives dimension and a realistic look to the page. I made layers with the different images and papers.

I distressed with the green ink from the Color Wheel by Vicky Boutin the edges of the frame from the Noteworthy package and adhered the photo to the center.

I stamped some leaves on the background using the new Simply Flower stamp and the Color Wheel inks.  I took a paint brush to blend the same green ink around the images, it creates a dimension effect on the background .

I used the layered chipboard and the Noteworthy die cuts on my page.

Finally, I added some pearls and gave white paint splatters. If you want to see how I created this page don't miss the video tutorial down below. I hope it inspires you, Thank you so much for visiting us today.
Until next time!
Marilyn


Bo Bunny Supplies:
Pattern Papers: Jungle Life- Jungle Life, Giraffe, Animals, Atrium
Chipboard: Jungle Life
Noteworthy: Jungle Life
Stamp: Simply Flowers
Stickers: Jungle Life
Double Dot Jewels: Mocha Jewels
Inks: Color Wheel Vicky Boutin
Sticky Thumbs: adhesive foam dots, runner tape

Friday, July 27, 2018

Escape to Paradise Cards with Marilyn

Hello everyone!

Marilyn here to share with you three cards that I made with the beautiful Escape to Paradise collection. It was so fun to work with this collection the images are adorable, let's take a look...
My first card is 5 1/2" by 4 1/2" inches. I started cutting a rectangle from the flower paper then I cut a circle to create a window. I adhere this flower paper to my card base.

I stamped some flowers in a white cardstock using the Simply Flower stamp and the Color Wheel Inks by Vicki Boutin. I cut out the flowers with the scissors and adhered them to the card.

I adhered a few of the flowers with adhesive foam dots to create dimension. The adorable flamingo is from the Noteworthy package, I just cut it out  from one of the die cuts and the sentiment from one of the paper. Once I made the composition, I adhered all the pieces and for the final touch  I made some dots with the pearlescents in coral and blue colors.

My second card is fun and easy to do. It's the bigger of the three cards, it is 7 1/2" by 4 1/2" inches. I cut another circle to create a window in the blue paper when I can show the adorable fish that are from the sticker sheet.
I'm using the Noteworthy die cuts and the sticker to make this card, it's so easy to work with it. I added some dots with the pearlescent to give the effect of water bubbles.


Finally, I made the dotted lines with a black gel pen.

I love this paper with the pineapples, it reminds me of the delicious "Pina Colada" and the Caribbean beaches. It is a simple card with many layers that I highlighted them with the dotted lines. I cut a square 2 1/2" by 2 1/2" inches in a black cardstock and adhered to the center.

I used the Layered Chipboard in this card. I can't resist to use the adorable pineapple with the brilliant crown.

I cut and adhered two tiny flowers from one of the papers, added some dots with the pearlescents and a few sequins.

Here are the three cards, I hope they inspire you! Thanks you so much for stopping by...until next time!
Marilyn

Bo Bunny supplies:
Papers: Escape to Paradise- Escape to Paradise, Dreamy, Aloha, Pineaples, Waves,
Chipboard: Escape to Paradise
Noteworthy: Escape to Paradise
Stamps- Simply Flower
Pearlescents: Butterscotch, Coral, Brilliant Blue

American Craft supplies:
Inks- Vicky Boutin
Sticky Thumb: adhesive foam dots, runner tape


Monday, May 28, 2018

Destination Happiness Mini Album with Ginny

Well hello there friends and BoBunny fans!
Today I'm sharing a fun mini album created with the World Traveler collection.

Word Traveler_Mini Album_Ginny_May28_01
A mini album is such a great way to document a special trip. It's a walk down memory lane and can also be used as home decor propped on a shelf or table. That way your friends and family know they are invited to flip through and enjoy your pictures and journaling.
Word Traveler_Mini Album_Ginny_May28_012
I started by gathering the collection and embellishments.  This is where the layering process really begins for me as I'm choosing elements that fit my project and look good together.
Word Traveler_Mini Album_Ginny_May28_013
I originally thought I would create a card...but once I started layering I decided that I could make this a layout for the cover of a mini album.
Word Traveler_Mini Album_Ginny_May28_014
I created a mini album base so I would have the perfect size for these elements. Mat board works great for the cover as it's easy to cut but still very sturdy.
Word Traveler_Mini Album_Ginny_May28_02
The inside cover has a nice large area for bigger pictures. The little tag is from the Combo Sticker sheet. I used foam tabs to pop this up to build dimension. The banner is also from the sticker sheet.
Word Traveler_Mini Album_Ginny_May28_03
The cut apart sheet has fabby postcard images that I used to create a pocket. There's a uniquely shaped die cut from the Noteworthy collection to provide a place to add journaling.
Word Traveler_Mini Album_Ginny_May28_04
I'm alternating the patterns and scale to create raised sections for pictures.
Word Traveler_Mini Album_Ginny_May28_05
Tabbed topped stickers and Layered Chipboard Stickers are great accents for this set of pages.
Word Traveler_Mini Album_Ginny_May28_07
This pocket is created by layering a strip of tags cut from the patterned papers onto the stripe. Matting is very important to keep this from looking busy.
Word Traveler_Mini Album_Ginny_May28_09
I fussy cut a few of the tags and popped them up just for a little extra detail. The tag in the pocket is a section of the large die cut from Noteworthy.
Word Traveler_Mini Album_Ginny_May28_010
You can never have enough pockets in a mini to tuck in all the little bits and pieces so here's another for the last page.  Those tiny suitcase stickers are so charming! One more die cut in the pocket for journaling.
Word Traveler_Mini Album_Ginny_May28_011
The back cover is finished similar to the front with a tag and some stickers and twine.

Wishing you all a happy and productive day : ) Ginny

BoBunny supplies:Patterned Paper- Word Traveler-Wanderlust, Culture, Foreign, Postage, JourneyNoteworthy- World TravelerCombo Stickers- World Traveler Layered Chipboard Sticker- World Traveler6x6 Paper Pad- World TravelerDouble Dot Jewels- AquaDouble Dot Brads- Blue HuesDies- Ornate DoiliesBoBunny Blossoms- Natural Earth BouquetAmerican Craft:Sticky Thumb Adhesive RunnerSticky Thumb foam dots