Showing posts with label Rita. Show all posts

Wednesday, August 18, 2010

Liquid Embossing with Bo Bunny AND a Layout Sketch...

Hello there! Patti Milazzo here with a beachy layout I want to share using the Paradise collection and some tips on liquid embossing.

Whenever I'm creating a layout or card, I like to find ways to make my embellishments stand out and be unique. One way to do that is to use a liquid embossing product. If you're not familiar with it... it's different than the embossing fluid you might use with dry embossing powders on your stamp projects. Liquid embossing is more like a glaze or a dimensional glue that is usually clear or may come with a slight tint of color that you can apply to virtually any scrapbook product. Once it dries it has a glassy finish that adds shine and dimension to your project. It resembles the great effect you get when using an embossing powder that has been melted with a heat gun, but liquid embossing is a bit easier to accomplish especially for those who may not stamp. I find that applying the liquid embossing is a super simple technique that can really make stickers, chipboard, paper designs and stamped images come to life.

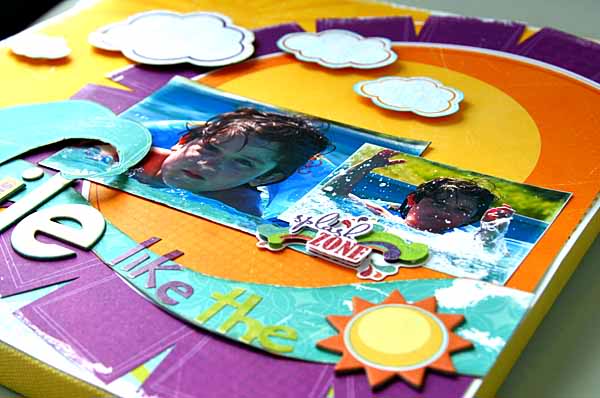
In this layout - Surf's Up! - I used liquid embossing on many of the embellishments and stickers as well as the patterned paper and background cardstock.

For your own projects, my suggestion is to first organize and design your layout almost completely. Applying the liquid embossing product will most likely be the last thing you do to your layout and to any accent pieces. It will require a little time to dry, but the effect is well worth it. Also, you may choose to liquid emboss pieces before attaching them to your page. If so, be sure to give them plenty of time to dry to a hard finish before you try to adhere them.

Once you've chosen the embellishments and paper accents you want to liquid emboss you can start by applying any inking or pen work to them. Then apply the liquid embossing to these pieces by first outlining the shape of the accent or design and then filling in the center of your outline. Avoid shaking the bottle since that will create bubbles which can make it difficult to apply the liquid smoothly. If you do get bubbles, use a sewing needle to carefully pop the bubbles for that smooth finish. On my layout, I applied the liquid embossing product to alpha letters, images on cut out paper squares and to chipboard shapes as well.

I also stamped images, added a bit of color with colored pencil and then applied the liquid embossing. When applying the liquid to paper or cardstock, it may bend or warp some but this will flatten out once it's dried.

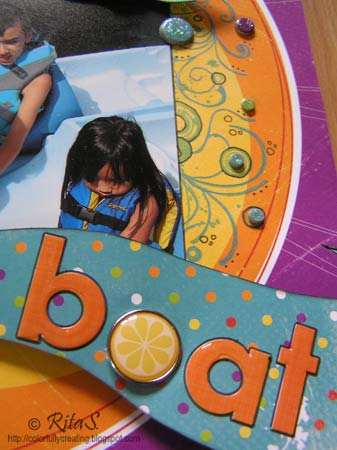
Once the first coat dries, another coat can be added to really add shine and dimension. I added a few extra layers to the alphas in my title for that bubble letter effect.

I loved this crab image so much and decided to use it as a part of an accent at the top left corner of my page. I simply outlined and filled in the crab image once I had all my pieces adhered in place.

I also liquid embossed this turtle image and made it into a stamp of sorts. I applied the liquid embossing to the starfish and other chipboard pieces on the page as well.

I hope you enjoyed my layout using liquid embossing. Adding dimension and shine is a fun way to further enhance Bo Bunny's beautiful products. I hope you'll do the same by giving your projects your own personal flair.

Materials Used: Paradise pattern paper - Flight, Surf, Paradise, Locals, Sunset, Boardwalk, Lingo and Paradise Cut Outs; Paradise iCandy Chipboard, iCandy Jewels and iCandy Brads; Paradise 12x12 Chipboard; Paradise Combo Stickers; Paradise Buttons & Bling and Paradise Rub-Ons.
...................................................................................................................................

That's not all today....we also have some fabulous layouts to share with you based on a Layout Sketch created by the very talented Rita Shimniok.


Designer: Debbie Nicholas
Products used: Bo Bunny Flower Child Patterned papers - Aquarius, Love beads, Free Bird, Far Out, Stripe and Hippy; Bo Bunny Flower Child Combo Stickers, iCandy Brads, Chipboard Stickers.


Designer: Rita Shimniok
Products used: BoBunny Roughin' It Papers- Nature, Leaves, Dots, Way to Go Diecut, Roadsigns, CutOuts; Combo Stickers; iCandy Chipboard Stickers; iCandy Brads; Catching Memories Cardstock Stickers; On With Nature Rub-on; Buttons and Bling; Blueberry Double Dot Ribbon;
Bodacious Brads


Designer: Juliana Michaels
Products used: Bo Bunny Petal Pushers Patterned Paper in Stripe and Doodles; Noteworthy Loose Leaves; Lazy Daisy Rubons;Petal Pushers Combo Stickers; Double Dot Cardstock in Decaf'
Double Dot Ribbon in Kiwi; Bo Bunny Bling (various)

Designer Tip: Remove the cover of the Noteworthy Journaling Cards. Weave the ribbon through
the holes on the cover of the Noteworthy journaling cards, cut out around the
image and then attach to your layout as an embellishment.


Designer: Christine Ousley
Products used: Block Party Celebration, Sparkler, Chill and Picnic; Block Party Journaling Cards; Block Party Combo Sticker; Block Party Chipboard; Chunky Chips Chipboard Alpha- Chiffon

Designer Notes: Don't be afraid to add or subtract elements from the layout
sketch. Here I opted for 2 vertical pictures instead of the 1 large horizontal
and 2 smaller pictures. Substituting the pictures plus the few embellishments
works because they take up approximately the same amount of space. This tip is
good to remember when you only have a few pictures and the sketch calls for
many.


Designer: Robyn Weatherspoon
Products used: Petal Pushers pattern paper - Garden, Doodles, Stripe and Petal Pushers Cutouts; Petal Pushers Combo Stickers;Petal Pushers Chipboard;It's A Girl Thing Cardstock Stickers;Petal Pushers iCandy Jewels;Chunky Chips Alpha-Licorice


We hope you've been inspired and enjoy the sketch!

Feel free to join us in our sketch. Either email your project to thebobunnyblog@gmail.com or add your image to the link below. Due 8/25.

Can't wait to see what you come up with!

Thursday, August 12, 2010

Oh what do you do in the SUMMERTIME???

Today's layouts are brought to you by the Letter S....
S for SUMMER!!!!

What a fun journaling idea by Tonya... she did word blocks of all the
activities they enjoy doing in the summer around her photo.


Layout Designed by: Tonya Dirk
Products used: Petal Pushers, Garden, Stripe, Greenhouse,
Doodles, Cut Outs, Chipboard, Glitter iCandy Chipboard,
iCandy Brads, Buttons & Bling, iCandy Jewels,
Flower Child Combo Sticker


How many of you have had a chance to play with our Die Cut papers?


Layout Designed by: Carole Janson
Product used: Petal Pushers Doodles Pattern Paper
Petal Pushers Stripe Pattern Paper (Reverse)
Petal Pushers Blossoms Die Cut
Petal Pushers Combo Stickers
Happiness Is Cardstock Stickers
Petal Pushers Cut Outs
Petal Pushers Buttons and Bling
Petal Pushers 12x12 Chipboard
Tip: When creating bunches of flowers
layer as much as you like, gives a great effect.


Here's a fun layout for those events when you have more than one
photo to highlight!


Layout Designed by: Rita Shimniok
Products used: Peacock Lane Flowers, Dot, Parade,
Cut Outs, Ivy, Bleu, Stripe, Combo Stickers,
Perfect Day Cardstock Stickers, Note Worthy,
Simply Wonderful Cardstock Stickers, iCandy Brads.

and who doesn't love the BEACH in the summer????


Layout Designed by: Shanna Vineyard
Product Used: Sun Kissed Chillin', Skies, Heat Wave Die Cut,
Chipboard, Combo Sticker

There's only a few weeks left in the summer...
Sooooo, get outside and take some photos to scrap with
your favorite BoBunny paper.
Don't forget to share your ideas with us.
You can post your layouts on FACEBOOK...
Invite your friends to join our Facebook page too.
Happy Scrappin'!!!


Monday, August 2, 2010


Its Card Sketch Tuesday


Our sketch today comes from the lovely Patti Milazzo, I know you are going to love creating this gorgeous sketch, so grab your Bo Bunny goodness and get cutting.

Here are some gorgeous examples from our lovely Design Team Girls so grab a coffee and relax.


"Thanks a Bunch" Card

Designer Patti Milazzo
Materials used: Bo Bunny Supply List: Petal Pushers patterned paper Notes, Petal Pushers, Stripe, Garden, Bloomers, Dot and Doodles; Petal Pushers 12x12 Chipboard; Lazy Daisy Rub-Ons; Petal Pushers iCandy Chipboard Stickers and Petal Pushers iCandy 3D Dimensional Stickers


"Bloom Where" Card

Designer Rita Shimniok
Materials used: Petal Pushers: Papers – Bloomers, Stripes; Noteworthy, 12x12 Chipboard, Combo Stickers Sunkissed Clearly Stamps (bee)5/8" Kiwi Dot Ribbon Ocean Dot Cardstock.
Tips:• When using a strip of 2 sided patterned paper, fold over edges for a two strip effect – as was done with striped paper.• Fold 5/8" ribbon in half, offset a little bit, and stitch close to fold line to create a layered look with a bit of dimension.


" You Still Make Me See Stars" Card

Designer Tonya Dirk
Materials used: Block Party Fireworks iCandy Stickers Combo Sticker Buttons & Bling ICandy jewels Double Dot Blueberry Wasabi

"Squeeze Me" Card

Designer Debbie Nicholas
Materials used:Bo Bunny Patterned paper: Sunkissed Afternoon, Sunkissed Skies, Summer. Double Dot Paprika, Double Dot Kiwi.Bo Bunny Embellishments: Sunkissed 12x12 Chipboard Misc: Jewels, Ribbon


"Just Keep Swingin" Card

Designer Rita Shimniok
Materials used: BoBunny Chocolate, Ocean & Kiwi Dot CardstockPatterned Papers: Sunkissed Splash Zone (green dot), Sun Kissed, SkiesSummer Sun Cardstock StickersTis the Season Red ButtonJuteThreadTurquoise Glimmer MistScribbles Iridescent Paint.
Tips:• Use chipboard cloud shapes from 12x12 chipboard as a template to make tree tops, or trace inside the opening of previously used shape. Trace outside and inside the outline, to obtain varied sizes that can be layered.• The tree shape negative from 12x12 chipboard was used to recreate shape of tree trunk onto Chocolate Dot cardstock. Irregular strips were cut and adhered/sitched into place to make the tree trunk look rounded.

"Simple Joys" Card

Designer Christine Ousley
Materials used: All products from the Peacock Lane line from Bo Bunny: Love Birds Die Cut paper, Peacock Lane Patterned Paers, Grape Double Dot Cardstock, Perfect Day Cardstock Stickers, 12x12 Combo Cardstock Stickers

Use the following link to share your card with us, we love to see what you create with Bo Bunny.
Post Cards Here:
Link tool by inlinkz.com

And don't forget to grab the NEW August Desktop!!

****ATTENTION... the response has been overwhelming and the talent is sooo great, that we are going to need some extra time to choose and announce the new Design Team.... but know that we are working around the clock on getting the new team announced and going!
Thank you for your patience... we will announce the new team on Aug. 13, 2010

Friday, July 16, 2010

Layout Challenge Friday


Who doesn't love a good layout challenge?
We've come up with a fun one for you today,
and just wait until you see what the
design team has come up with!

So here's the challenge...
We challenge you, to create a layout using
the title of your favorite movie or TV show!

Let's see what our amazing team has come up with!


"Good Times"

Designer: Rita Shimniok

Products Used:
Sun Kissed Heat Wave Die Cut, Sun Kissed Adventure,
Sun Kissed Chillin', Noteworthy Fun in The Sun, Summer Sun Cardstock Sticker,
12" Sun Kissed Chipboard, Sun Kissed iCandy Brads, Buttons, Bling, Sun Kissed Combo Sticker,
Double Dot Ribbon, Aquamarine Double Dot, Stamp & Store Write On

Designer Tip: Use Cardstock Sticker words for a unique journaling block.

For water themed layouts and projects, use clear
dimentsional glaze on alpha stickers to give them the "wet look".

Add iridescent sparkle dimensional glaze to chipboard colored circles
to give appearance of splashed water droplets, do the same to buttons!

Use Stamp n Store Write On set to create a photo frame/mat - use glitter pens
to trace scrolls and circles for even more color and definition


"The Dirk Bunch"

Designer: Tonya Dirk

Products Used: Petal Pushers Green House
, Petal Pushers Blossom Die Cute
Petal Pushers Notes, Petal pushers Dot, Petal Pushers Stripe, Petal Pushers 12" Chipboard,
Petal Pushers Combo Sticker, Petal pushers iCandy Chipboard,
Petal pushers Lazy Daisy Rub-on, Petal Pushers iCandy Jewels


"While You Were Sleeping"

Designer: Rita Shimniok

Products Used: Peacock Lane Ivy, Peacock Lane Bleu, Peacock Lane Parade,
Peacock Lane plumes, Peacock Lane Tweet, Peacock Lane Cut Outs,
Simply Wonderful Cardstock Stickers, Peacock Lane Combo Sticker,
Peacock Lane Rub-on, Sun Kissed Skies paper, Summer Fun Cardstock Sticker
Peacock Lane Buttons, Peacock Lane Bling, Concord Double Dot Ribbon, Chocolate Double Dot

Designer Tip: Journal between the lines on the tree design found in Peacock Lane Bleu.


On older photos with date stamps, use embellishments to cover the date if desired.

Staple ribbon loops to a think strip of scrap paper, and cover staples with an overlapped boarder.


"America's Next Top Model"

Designer: Robyn Weatherspoon

Products Used: Peacock Lane Stripe, Peacock Lane Bleu, Peacock Lane Combo Sticker
Peacock Lane Cut Outs, Peacock Lane iCandy Brads, Peacock Lane Flowers,
Grape Double Dot, Chiffon Double Dot, Turquoise Double Dot


"Smile Like the Sun"

Designer: Sherry Wright

Products Used: Sun Kissed
Skies, Sun Kissed Adventure, Sun Kissed Dots,
Sun Kissed Die Cut, Sun Kissed Party, Sun Kissed 12" Chipboard,
Sun Kissed Combo Stickers, Sun Kissed iCandy stickers


"Mr. Baseball"

Designer: Patti Milazzo

Products Used: Block Party Jamboree, Block Party Picnic, Block Party Good Times,
Block Party Stripe, Block Party Sparkler, Block Party Celebration, Block Party Shindig,
Block Party 12" Chipboard, Block Party Combo Sticker, All About Family Cardstock Sticker,
It's A Boy Thing Cardstock Sticker, Block Party iCandy Brads, Block Party Buttons & Bling,
Summer Bash Rub-ons, Block Party Clearly Stamps, Decaf Double Dot

Designer Notes: I layered and popped up the alpha sticker title with foam adhesive.
I also applied the small start rub-ons inside and around the stamped stars.


And with every Layout Challenge Friday...

Its time to announce our Layout Challenge winner from our last sketch.

Drum Roll Please.....

Justina, who created this clever layout using Sun Kissed.

We loved how she created the splash elements, and also the fun little details.
Congrats Christine! Email us at thebobunnyblog@gmail.com so we can send you your prize!

Make sure to join us and create a layout using

your favorite movie or TV title

and your favorite Bo Bunny products!

Please email your layout to us at thebobunnyblog@gmail.com

or use the inlinkz to upload.

Layouts will be due August 11th and we'll send the winner some of our

the Mama-razzi collection to enjoy!

Join us for a new Layout Sketch Challenge Due August 13th!


Hope you all have a great weekend!