Showing posts with label gift box. Show all posts

Sunday, October 25, 2015

Love and Lace Cards & Box!

Hello Everyone! Today we have a few lovelies from the Love & Lace collection! Our Love & Lace collection is a beautiful gathering of lace, flowers, leather and soft dusty colors. It lends itself perfectly to projects that feature love and friendship, in a feminine but rustic way.


First up is this Love & Lace card. The pockets are made to perfectly fit a letter, a gift card or perhaps a small gift.


Next is a pretty little gift box made from chipboard and covered in Love & Lace Devotion paper. 


With a tag added, and a big bow is tie on top, this box is ready for gift giving!


Supplies: 
1 Love & Lace Devotion
1 Love & Lace Together
1 Love & Lace Always
1 Love & Lace Forever
1 Love & Lace Passion
1 Love & Lace Lace
1 Licorice Dot
1 Carnival Brads
1 Sentiments Silver Foil Transfer
1 Misc Me 12 x 12 Chipboard Inserts
2 yd. ribbon

Next we have a 2 more lovely cards using Love & Lace! And instructions for you too! The first cards instructions are as below:

Base is  4 1/4" x 11 from Love & Lace Together (back)
Cut  5" x 3 3/4" from Love & Lace Always (back)  then cut from top left corner to bottom right corner forming a diagonal
Adhere 1/2 of doily under diagonal. Fussy cut 3 sizes of flowers from Love & Lace*, use foam dots to give dimension.
Apply foil transfer to card.
Adhere "Love" element from Love & Lace (back)

*Use caution when cutting the Love & Lace paper so that you retain the brown "Love" piece shown on the first card  and the blue "Love" circle shown in the center element of the second card.

 The next Love & Lace card is beautiful and here are the instructions for this card:

  Base is 6" x 10" cut from  Sweet Pear Dot (back), fold.
Cut Love & Lace (front) 5 3/4" x 4 3/4" adhere to front of card.
Cut Sweet Pear Dot (back) 1 1/4" x 6"  spray with bronze Glimmer spray - let dry
Cut Seafoam Dot (front) 1" x 6" adhere to top of sprayed piece.
Adhere 1/2 doily to top left of Love & Lace piece.
Apply sprayed band2 1/2" from top of card.
Cut Seafom Dot (back)  3" x 4" cut bottom at angles to form banner
Cut Love & Lace Together 2 3/4" x 4 1/4" spray with bronze glimmer spray - let dry. Cut bottom at same angle as
Adhere to seafoam piece, then card
Cut label from back of love and Lace, adhere to card with foam dots.
Add blue "Love" work from back of Love & Lace.
Randomly apply dots to card with Coral Pearlescent- let dry

Supply List for both Cards: 
Love & Lace 19001201
Love & Lace Lace 19001207
Love & Lace Together 19001210
Love & Lace Always 19001203
Seafoam Dot 12SFD707
Coral Pearlescents 12040598
Bronze Glimmer Spray 11837615
Copper Filigree Foil Transfer 12812162

Small Doilies 10522770

We hope you love these fun project as much as we do! Happy crafting and as always, please do share what you create! We love seeing what your creations. (don't forget, use #bobunny!) 

Friday, April 24, 2015

Day 6 of the Blog Hop....yay!!!

Welcome to day 6 of the Bo Bunny/ScrapbookAdhesives by 3L Bog hop!!!  We're so glad you're still playing along with us.  If this is your first day visiting this week, hop on over to Sunday's post and play along.  There's still time ;)  Today we're starting out with this Gorgeous Gift Box....sigh

The Story of our Life Gift Box by Romy Veul 

My project is a gift box featuring the gorgeous 'Heritage' collection. I used the tape runner to attach the papers onto the gift box. The tape runner is such an easy tool that enabled me to cover the entire box with  papers in very little time.


As you can see on the detail photo above, I added several chipboard pieces to the center of the gift box. In order to make every element stand out more, I used the black foam squares to attach the chipboard pieces to my gift box. I attached the butterfly with a dimensional glue dot onto the chipboard tag.


Bo Bunny Supply List:
Patterned Papers: Generations, Register, Roots, Belong/ Heritage 
Chipboard: Heritage Layered Chipboard, Heritage Chipboard 
Noteworthy: Sweet Life, Heritage 

Scrapbook Adhesives by 3L Supplies Used:
3D Foam Squares - Mix Black
E-Z Runner Permanent Strips Refillable
Dodz 3D 


Hop #3: Margie Higuchi

Wednesday, December 3, 2014

Luscious Gift Box!

Hello! Evgenia here today! This time I have played with my favourite collection out of this release-Rose Cafe, I love that it contains lots of colors and depending on your mood, the occasion, you can create in different colors.  I have madethe gift box. By using the die and the thick cardboard it came out very nice and it's quite a gift itself:) I went with more neutral background paper and then added a few embellishments in more pink colors (dark and light) and it all came together nicely.

Gift box by Evgenia Petzer
Gift Box by Evgenia Petzer uisng Bo Bunny Rose Cafe Collection

Let's check it from all the different angles

Gift Box by Evgenia Petzer uisng Bo Bunny Rose Cafe Collection

I made those pearl accents using our new product- Pearlescent Pen, really love the dimension and shimmer that it gives!

Gift Box by Evgenia Petzer uisng Bo Bunny Rose Cafe Collection


Gift Box by Evgenia Petzer uisng Bo Bunny Rose Cafe Collection

Love the BoBunny buttons- different shapes and materials.

Gift Box by Evgenia Petzer uisng Bo Bunny Rose Cafe Collection

I also did some fussy cutting and added those tiles to some of the corners of my box.

Gift Box by Evgenia Petzer uisng Bo Bunny Rose Cafe Collection


BoBunny supplies:
Patterned Paper: Posr, French Roast/Rose Cafe
Stickers: Combo Sticker/Rose Cafe
Buttons: Rose Cafe
Jewels: Tuxedo
Jewel Fourishes: Glaze Jewels
Chipboard: Layered/Rose Cafe
Pearlescent: Sugar

Thursday, June 26, 2014

Off The Page Projects

Do you ever just get the urge to do something different? You want to try something new, but your not sure where to start? These Somewhere In Time off the page projects are incredible!

Siblings And Friends By Lynn Shokoples


I'm sharing an altered frame I made capturing the relationship between our two children Nicole and Ryan who have been best friends since he was born and it continues.  I chose two photos, one when they were small and the other at Nicole's wedding. I started by crackling the frame and the Kraft Wooden Shapes. Then I took the frame piece from the Noteworthy collection and traced it onto the patterned paper to make the two other frames. Along with some fussy cutting of the flowers and playing with the new Gateway Stamps I was really having fun with this project. I added some jewels and trinkets from past collections to add a little extra something extra.


The Kraft Wooden Shapes were the perfect touch for the edges of the frame.


The Antiquity Patterned Paper had so many beautiful flowers on it, I just had to fussy cut a few.


This was my favorite saying on the project. I found it on the internet, printed it out onto the 6x6 patterned paper and then stamped around the edges. 

BoBunny Supplies:
Patterned Paper: Antiquity, Timeless, Keepsake, Chrononaut/ Somewhere in Time
6x6 Paper Pad: Somewhere in Time
Noteworthy: Somewhere In Time
Layered Chipboard: Somewhere In Time
Kraft Wooden Shapes: Elegant
Rub-Ons: Timepiece
Stamps: Gateway
Trinkets: Trail Mix
Jewels: Powder Mountain
Blossoms: Buttercup Dahlia, Harvest Orange Dahlia, Natural Earth Dahlia


An Elegant Lady by Megan Gourlay


When Somewhere in Time was introduced I was in seventh heaven, there were so many things in this collection that I loved.  The colours, the little bits of history with bustles, and time pieces are just beautiful - things I have a passion for - history.  So I decided to make my own historical piece.  I had this mannequin at home for ages, but felt it needed an update, so I decided to make an old fashioned lady's dress with a bustle effect and matching hat.


I punched strips of paper and then  sprayed it with water and adhered it to my mannequin moulding it to the shape I wanted - I used the same technique to add the lace effect to my hat.   I fussy cut the gorgeous vine from the  Passage piece of paper and included it in my cluster of vines and flowers at the waist of the pleated burlap lace.  Lastly I added jewels to the center of my paper flowers.


To create my bustle I cut  three different sizes of squares and rolled them into cone shapes, layering them on top of each other. When I was finished I thought that like all fashionable women she needed a necklace and I dug out an old locket from my jewelry box and adhered it to a trinket.


I had so much fun creating this piece!  I swear Somewhere in Time was created just for me!


BoBunny Supplies:
Patterned Paper:Somewhere in Time, Momento, Passage, Chrononaut /Somewhere in Time
Jewels: Licorice, Pop Quiz, Happy Tails
Kraft: Pleated Burlap Lace
6x6 Paper Pad: Somewhere in Time
Doilies: Large 8.5"
Trinkets: The Avenues


Gift Box by Romy Veul


My friend is celebrating her birthday this weekend and I wanted to give her a bracelet, but in a special way. Therefore, I made this little gift box, so I can give her something special. I altered it with the gorgeous Somewhere in Time collection. She loves vintage, so this collection suits her just perfectly.


I also did some stamping with the Stained Textured stamps. I heat embossed the stamping with brown embossing powder to add a bit of texture to my gift box.


I didn't only decorate the outside of the gift box, but also the inside of it. I decorated it with some strips of paper and also attached a die-cut gear and a fussy cut hot-air balloon in the inside of the box.


Bo Bunny Supply List:
Patterned Paper: Somewhere In Time, Balloons, Beauty, Memento, Passage/ Somewhere In Time
Chipboard: Somewhere In Time Layered Chipboard Stickers
Noteworthy: Somewhere In Time
Large Stamps: Stained Textures


Friday, November 30, 2012

We ♥ Mistletoe!

Mistletoe is so much fun!
(I'm talking about the paper collection, not kissing!)

I love the variety of projects the girls used today.

Just a Little Something Gift Box
Jolanda Meurs
 Bo Bunny Supplies:
Paper: Mistletoe Pucker Up and Countdown
Chipboard: Mistletoe 
Lots of yummie chocolates!


May your Holidays Be Merry and Bright
Romy Veul
 Bo Bunny Supply List:
Patterned paper: Ornaments, Wrap/ Mistletoe
6 x 6 Paper Pad: Double Dot Natural Necessities
Chipboard: Mistletoe Layered Chipboard Stickers, Mistletoe 12 x 12 Chipboard
Card Kit: Mistletoe


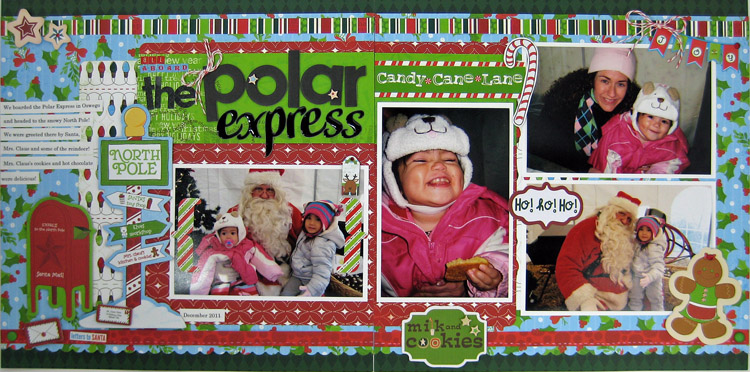
Polar Express
By Sarah Eclavea


Bo Bunny Supplies: 
Patterned Paper: Twas the Night, Pucker Up, Ornaments, Wrap, Stipe/ Mistletoe
Chipboard: 12x 12/ Mistletoe; Chipboard Alpha (licorice)
Jewels: Mistletoe
Stickers: Combo Sticker, Christmas Cheer, Elf Type/ Mistletoe
Noteworthy: Mistletoe
Brads: Mistletoe
Stickers Dimensional: Mistletoe


Happy Everything
Tara Orr
 

Bo Bunny Supplies:
Jewels: Mistletoe
Chipboard: Mistletoe
Combo Stickers: Mistletoe
Brads: Mistletoe
Layered Chipboard: Mistetoe
Noteworthy: Mistletoe
Dimensional Stickers: Mistletoe
Cardstock Stickers: Christmas Cheer
Patterned Paper: Countdown, Greetings, Ornaments, Santa's List, Mistletoe, Stripe/Mistletoe


There you have it. Gift box, tag & layouts. The possibilities are endless!
and.... tomorrow is December!!!!