Good Morning! Have you all enjoyed our Mix & Match week? Who would have thought that you could mix and match so many of the different BoBunny collections? Today I'm sharing my Misc. Me pages that I did featuring the Candy Cane Lane and Madeleine collections.
It's A Onesie Kind of Christmas by Lynn Shokoples
What do those have in common? Colors for one thing... the light greens and the soft pinks. Our daughter bought everyone "onesies" for Christmas last year, so we had some fun photos that I just had to scrap! Of course I couldn't forget our furbabies so they all had antlers for the holidays! To start I took some of the Madeleine Journal contents cards and mixed them with cards I made from the Candy Cane Lane 6x6 Paper Pad.
The Candy Cane Lane "Countdown" patterned paper had the cutest little cards on them, so I cut some out and layered them on the bigger cards. The 6x12 Chipboard has the cutest little sayings on them, so I tucked them here and there. That's the fun part of Misc. Me, playing with all the fun embellies!
The Candy Cane Lane "Holiday" patterned paper was full of fun bingo cards, so I jazzed them up with some of the Gold Glitter Paste and the buttons from the collection. The glitter paste was so much fun to play with I couldn't stop there. I took the Circle Stencil from the Brocade Stickable Stencil pack and added some fun glittery circles all over the cards. I thought it added some fun holiday glitter to the pages.
BoBunny Supplies:
Patterned Paper: Candy Cane Lane/ Countdown, Snowflake, Jack Frost, Candy Cane Lane
6x6 Paper Pad: Madeleine
Journal Contents: Madeleine
Noteworthy: Candy Cane Lane
Buttons: Candy Cane Lane
Chipboard: Candy Cane Lane 6x12
Stickable Stencils: Brocade
Stamps: Stitches
Ink Pad: Emerald
Glitter Paste: Gold
Page Protectors: Misc. Me Life Journal
Showing posts with label Madeleine. Show all posts
Saturday, November 22, 2014
Tuesday, November 11, 2014
Fly Away with Glimmer Sprays!
Today's off the page project is a beautiful canvas using our yummy mixed media!
Spread your wings and fly away by Ulrika Wandler
My OTP project is a canvas, and I love working with them! I also love Glimmer sprays, and they are perfect to use on canvases.
Glimmer spray: Gold, Bronze
Glitter paste: Gold
Stencil: Brocade Stickable Stencil
Wood Shapes: Iron Works
Spread your wings and fly away by Ulrika Wandler
My OTP project is a canvas, and I love working with them! I also love Glimmer sprays, and they are perfect to use on canvases.
You start off with priming the canvas with gesso.
After that you can add Glimmer sprays in several different ways. Spraying or splashing for instance.
I used Bronze Glimmer spray together with a stencil to make the pattern on the lower left side and the upper right side of the canvas.
I used the Gold Glimmer spray on the paper with the birdcage on it.
On the blossoms I used Gold Glitter paste.
The light yellow blossoms turned golden with some Gold Glimmer sprays on them!
BoBunny supplies:
Patterned paper: Madeleine, Grace, Roses/Madeleine
Noteworthy: Madeleine
Buttons: Madeleine
Jewels: Double Dot Mocha
Blossoms: Blush pansy, Buttercup Bouquet
Doilies: 4" smallGlimmer spray: Gold, Bronze
Glitter paste: Gold
Stencil: Brocade Stickable Stencil
Wood Shapes: Iron Works
Saturday, November 8, 2014
Cards With A Little Sparkle!
Madeleine and gorgeous, sparkly, shiny jewels....does it get any better? I don't think so! These gorgeous cards are the perfect example of that! Enjoy!
"Love Story" Card by Kaori Fujimoto
Hello! I am so excited to share my cards with you today. When I was assigned the "Cards" and "Jewels" to work with, I decided to use Madeleine collection because they match well! I used Double Dot Jewels for the corners. There are various kinds of colors, so it is possible to choose the appropriate color.
BoBunny Supplies:
Paper: Madeleine, Allure, Elegance, Grace, Happiness/ Madeleine
Stickers: Madeleine Combo Stickers
6 x 6 Paper Pad: Madeleine
Petals: Madeleine
Double Dot Jewels: Emerald
Jewel Flourishes: Frosting
Stickable Stencils: Lace
Stamp: Written Stamp
"Life Captured" Card by Kaori Fujimoto
This is one of the items that are essential to the beautiful and elegant projects. I like to use with lace and doily.
"Love Story" Card by Kaori Fujimoto
BoBunny Supplies:
Paper: Madeleine, Allure, Elegance, Grace, Happiness/ Madeleine
Stickers: Madeleine Combo Stickers
6 x 6 Paper Pad: Madeleine
Petals: Madeleine
Double Dot Jewels: Emerald
Jewel Flourishes: Frosting
Stickable Stencils: Lace
Stamp: Written Stamp
"Life Captured" Card by Kaori Fujimoto
This is one of the items that are essential to the beautiful and elegant projects. I like to use with lace and doily.
BoBunny Supplies:
Paper: Madeleine, Allure, Elegance, Grace, Happiness/ Madeleine
Stickers: Madeleine Combo Stickers
Paper: Madeleine, Allure, Elegance, Grace, Happiness/ Madeleine
Stickers: Madeleine Combo Stickers
6 x 6 Paper Pad: Madeleine
Petals: Madeleine
Double Dot Jewels: Think Pink
Jewel Flourishes: Frosting
Stickable Stencils: Lace
Stamp: Written Stamp
Doilies: 4in Small Doilies
Petals: Madeleine
Double Dot Jewels: Think Pink
Jewel Flourishes: Frosting
Stickable Stencils: Lace
Stamp: Written Stamp
Doilies: 4in Small Doilies
Labels:
Double Dot Jewels,
jewels,
Kaori Fujimoto,
Life Captured,
Love Story,
Madeleine
Saturday, November 1, 2014
BoBunny November 2014 Sketch Challenge
Hello friends! It's time for this months Sketch challenge! Here's how it works in case you missed the last few months! Each month we will share a new sketch and how one of our designers was inspired to create with it. To play along all you have to do is create a project inspired by the sketch, using BoBunny products and then share it with us using the InLinkz widget below. When you enter, you will have the chance to be randomly selected to win a fabulous prize package full of BoBunny goodies! Take a look at this months challenge! We can't wait to see what you create!
And now, without further a do, here is this months beautiful challenge done by the wonderful DT member Amy Voorthuis!
Sisters by Amy Voorthuis
BoBunny Supplies:
Patterned Paper: Madeleine, Stripe, Symmetry, Charm, Elegance,Songbirds, Roses/Madeleine
6 x 6 Paper Pad: Madeleine
Blossoms: Natural Earth Zinnia, Natural Earth Daisy, Blush Pansy
Chipboard: Madeleine
Glitter Paste: Silver
Glimmer Spray: Sugar
Ink Pad: Licorice
Jewels: Licorice
Stamps: Powder Mountain, Prairie Chic, Serenade, Autumn Song, Wall To Wall Textures, Romance, It Is Written
And now it is your turn! This is the marvelous BoBunny Prize Package for the November 2014 Sketch Challenge.
One lucky person will win this amazing Christmas Collage Prize!!! Enter below using the InLinkz widget for your chance to win. The deadline to submit your layout for the October Sketch Challenge is December 12th, 2014.
Now for the winner of October's sketch challenge!!! The winner is..... #10 Sandi B! Please email us your contact information so we can send you your wonderful Wild Card prize package. Congratulations Sandi!
An InLinkz Link-up
And now, without further a do, here is this months beautiful challenge done by the wonderful DT member Amy Voorthuis!
Sisters by Amy Voorthuis
I was very pleased when I saw that my assignment for the month November was the Sketch Challenge I really enjoy working with sketches. I knew right away which photo's I was going to use, if you look closely you see that the girl in the picture in the middle is another girl; her name is Mijntje {she is my oldest niece from my husbands sister} the girl on pictures on the left & right is Roos, Mijntjes younger sister.
Both girls have almost an identical smile don't you think so?
Since this is stamp week I used a whole bunch of stamps. At first I was scared of stamping but now I really love it. Maybe you see I used some older stamps too? I will tell you which on the supply list. Another thing I love is layering & sewing and I did a lot of that too on this layout.
I used the licorice ink pad to stamp. It's actually a really dark ink pad, so to soften it up I used some gesso & the sugar glimmer spray.
I wanted the journaling to be the focal point on my layout it says:
In Dutch:
Lieve Mijntje en Roos toen jullie nog heel klein waren.
Leken jullie ontzettend veel op elkaar zelfs jullie lieve lach was bijna identiek.
Het is zo leuk om deze foto's naast elkaar te zien echt zusjes.
In English:
Sweet Mijntje and Roos when you were little girls
You looked so much alike even your smiles were identical.
It's so nice to see those picture together real sisters.
Patterned Paper: Madeleine, Stripe, Symmetry, Charm, Elegance,Songbirds, Roses/Madeleine
6 x 6 Paper Pad: Madeleine
Blossoms: Natural Earth Zinnia, Natural Earth Daisy, Blush Pansy
Chipboard: Madeleine
Glitter Paste: Silver
Glimmer Spray: Sugar
Ink Pad: Licorice
Jewels: Licorice
Stamps: Powder Mountain, Prairie Chic, Serenade, Autumn Song, Wall To Wall Textures, Romance, It Is Written
And now it is your turn! This is the marvelous BoBunny Prize Package for the November 2014 Sketch Challenge.
One lucky person will win this amazing Christmas Collage Prize!!! Enter below using the InLinkz widget for your chance to win. The deadline to submit your layout for the October Sketch Challenge is December 12th, 2014.
Now for the winner of October's sketch challenge!!! The winner is..... #10 Sandi B! Please email us your contact information so we can send you your wonderful Wild Card prize package. Congratulations Sandi!
An InLinkz Link-up
Thursday, October 30, 2014
BoBunny Stamps and Misc Me
Hello friends! We have another beautiful Misc Me project for you today featuring some of our fabulous stamps!
Morro Branco by Solange Marques
Hello, it has arrived, the day I share with you a few more pages of my Misc Me! I'm enjoying making my travel album with Misc Me. It is super convenient and fast. This time I chose Madeleine BoBunny collection. This collection is a real charm.
These are some more photos of my trip to Fortaleza, a heavenly place!
Of course I used touches of mixed media in my project and I also used many BoBunny stamps to complete my Misc Me.
I loved this photo of rafts by the sea and I could not resist to extend it using paints and textures interspersed with stamps.
BoBunny supplies:
Stickers: Madeleine Combo Sticker
Buttons: Madeleine
Jewels: Citrus Jewels
Stamps: Romance Stamp, Captured Stamp,Stitches Stamp,It Is Written Stamp
6 x 6 Paper Pad: Madeleine
Petals: Madeleine
Misc Me Binder 12x12: Primrose
Misc Me Contents: Madeleine Journal Contents
Kraft: Wood Shapes Elegant
Stencil: Brocade Stickable, Blisss Stickable
Ink Pad: Licorice
Glimmer Spray: Bronze
Glitter Paste: Gold
Morro Branco by Solange Marques
Hello, it has arrived, the day I share with you a few more pages of my Misc Me! I'm enjoying making my travel album with Misc Me. It is super convenient and fast. This time I chose Madeleine BoBunny collection. This collection is a real charm.
These are some more photos of my trip to Fortaleza, a heavenly place!
Of course I used touches of mixed media in my project and I also used many BoBunny stamps to complete my Misc Me.
I used stamps on the photos and on the journal cards:
I loved this photo of rafts by the sea and I could not resist to extend it using paints and textures interspersed with stamps.
I used to lace around the frame on this journal card and more stamps:
I hope you enjoy it!
BoBunny supplies:
Stickers: Madeleine Combo Sticker
Buttons: Madeleine
Jewels: Citrus Jewels
Stamps: Romance Stamp, Captured Stamp,Stitches Stamp,It Is Written Stamp
6 x 6 Paper Pad: Madeleine
Petals: Madeleine
Misc Me Binder 12x12: Primrose
Misc Me Contents: Madeleine Journal Contents
Kraft: Wood Shapes Elegant
Stencil: Brocade Stickable, Blisss Stickable
Ink Pad: Licorice
Glimmer Spray: Bronze
Glitter Paste: Gold
Wednesday, October 22, 2014
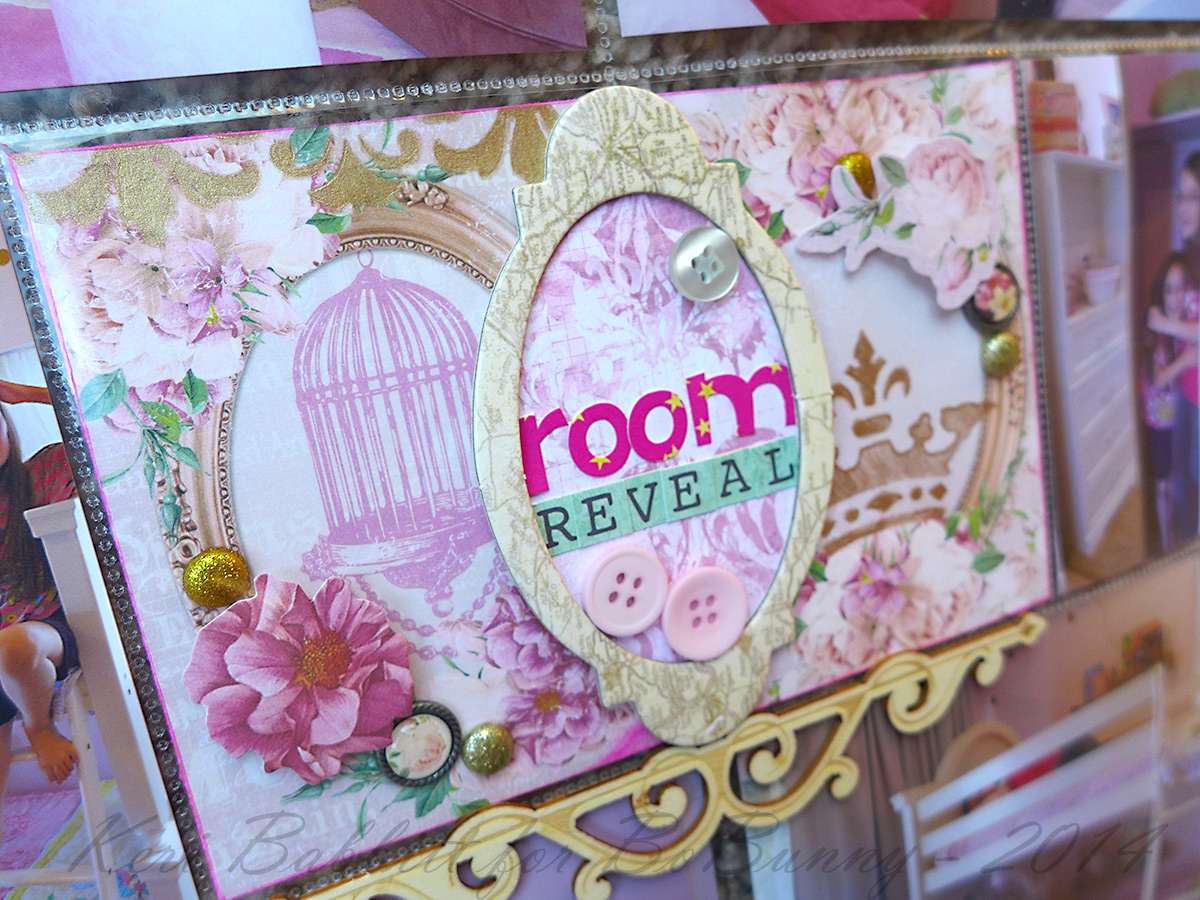
Room Reveal!
This is Misc Me project is a must see! It's the perfect idea to capture all those fun surprises in life! The skies the limit here!
Room Reveal by Keri Babbitt
The new stickable stencils from BoBunny are my new favorite toy, and I love using them in different ways on my monthly Misc Me pages. This month's page is about my daughters' new room. Its vintage, shabby chic style paired well with the Madeleine collection, so I got out some Madeleine papers and started layering the stencils over them.
For this first, photo-heavy spread, I lined up the stencils along the edges of the papers, and used a gold pen to outline the images and then fill them in. The "stickable" factor of the stencils allows for detailed penwork like this, without having to worry about the stencil shifting beneath you. So helpful and gives great results.
On the second page, I layered glitter paste, Pearlescents, and glimmer spray over the dots and doily stencils.
The dimension and detail the stencils add is so lovely, and customizing with stencils is a fun, fast way to add a little mixed media touch to my clean-lined Misc Me style. I love the way the glitter paste and Pearlescents take the color of the glimmer spray, without losing their own sparkle and shine. The result is a look with variegated hints of gold, cream, pink, and of course glitter. Just perfect for my pink &glitter loving girls!
BoBunny Supplies Used:
Patterned Paper: Elegance, Grace, Happiness, Roses/Madeleine
Stickers: Candy Cane Lane Combo Sticker, Madeleine Combo Sticker
Noteworthy: Madeleine
Buttons: Madeleine
Brads: Candy Cane Lane, Christmas Collage, Madeleine
Chipboard: Madeleine, Wild Card
Misc Me Binder: 12x12" Black
Misc Me Page Protectors: Variety Pack
Wood: Iron Works
Stencils: Bliss, Brocade, Lace
Glitter Paste: Gold
Pearlescents: Blush, Butterscotch
Glimmer Spray: Gold
Room Reveal by Keri Babbitt
The new stickable stencils from BoBunny are my new favorite toy, and I love using them in different ways on my monthly Misc Me pages. This month's page is about my daughters' new room. Its vintage, shabby chic style paired well with the Madeleine collection, so I got out some Madeleine papers and started layering the stencils over them.
For this first, photo-heavy spread, I lined up the stencils along the edges of the papers, and used a gold pen to outline the images and then fill them in. The "stickable" factor of the stencils allows for detailed penwork like this, without having to worry about the stencil shifting beneath you. So helpful and gives great results.
On the second page, I layered glitter paste, Pearlescents, and glimmer spray over the dots and doily stencils.
The dimension and detail the stencils add is so lovely, and customizing with stencils is a fun, fast way to add a little mixed media touch to my clean-lined Misc Me style. I love the way the glitter paste and Pearlescents take the color of the glimmer spray, without losing their own sparkle and shine. The result is a look with variegated hints of gold, cream, pink, and of course glitter. Just perfect for my pink &glitter loving girls!
BoBunny Supplies Used:
Patterned Paper: Elegance, Grace, Happiness, Roses/Madeleine
Stickers: Candy Cane Lane Combo Sticker, Madeleine Combo Sticker
Noteworthy: Madeleine
Buttons: Madeleine
Brads: Candy Cane Lane, Christmas Collage, Madeleine
Chipboard: Madeleine, Wild Card
Misc Me Binder: 12x12" Black
Misc Me Page Protectors: Variety Pack
Wood: Iron Works
Stencils: Bliss, Brocade, Lace
Glitter Paste: Gold
Pearlescents: Blush, Butterscotch
Glimmer Spray: Gold
Tuesday, October 21, 2014
Your Happy Place
Everybody has a happy place....you know that thing or place that just calms your soul. Well, why not scrap it? Maria has done just that below!
Everyone has some kind of place in which they feel good, where they are always smiling...
It can be a city in which you spent your childhood, or the street where once there was something very pleasant, or even a tiny piece of land, which somehow heals the soul...
Today my LO is about this.
Keep Smiling LO by Maria Potapovich (mellpellmell)
To give the impression of the old place, I used a dark and "gold" tones, as well as a little weathered in the form of bleaching with the gesso some places.
As always, I could not resist and used labels from paper sheets!
For example, here this: charcoal chevron;
Or this: NY - are two last letters from "Bo Bunny"
Or...maybe... Do you know what are the multicolored circles (dots)? ;)
And I would like to tell you what products I have used to create this scrapbook page. So...
BoBunny Supplies:
Patterned Paper: Charcoal Chevron Dot, Madeleine: Tiles, Happiness and PincushionDouble Dot Glimmer Spray: Bronze, Gold
Stencil: Brocade Stickable Stencil
...have a creative day!
Saturday, October 18, 2014
Madeleine 8x9 is Sublime!
Hello friends! You are going to love what Lisa has for you today! I love the creativity and out of the box thinking in this album. Tons of inspiration here! Take a look!
Here's The Story - Lisa Novogrodski
This time around I was inspired to do something totally different and FUN with my Misc. Me collection. I decided to focus on the Pocket Page Protectors but use them in a more 'out of the box" way! I also wanted to incorporate larger scale photos to show you how those work.
I started with the recipe dividers and set my first photo against that to begin my story. I've embellished with contents from the Madeleine collection.
As you turn to look at my next page I have actually filled a full 8 x 9 page protector with confetti that I punched from Madeleine Paper and some vellum. I added little sequins from my collection. On the outside of the page protector I adhere the wood "That's Life" embellishment. I used the Pearlescents and glitter paste to enhance the wood.
You can see my photo from the following page underneath. I took a large scale photo and cut it in half to fit that page which is the 8 x 9 Recipe Page Protector.
I love how it looks with the peeking through.
My next page is a collage I created in Photoshop. I prefer black and white photos when I am working with a busy theme. I like the continuity between the pages. I added many different photos from different times in my daughters life.
On the page following this one I used two different size photos and once more added sequins to the pocket to step it up a notch and make it more playful.
I love the unexpected in my albums. I again cut apart the page protector and added some sequins and stamped images. I sewed up the opening and made a little flip book.
For this little flip up see through pocket I simply cut one of the pockets from the Page Protector Variety Pack and filled it with confetti. I sewed along the bottom and embellished the front. I punched a hole through my the protector for my collage page and attached the little pocket with a ribbon.
I've started this book with a variety of photo and playful elements for my daughter to enjoy in years to come! I hope you are inspired to add a few of these little treasures to your Misc. Me books as well!
BoBunny Supplies:
Misc Me Binder: Black Binder 8 x 9
Misc. Me Contents: Madeleine Recipe Contents
Misc. Me Page Protector: 6 x 8 Page Protector, 8 x 9 Recipe Page Protector, 8 x 9 Page Protector Variety Pack
Wood Shapes: That's Life
Doilies: 4" Small
Stamps: Captured
Combo Sticker: Madeleine
Chipboard: Madeleine
Noteworthy: Madeleine
Stamp Block Set
Stencils: Brocade
Jewels: Baby Bump, Emerald, Think Pink
Buttons: Madeleine
Pattern Paper: Grace/ Madeleine
Glitter Paste: Gold
Ink Pad: Pink Punch, Licorice
Pearlescents: Blush
Here's The Story - Lisa Novogrodski
This time around I was inspired to do something totally different and FUN with my Misc. Me collection. I decided to focus on the Pocket Page Protectors but use them in a more 'out of the box" way! I also wanted to incorporate larger scale photos to show you how those work.
I started with the recipe dividers and set my first photo against that to begin my story. I've embellished with contents from the Madeleine collection.
As you turn to look at my next page I have actually filled a full 8 x 9 page protector with confetti that I punched from Madeleine Paper and some vellum. I added little sequins from my collection. On the outside of the page protector I adhere the wood "That's Life" embellishment. I used the Pearlescents and glitter paste to enhance the wood.
You can see my photo from the following page underneath. I took a large scale photo and cut it in half to fit that page which is the 8 x 9 Recipe Page Protector.
I love how it looks with the peeking through.
My next page is a collage I created in Photoshop. I prefer black and white photos when I am working with a busy theme. I like the continuity between the pages. I added many different photos from different times in my daughters life.
On the page following this one I used two different size photos and once more added sequins to the pocket to step it up a notch and make it more playful.
I love the unexpected in my albums. I again cut apart the page protector and added some sequins and stamped images. I sewed up the opening and made a little flip book.
For this little flip up see through pocket I simply cut one of the pockets from the Page Protector Variety Pack and filled it with confetti. I sewed along the bottom and embellished the front. I punched a hole through my the protector for my collage page and attached the little pocket with a ribbon.
I've started this book with a variety of photo and playful elements for my daughter to enjoy in years to come! I hope you are inspired to add a few of these little treasures to your Misc. Me books as well!
BoBunny Supplies:
Misc Me Binder: Black Binder 8 x 9
Misc. Me Contents: Madeleine Recipe Contents
Misc. Me Page Protector: 6 x 8 Page Protector, 8 x 9 Recipe Page Protector, 8 x 9 Page Protector Variety Pack
Wood Shapes: That's Life
Doilies: 4" Small
Stamps: Captured
Combo Sticker: Madeleine
Chipboard: Madeleine
Noteworthy: Madeleine
Stamp Block Set
Stencils: Brocade
Jewels: Baby Bump, Emerald, Think Pink
Buttons: Madeleine
Pattern Paper: Grace/ Madeleine
Glitter Paste: Gold
Ink Pad: Pink Punch, Licorice
Pearlescents: Blush
Thursday, October 16, 2014
Madeleine Misc Me!
What an amazing idea for wedding pictures! I love the delicate accents the mixed media adds to this stunning project!
Welcome To My World by Lynn Shokoples
Good Morning Everyone! How do you do your Misc. Me pages? By the week? The month? I do a little different system. My goal is to capture memories of events, places, vacations etc. I don't do a weekly spread or even a monthly one. These are all memories I want to document and some aren't even in the same year. This way I am never behind ( well that's my story and I'm sticking to it, lol).
For these pages I am featuring the Madeleine collection. I loved the soft elegant colours and I immediately thought of my daughters wedding photos. Her wedding colours were purples, so I quickly changed the photos to black and white and was on my way. I loved how they still popped out of the pages.
First I started with the Madeleine Journal Contents package and picked out several of the cards. Then I had this idea when I saw one of the cards had a frame. I fussy cut it and tucked Nicole's photo into the frame. This then gave me the idea of taking the Allure Patterned Paper and fussy cutting some of the frames to use on other cards. My next step was way too much fun!!
The next thing I did was use the new Lace Stickable Stencil with the Pearlescents. I chose the Island Mist and Blush to add some detail to the cards. I also used the Pearlescents to dot the centers of the flowers for some added bling. I snuck some stamping in on the corners of the cards using the small corner pieces in the Romance package and some Emerald Ink. Along with some of the chipboard pieces , the noteworthy and combo stickers my cards were complete. I love how they all add dimension without adding bulk to your pages.
Have you tried the new Glitter Pastes? Oh my goodness they are my new favourite thing! Along with the Stickable Stencils I wasn't sure I could stop.
We would love to see what everyone is working on in their own Misc. Me binders, so please share with us on our Facebook page! Have a wonderful day everyone, and thank you for peeking at my pages!
BoBunny Supplies:Welcome To My World by Lynn Shokoples
Good Morning Everyone! How do you do your Misc. Me pages? By the week? The month? I do a little different system. My goal is to capture memories of events, places, vacations etc. I don't do a weekly spread or even a monthly one. These are all memories I want to document and some aren't even in the same year. This way I am never behind ( well that's my story and I'm sticking to it, lol).
For these pages I am featuring the Madeleine collection. I loved the soft elegant colours and I immediately thought of my daughters wedding photos. Her wedding colours were purples, so I quickly changed the photos to black and white and was on my way. I loved how they still popped out of the pages.
First I started with the Madeleine Journal Contents package and picked out several of the cards. Then I had this idea when I saw one of the cards had a frame. I fussy cut it and tucked Nicole's photo into the frame. This then gave me the idea of taking the Allure Patterned Paper and fussy cutting some of the frames to use on other cards. My next step was way too much fun!!
The next thing I did was use the new Lace Stickable Stencil with the Pearlescents. I chose the Island Mist and Blush to add some detail to the cards. I also used the Pearlescents to dot the centers of the flowers for some added bling. I snuck some stamping in on the corners of the cards using the small corner pieces in the Romance package and some Emerald Ink. Along with some of the chipboard pieces , the noteworthy and combo stickers my cards were complete. I love how they all add dimension without adding bulk to your pages.
Have you tried the new Glitter Pastes? Oh my goodness they are my new favourite thing! Along with the Stickable Stencils I wasn't sure I could stop.
We would love to see what everyone is working on in their own Misc. Me binders, so please share with us on our Facebook page! Have a wonderful day everyone, and thank you for peeking at my pages!
Patterned Paper: Madeleine/ Allure
6x6 Paper Pad: Madeleine
Noteworthy: Madeleine
Stickers: Madeleine Combo Stickers
Chipboard: Madeleine
Journal Contents: Madeleine
Jewels: Double Dot Emerald
Stickable Stencils: Lace
Stamps: Romance
Glitter Paste: Gold
Pearlescents: Blush, Island Mist
Ink Pads: Emerald, Pink Punch
Page Protectors: Misc. Me 12x12 Variety Pack
Labels:
12 x12 Misc Me,
Glitter Paste,
Lynn Shokoples,
Madeleine,
Pearlescents
Wednesday, October 15, 2014
Gorgeous Madeleine Layout!
This Madeleine layout is simply breathtaking! I love the color combos, they add a soft and elegant touch!
'Sisters' by Gabrielle Pollacco
Bo Bunny Supplies:
Patterned Paper: Madeleine, Charm, Elegance / Madeleine
'Sisters' by Gabrielle Pollacco
Hi Bo Bunny fans! Gabrielle here with you today to share a layout I made using the beautiful Madeleine collection papers and embellishments! The subject of my photo that I'm scrapping today are my two daughters. I would say in general they get along pretty good, but like all siblings there's always a bit of good natured poking at each other that goes on. This picture says it all.
I just love using the new Stickable Stencil designs from Bo Bunny, and among my favorites is this scripted stencil from the 'Brocade' stencil set. I also used a lovely little scroll design from the 'Bliss' stencil set as well. But before I started, I gave the background area behind the photo a little spritzing with the new Glimmer Mist in the 'Tutu' color. I finished the design around the photo with some blooms, some of the Kraft Wood designs and some fussy cut bloom images from the 'Elegance' patterned paper.
To embellish the corner of my photo, I used some handmade fabric blooms from a friends etsy shop and some chipboard leaves from the Madeleine 12x12 chipboard. I tucked in some more chipboard banner strips, jewels and Madeleine buttons. I finished the look with a twine bow.
When I use a design that is heavy on one side of the page, I like to balance the page by adding a small embellishment cluster on the opposite side. Here I used part of a chipboard frame, some buttons from the Madeleine collection and some more Kraft Wood designs.
Patterned Paper: Madeleine, Charm, Elegance / Madeleine
Combo Stickers: Madeleine
Chipboard: Madeleine
Wood Shapes: Iron Works, Camera Kraft Wood Shapes
Buttons: Madeleine
Jewels: Primrose
Glimmer Sprays: Tutu
Stencils: Brocade, Bliss Stickable Stencils
Thanks so much for stopping by the Bo Bunny blog today, I hope you enjoyed checking out my project as much as I enjoyed making it! xo
Labels:
Gabrielle Pollacco,
Madeleine,
Stickable Stencils,
Wood Shapes
Subscribe to:
Posts (Atom)