Showing posts with label Scrapbook Page. Show all posts

Wednesday, March 20, 2019

Harmony: Layout with Angela

Hello BoBunny friends!
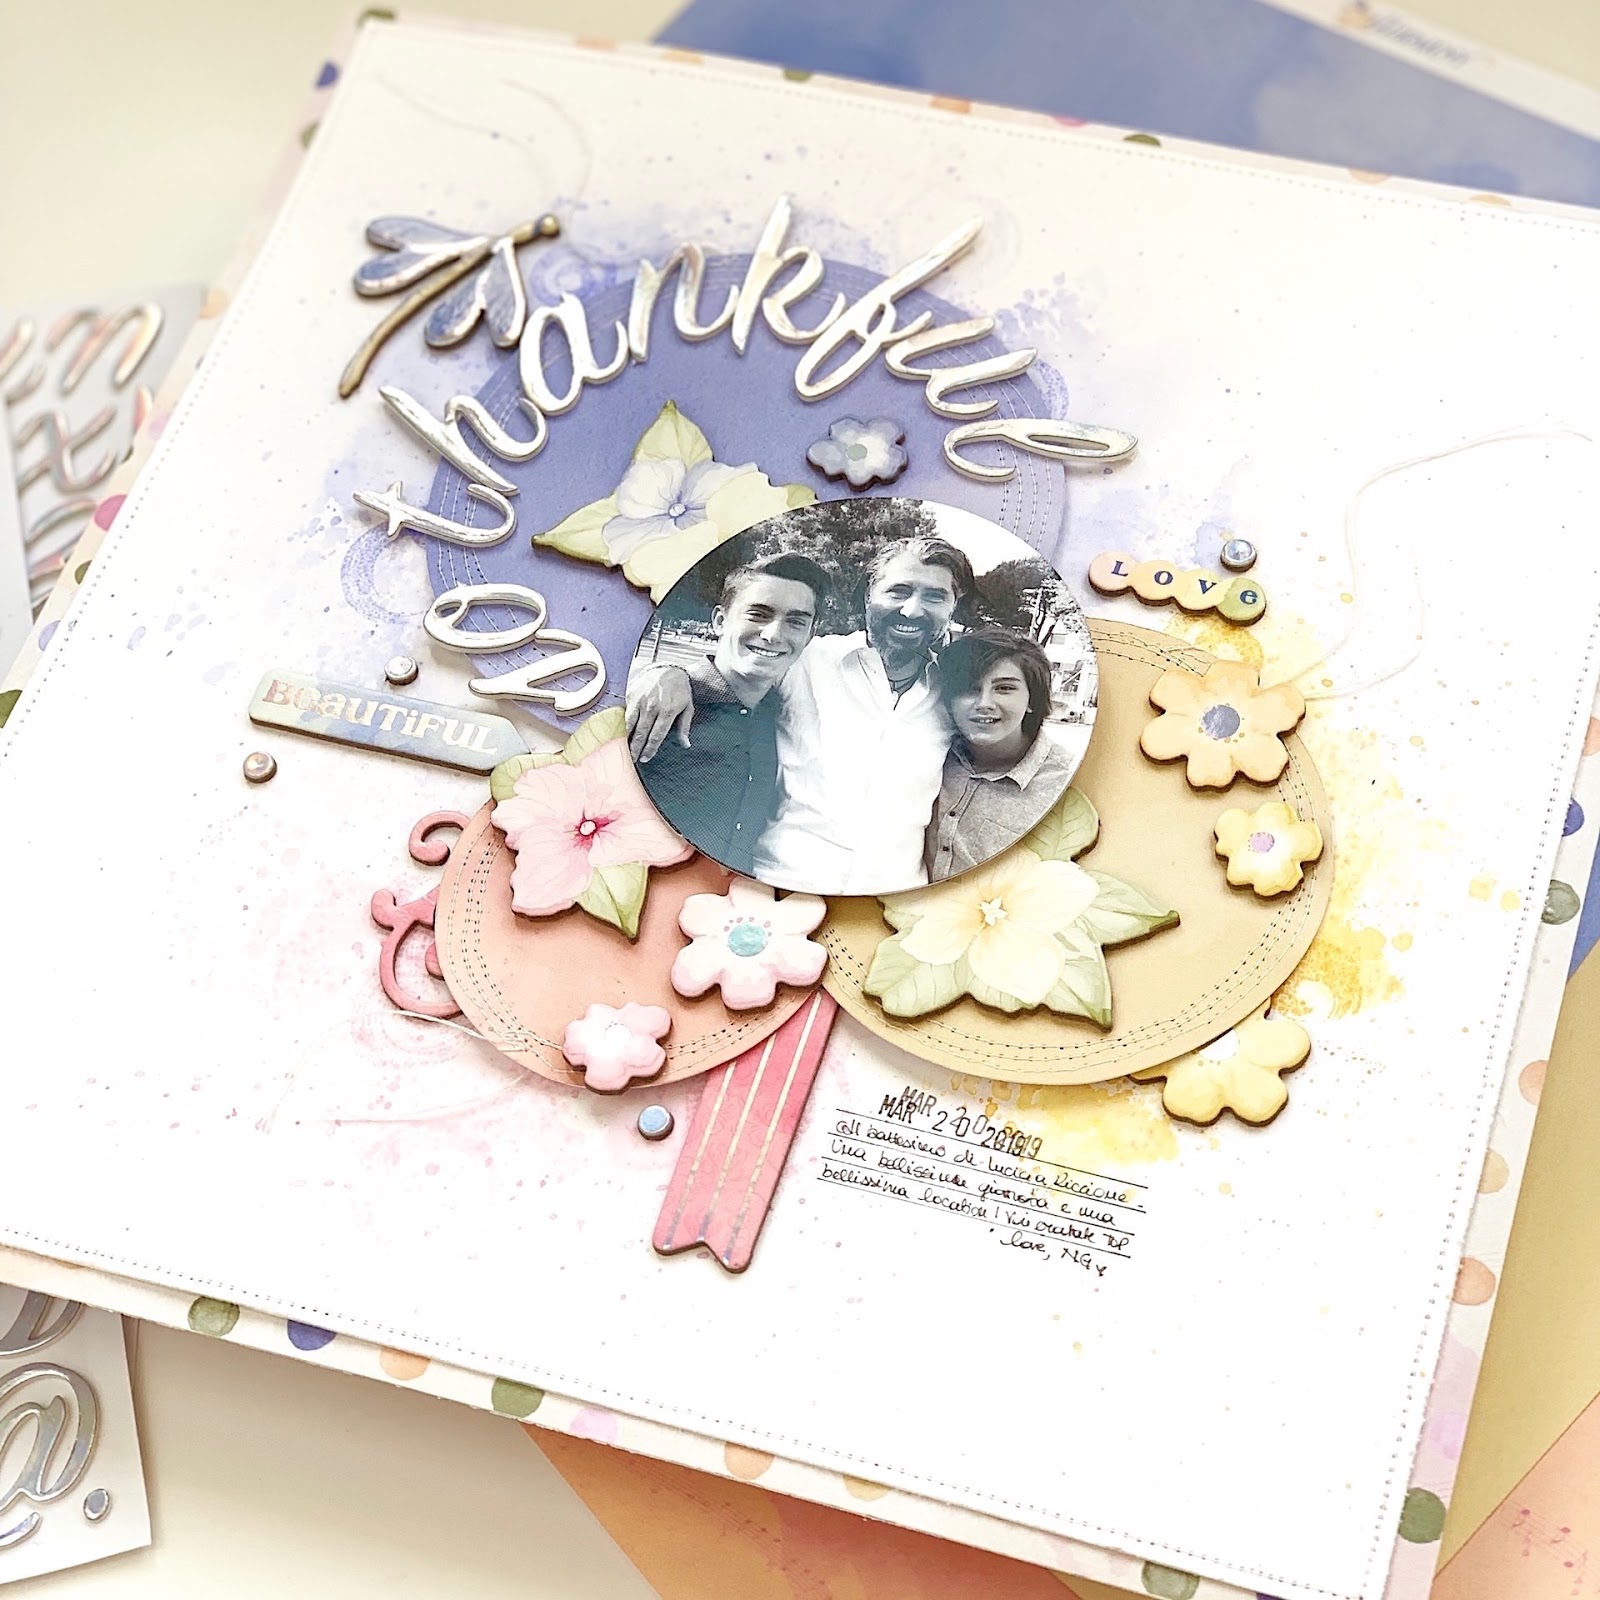
It's Angela here sharing a scrapbook page featuring the new charming Harmony collection. It's a fresh and tender collection with mainly pastels and lots of birds and flowers, perfect for spring projects for the coming sunny days.

Harmony_ScrapbookPage_Angela_March20_01.JPG


I started my layout choosing the color combo and I went for this trio: slate blue, light ocher and salmon. They match beautifully together. I love these shades also because they aren't perfectly solid, they have a soft watercolor effect. So, I cut 3 circles, one from each color, using the We R Memory Keepers Circle Spin & Trim. I cut a 5" circle in blu, a 4" circle in ocher and a 3" circle in salmon. I also cut my photo in a circle shape of 3" and 1/2. Then, I arranged the circles so that they slightly overlap each other and I put the photo in the center.

Harmony_ScrapbookPage_Angela_March20_02.JPG

Before adhering the circles, I stitched each one with my sewing machine. Then, I prepped the background. I used a smooth heavy white cardstock and I marked the position of the different circles on it. I colored and splattered the cardstock using Distress Inks that matched my circles, it means shaded lilac, scattered straw and spun sugar. To add more interest, I also stamped a few circles with the Painted Circles stamp set by BoBunny using the same Distress Inks colors.

Harmony_ScrapbookPage_Angela_March20_03.JPG

When everything was dry, I sticked in place the circles and started embellishing the page.
My idea was to keep everything inside the circles creating a kind of color clusters. So, I placed the title on the blue circles, because it was the biggest.

Harmony_ScrapbookPage_Angela_March20_04.JPG

According to my initial idea, I added yellow flowers on the yellow circles, pink flower on the salmon circle and so on. 
For the journaling, I added a brief description of the photo by hand, but before doing it I drew a few lines for being sure to write straight.

Harmony_ScrapbookPage_Angela_March20_05.JPG

Here is a close up of the clusters. As you can see, I used dimensional foam adhesive to have different height. In some places, like in the photo, I even used two pieces of foam tape, one on the other.
Last, I trimmed 1/4 of inc all around the page, I sewed all around and adhere it to a multicolor polka dots paper for framing the layout.

Harmony_ScrapbookPage_Angela_March20_06.JPG


That's all for today my crafty friends. Thanks for stopping by, I hope you feel inspired by my layout and by the beautiful Harmony collection.

Love,
Angela


BoBunny Supplies:
Patterned Paper: Harmony and Harmony Perfection/Abounds/Everywhere
Chipboard Stickers: Harmony
Stamps: Painted Circles

Other Supplies:
Bazzil Marshmallow
WRMK Circle Spin & Trim
AC foil foam stickers Armony
AC Sticky Tumb adhesives


Saturday, September 29, 2018

Beautifully Brisk Layout by Angela

Hello everyone! Nice to meet you again here on the BoBunny blog. Today I will share with you my latest layout featuring one of my favorite technique: fussy cutting! Patterned papers are full of beautiful illustrations easy to fussy cut. The new Autumn collection Beautifully Brisk has many different leaf sketches so I grabbed my scissors and I started cutting them out.Beautifully_Brisk_Layout_Angela_Sep18_01.jpg


As a base for my page I used a dusty blue paper, with a slight flourish pattern. Then, I adhere two photos at the top of the page and I mat them with craft cardstock, to match the color of the leaves.

Beautifully_Brisk_Layout_Angela_Sep18_02.jpg

I fussy cut lots of leaves not only because I like fussy cutting, rather because I love leaves in any shape, color and design. I would use them also with pasta, we say in Italy :)
Underneath the photos I arranged a first cluster of leaves in line and stitched them in place with my sewing machine.

Beautifully_Brisk_Layout_Angela_Sep18_03.jpg

The two joined photos created a space that allowed me to place the title in the middle. The letters I used are from the collection. They are copper, almost orange with glitter and that gives a lot of brightness to the page.

Beautifully_Brisk_Layout_Angela_Sep18_05.jpg

I added another cluster of leaves at the bottom of the page and I placed a bunner on top of it.
As I finishing touch, I spray gold splatters all over and voilĂ , the page is done!
Thank you so much for stopping by, I hope you liked my project and to have inspired you to fussy cut everything!
Love,
NG

BoBunny supplies:
Patterned papers: Beautifully Brisk/ Air, Autumn
Noteworthy: Beautifully Brisk
Layered chipboard: Beautifully Brisk
Glimmer spray: Gold

American Craft supplies:
Thickers: Beautifully Brisk glitter letters
Adhesive: Sticky Thumb foam dots

Saturday, August 18, 2018

Splashing Memories with Angela


Hi crafty friends,
It's Angela here sharing with you another summer memory. I made this layout using Escape to Paradise collection, that was perfect for this page and I used few embellishment from the same collection.  The lovely little face in the pic is my son Francesco having fun splashing everybody, that's why I chose 'Splashing' for my title. I used foam Alpha, so I've been able to bend a bit the letters, for a fun look. 

Escape_To_Paradise_Angela_Tombari_August_01.jpg

I kept on building the page fussy cutting strips of waves from a paper called exactly Waves and I arranged them at the bottom of the page. I slightly overlapped them and adhered with foam adhesive. Then, I insert in between the waves a few jumping fishes.

Escape_To_Paradise_Angela_Tombari_August_02.jpg

In the center of the page I positioned the photo, creating a layer of paper, die-cuts and sticker and embellished around with sequins and jewels keeping a monochromatic feeling, using only shades of blue. Under the photo, I placed also a glassing bag that I filled in with other colored sequins.

Escape_To_Paradise_Angela_Tombari_August_04.jpg

And voilĂ . the page is done! I hope you enjoyed this summery layout and thanks so much for stopping by. I'll see you soon.
Love,
Angela

BoBunny supplies:
Patterned papers: Escape to Paradise/ Escape to Paradise, Waves, Swim
Noteworthy: Escape to Paradise
Layered Chipboards: Escape to Paradise
Stickers: Escape to Paradise
Alphabet: Escape to Paradise thickers
Jewels: Double Dot Aqua
Glimmer Spray: Gold

Tuesday, July 24, 2018

You're My Wild Flower Layout with Angela


Hello crafty friends!
It's Angela here today to show you a layout featuring the new Jungle Life collection by BoBunny which is my preferred collection ever, at least in this moment ;P 
The layout is all dedicated to my hubby because he's living a hard time and I would like to let him know he has all my love and support.


Let's talk about how I made it. First, I used my Silhouette Cameo to cut the heart on white cardstock.
Then, I removed each triangle and replaced them with the animal patterned paper from the collection.
The cut-file shape is very simple and I used it just to save time but if you like the design and you don't have a cutting machine, no worry, you can make the heart cutting a few squares and dividing each square into two triangles.


About the title of the layout, I used the coordinated Alpha chipboards by American Crafts. I don't know if you can guess it, but the title should be read You're My Wild Flower, where the world flower is not written, but it's the flower itself. I know, I'm making it complicated ahahah!

Anyway, I made this big dimensional flower using the We R Memory Keepers Flower Punch Board and lots of layers of different stuff like buttons, crochet flowers, doilies, laser cut chipboard, die-cuts and fussy cut leaves.


As you can see from the photo below, the layout is pretty thick and I admit that, this is a thing that I love pretty much.


That's all for today my dear scrappy friends, I hope you enjoyed my project and to have inspired you to create a wild layout!

Love,
Angela

BoBunny Supplies:
Patterned Paper: Jungle Life/ Canopy, Animals, Zoo, Giraffe, Prowl
Noteworthy: Jungle Life
Stickers: Jungle Life
Brads: Double Dots Tuxedo
Blossom: Natural Earth Dahlia, Buttercup Bouquet
BoBunny Buttons
Laser-cut chipboard: Foliage
Doily: Small size
BoBunny white gesso
Stickable Stencils: Brocade
Glimmer spray: Bronze
Pearlescents: Sugar, Chocolate
Others:
American Crafts thickers: Jungle Life
WRMK Flower punch board

Friday, June 15, 2018

Big Little Friends Layout with Angela

Hi everyone!

It's Angela here with you today and I have another layout but this time with summer theme.
I love the geometric pattern of the Early Bird Fanciful paper an it immediately inspired me this fussy cut page


Early_Bird_Collection_Angela_Jun18_01.jpgTo start my layout I first cut a window in the center of the paper using a craft knife, so that it fitted the dimension of my photo. Then, I fussy cut with a pair of scissors the outline, following the shape of the hexagons and keeping an irregular look.
I also had the idea of cutting a few inner hexagons and creating tiny shakers with gold sequines here and there.

Early_Bird_Collection_Angela_Jun18_02.jpg

For the title I used a glitter rose gold foam alphabet by American Crafts, called Escape To Paradise, which adds lots of sparkling to the page.

Early_Bird_Collection_Angela_Jun18_03.jpg

I mounted the layout on a white Bazzil, using foam adhesive and then on another paper called Time Flies, always from Early Bird collection.

Early_Bird_Collection_Angela_Jun18_04.jpg

Just a few other embellishments like butterflies and acqua jewels and lots of gold and blue splatters and the page is finished.

Early_Bird_Collection_Angela_Jun18_05.jpg

I hope you like it and I hope to have inspired you somehow. Thanks for stopping by, see you soon.

Love,
Angela

BoBunny Supplies:
Patterned Paper: Early Bird/ Fanciful, Time Flies, Flutter
Noteworthy: Early Bird
Jewels: Double Dot Aqua
Glimmer Spray: Gold


Saturday, September 6, 2014

BoBunny September Sketch Challenge

Happy Saturday BoBunny Fans! We have an exciting announcement for you today. Our monthly Sketch Challenges are back! Each month we will share a new sketch and how one of our designers was inspired to create with it. To play along all you have to do is create a project inspired by the sketch, using BoBunny products and then share it with us using the InLinkz widget below. When you enter, you will have the chance to be randomly selected to win a fabulous prize package full of BoBunny goodness! We can't wait to see how you are inspired.

This is our September Sketch and Megan Gourlay shares her take on it using our new Christmas Collage collection!

BoBunny September 2014 Sketch Challenge

Sketches are such a great starting point when you get stuck on layout ideas! I've taken the sketch and flipped it. You can do pretty much what you like with sketches and yet still remain true to the sketch, so you could rotate it, or mirror image it, or even leave it as it is.

Merry Christmas Scrapbook Page by Megan Gourlay using BoBunny Christmas Collage

I die cut the poinsettias, inked the edges and added glittered brads for my centers. You can also see at the top of the photo where I have used some of the new pearls. I love that these are now available separately packaged in different shade. It makes it so much easier to decide which shade of red I want and whether I want a pearl or jewel!

Merry Christmas Scrapbook Page by Megan Gourlay using Christmas Collage

I also used the new Glitter Paste. This new product is brilliant for altering chipboard giving it a bit of bling without looking too much. I also stamped and inked the chipboard for added detail.

Merry Christmas Scrapbook Page by Megan Gourlay using Christmas Collage

I'm looking forward to seeing all your entries!
Megan

Merry Christmas by Megan Gourlay

BoBunny Supplies:
Patterned Paper: Evergreen, Decoupage, Caroling / Christmas Collage
6x6 Paper Pad: Christmas Collage
Brads: Christmas Collage
Stamps: Stitches, It is Written
Buttons: Christmas Collage
Dot Jewels: Red
Glitter Paste: Gold
Ink Pad: Licorice, Emerald


This is the BoBunny Prize Package for the September 2014 Sketch Challenge. One lucky person will win this Lemonade Stand Prize Package. Enter below using the InLinkz widget for your chance to win. The deadline to submit your layout for the September Sketch Challenge is September 30th.

BoBunny September 2014 Sketch Challenge Prize Package


Thursday, July 31, 2014

Using BoBunny Stamps on Scrapbook Pages

Welcome back to another day of BoBunny Stamp inspiration. Today, our designers are sharing ways to use stamps on scrapbook pages.


Live Your Own Fairytale by Juliana Michaels

Live Your Own Fairytale Scrapbook Page by Juliana Michaels #bobunny #enchantedgarden #scrapbookpage #stampsWhen I first laid eyes on Enchanted Garden, I knew immediately what I would use this collection for...scrapbooking photos of my nieces! Especially the youngest one who still loves fairies and princesses!

To create my page, I began by selecting the new Lavendar Dot Double Dot as my background. I then trimmed and cut the Enchanted Garden Mosaic and Magic patterned papers to create the large strip behind my photo.  The sweet little fairies were just calling to me, so I knew I wanted to add some of them to my layout.  I fussy cut two of them from the Pixies patterned paper. The title piece was also cut from this paper.

Live Your Own Fairytale Scrapbook Page by Juliana Michaels #bobunny #enchantedgarden #scrapbookpage #stamps

Next, I used the new BoBunny Stitches Stamp to create a border around the outside edge of my layout and along the edge of the large strip behind my photos. It really gives the look of machine stitching and is perfect way to add a touch of texture to a project. I wasn't done stamping though. I also used the To The Point Stamp. The "bubbles" looking stamp that comes with this set seemed like it would be perfect for adding a touch of magic to the fairies. I stamped it with clear embossing ink, added Stampendous Frantage Embossing Powder in Shabby Blue and then heat set it to melt the powder. This added a fun shiny and sparkly touch to the layout. I added the fairies to my layout using double sided foam tape and then tucked in some of the Elegant Kraft Wood Shapes. I even cut one of them in half to make the most of my embellishments.

Live Your Own Fairytale Scrapbook Page by Juliana Michaels #bobunny #enchantedgarden #scrapbookpage #stamps

The final touch was to hand punch all the little butterflies from various colors of BoBunny Double Dot. I then hand drew a butterfly image on each of them with a black pen to give them a stamped feel as well.

Live Your Own Fairytale Scrapbook Page by Juliana Michaels #bobunny #enchantedgarden #scrapbookpage #stamps

BoBunny Supplies:
Patterned Paper: Pixies, Mosaic, Magic / Enchanted Garden
Double Dot: Lavender, Caribbean, Turquoise, Almond, Island Mist
Stickers: Enchanted Garden Combo Sticker
Kraft: Wood Shapes Elegant
Stamps: Stitches, To The Point


6 by Bernii Miller


I must admit when I first started this layout, I had a totally different layout in mind! I wanted to use the sweet Doily stamps, that have just been released and was toying with the idea of creating a bright and bold layout, But then as I was going through all my gorgeous BoBunny goodies the Enchanted Garden collection literally fell off the shelf! I think it was a sign from the scrapbooking Gods, so I went with it. And boy am I glad I did!! I love how this layout came together, so much so that I have a step by step tutorial on my blog to show you how I made it. 


I played around with lots of blossoms and the Enchanted Garden ephemera pack to mainly complete this layout. I love the little surprises that you get in the ephemera packets and how well they are coordinated. So the ribbon, petals, book paper and trinkets came from the pack. 


I used three different ink colours to add hints of stamped images to the back ground, using the doily and lattice work stamp. I love the subtle hints of colour it adds to the background. I then went bold and added in black ink some paint splatter stamped images using the stained textures stamp set. 


Then to add a little interest to the layout, I added pops of colour by adding in a couple of the Harvest Orange bouquet petals to each of the flower clusters. This helps to draw the eye across the page. Please if you did want to see a little more detail on how I created this layout then head on over to my blog for a closer look. 

BoBunny Supplies: 
Patterned Paper: Moonlight, Imagine, Spellbound/ Enchanted Garden.
Double Dot: Lavender. 
Stamps: Stitches , Gateway, Stained Texture, Countdown.
Jewels: Frosting.
Ephemera Pack: Enchanted Garden. 
Doily: 6,5" Medium. 
Blossoms: Denim Blue Pansy, Plum Purple Pansy, Denim Blue zinnia, Plum Purple Bouquet, Harvest Orange Bouquet.   


Love this View by Amy Voorthuis


I have to admit I'm afraid to use stamps most of the time but this time I just kept adding more and more stamps! I'm addicted now lol.
Dragonflies are my favorite insects next to butterflies this picture was taken on our holiday just one week ago. They are so delicate and this one was hugh and had the most amazing colors.
I took out the Fantasy sheet from the Enchanted Garden collection and just stamped the Wall to Wall texture stamp in a pattern.


I'm not a hugh fan of orange but when I found those awesome flowers at a local scrapbook store on my vacation trip I had to use them. I can't make a layout without washi tape anymore it's so much fun to do!


I love the way all BoBunny collections can be mixed & matched for this layout I used Enchanted Garden & The Avenues such a wonderful combination.


BoBunny Supplies:
Patterned Paper: Fantasy, Spellbound/Enchanted Garden, Clocks, Stripe/The Avenues
Stamps: Wall To Wall, Zip-A-Dee-Doodle, Prairie Chic, Powder Mountain, Stitches, To The Point, Alphabet Stamp
Jewels: Autumn Song, Frosting
Washi Tape: Black & White
Blossoms: Harvest Orange Dahlia, Denim Blue Pansy
Trinkets: Isabella 

Thursday, July 10, 2014

Enchanted Garden Scrapbook Pages

We continue our week of Enchanted Garden projects with a trio of beautiful scrapbook pages.  Tracee, Agnieszka and Lisa each show how this collection is perfect for showcasing all things feminine.


Just So Special by Tracee Provis


As soon as I saw this pretty Enchanted Garden Collection I knew I had the perfect photo of my pretty little Granddaughter to go with it.


I started by cutting about a third of the Magic sheet off and used some gesso on the larger green side behind my photo placement, I also used the Geometric Shapes stamp set to create a little more interest to my background. Bo Bunny have some great Washi Tape designs and I added a little of the Black & White patterned to add to the mixed media feel of the background.


I couldn't resist fussy cutting the little gnome and raising him up on foam pads to create a 3D embellishment from the Mosaic sheet. I wanted to add in a blossom but didn't have the right colour. I took one of the Natural Earth daisies and I deconstructed it to make 2 flowers and then simply took some white paint and glitter and voila a perfectly coordinating flower. For the last touch I used another of the large stamp sets to the edges for added distressing.

Bo Bunny Supplies:
Patterned Paper; Magic, Imagine, Periodical, Pixies, Pathway, Mosaic/Enchanted Garden
Cardstock: Sugar Dot
6 x 6 Paper Pad: Enchanted Garden
Stickers: 12 x 12 Enchanted Garden
Brads: Modern Miss
Kraft Wood Shapes: Keys & Butterflies
Washi Tape: Black & White Patterned
Jewels: Glaze
Blossoms: Natural Earth Daisy
Stamps: It Is Written, Geometric Shapes


So Beautiful by Agnieszka Bellaidea


I have to admit I was in love with this collection the moment I saw sneak pick on my laptop. I even had photos ready - taken specially for this collection. Talking about commitment...
I had fun developing photos with colors matching this collection, this is our favorite place near home for photo shots.
I did some fussy cutting and distressing, used gesso and paste to create more textured background.


I have a special box where I keep my pretty stuff from older collection and every time I look there, this time I took a purple button and white flower.


Bo Bunny Supplies:
Patterned Paper: Fairies, Imagine, Moonlight, Mosaic / Enchanted Garden
Double Dot Cardstock: New Lavender Dot,
Stickers: Enchanted Garden Combo Sticker
Buttons: Isabella Buttons
Jewels: Fright Delight Jewels
Stamps: New Gateway Stamp, Curly Q Stamps
Washi Tape: New Kraft Wood


Imagine by Lisa Novogrodski


I'm in love with the beautiful lavenders, greens and blues that make the "Enchanted Garden" collection truly enchanting! My youngest daughter recently had her dance recital and these papers were truly magical to scrap those photos with.

I did a ton of layering! I love to pile the layers on with punched edges so the colors are revealed but you are left with the mystery of which papers were which. I leaned toward a slight vintage distressed look by adding in some golden browns on the leaves and inking.


I really love how the Denim Blue Zinnia adds the "pop" to this page. An unexpected color here that really makes this layout shine.


I've tucked in a fussy cut fairy, cut the little "I believe in fairies" off her and added it to the chipboard. Lot's of background inking with a mask right over the photo too so the flow would be maintained!

BoBunny Supplies:
Pattern Paper: Moonlight, Romance, Periodical, Fairies/ Enchanted Garden
Cardstock: Decaf Vintage, Lavender Dot/ Double Dot
Doilies: Medium
Noteworthy: The Avenues
12 x 12 Chipboard: The Avenues
Blossoms: Plum Purple Zinniz, Denim Blue Zinnia
Jewels: Family Is
Kraft: Wood Shapes Elegant
Stamps: It Is Written