Showing posts with label Bo Bunny Blossoms. Show all posts

Monday, October 29, 2018

Halloween: Vibrant & Spooky Layout with Emmy

Hello BoBunny fans!

Emmy here today sharing my newest creation with you! This week is all about Halloween on BoBunny's blog and I've designed a not-so-spooky layout featuring the Beautifully's Brisk collection from BoBunny's latest release. 


To create my background I used two different pattern papers. I divided one of them in three 10 x 30 cm stripes and cut off a 10 x 30 cm stripe from the other. After distressing their edges, I adhered them on top of a cream cardstock as shown. Then using a stickable stencil and glitter paste, I created the dimensional pattern. 


Once the glitter paste has dried I used various pre-cut embellishments, die cut paper doilies and stickers from the sticker sheet to decorate my page.


I added also paper blossoms and die-cut leaves to my design.


For my title I used a sticker word and a glitter alphabet.


As a final touch I added rhinestones and rhinestone-swirls. 


And here is a short YouTube tutorial on how I did it: 


BoBunny Supplies: 
Pattern Paper: Bright, Colorful, Vibrant, Autumn / Beautifully Brisk
Noteworthy: Beautifully Brisk
Layered Chipboard: Beautifully Brisk
Stickers: Beautifully Brisk
Brads: Beautifully Brisk
Double Dot Cardstock: French Vanilla Damask
Double Dot Jewels: Citrus Swirls
Double Dot Jewels: Citrus
Flowers: Natural Earth Pansy
Stickable Stencils: Oh My Stars
Glitter Paste: Copper
Craft dies: Darling Doily, Ornate Heart

Other: 
American Crafts Chipboard Alphabet Stickers: Beautifully Brisk
American Crafts Permanent Tape Runner and Refill
American Crafts Foam Dimen Dots


Thursday, September 7, 2017

Fall is (almost!) Here!-A Mixed Media Canvas Project with Elena

Hello BoBunny Friends,

Elena here. Fall is officially here and I definitely adore this season of the year. So that is why I decided to create a Fall inspired canvas.

Garden_Party_Canvas_Elena_September5_01.jpg

I chose a skinny long shape for my canvas as I kept the idea of falling leaves on my mind and wanted to showcase it on the canvas surface.

Garden_Party_Canvas_Elena_September5_02.jpg

I started with creating the texture on my canvas using gesso , mists and stencil pastes.
I even used the stencil with the falling leaves and added the Gold Glitter Paste for more falling leaves effect.

Garden_Party_Canvas_Elena_September5_03.jpg

For a dimensional look I stamped the images of the leaves on the Double Dots papers, cut them out and distressed the edges. I also used the crocheted, fabric and paper flowers from the Blossoms packs.

Garden_Party_Canvas_Elena_September5_04.jpg

But the main focus were the maple leaves that I drew freehand, no patterns or stencils for the shape and the colors. I used acrylic paints to draw them.

Garden_Party_Canvas_Elena_September5_06.jpg

I cut out the quote from the new paper line - Garden Party as well as a few leaf vines and the cut out pieces from the Noteworthy paper.

Garden_Party_Canvas_Elena_September5_07.jpg

To add a more crisp, fall feeling, much like the rain drops I added the jewels on the painted maple leaves.

Garden_Party_Canvas_Elena_September5_08.jpg

You can check my video tutorial for the process of creating


BoBunny Supplies:
Patterned Paper: Garden Party/ Love Story
Double Dot: Wasabi Vintage, Taupe Dot, Orange Citrus
Jewels: Citrus, Emerald
Stamp: Falling Leaves
Blossoms: Clover Bouquet, Natural Earth
Laser Cut Chipboard: Foliage
Glimmer Spray: Gold, Mint
Glimmer Paste: Gold
Stickable Stencil: Falling Leaves
Stencil: Backsplash
Gesso White

Pentart Supplies:
Stencil Paste: Vanilla, Silver
Acrylic Paints Semi Gloss: Brown, Red, Trumpet Flower, Gray, Olive.


Friday, September 1, 2017

Garden Party-Monochromatic Layout with Splashes of Greens

Funderar/Wondering by Ulrika Wandler

Hi! Ulrika here to give you a layout.
I worked with this prettiest Garden Party collection. Love that green together with black and white!

Funderar Scrapbook Page by Ulrika Wandler using BoBunny Garden Party Collection

The laser-cut wooden leaves were inked black, and then I added some Pentart green wax paste. Sorry for not being able to take the perfect picture to show that wax paste shimmer effect... Its a dymnamic look!

Funderar Scrapbook Page by Ulrika Wandler using BoBunny Garden Party Collection

I used some of the brand new BoBunny stamps! These circle patterns are so fun!

Funderar Scrapbook Page by Ulrika Wandler using BoBunny Garden Party Collection

I made some large circles using black gesso on the end of a large paper roll.
You can also see the stars made with a Stickable Stencil and some Pentart Wax Paste.

Funderar Scrapbook Page by Ulrika Wandler using BoBunny Garden Party Collection


BoBunny Supplies:
Patterned Paper: Garden Party / Whimsy, Enchanted, Soirée
Stamps: Circular Textures, Captured, Stitches
Chipboard: Foliage Lasercut Chipboard
Blossoms: Clover Dahlia
Stencil: Oh My Stars Stickable Stencil
Black Gesso

Pentart Supplies:
Wax Paste Green
Media Ink Olive


Wednesday, June 14, 2017

One Layout Three Ways Wednesday-with Katherine


Hello Everyone,
Welcome to my One Layout in Three Ways post using the new Weekend Adventures collection from BoBunny.  I've started with a clean and simple page, and then move onto the new stencils and pastes by my third version.

Here is a quick look at the different stages, before I go through them in more detail.

Smell the Flowers Scrapbook Page  by Katherine Sutton for BoBunny using Weekend Adventures

 Smell the Flowers by Katherine Sutton

Smell the Flowers Scrapbook Page  by Katherine Sutton for BoBunny using Weekend Adventures

I started my my page with Licorice double dot cardstock, I then chose some of the yellows and greens from the Weekend Adventure papers to match my photo.  I wanted some clusters of flowers so i used the new Posies stamps - and the largest stamp in this collection, I also used a couple of the smaller ones.  I took the large stamp and stamped it on both the Let's Play and Picnic papers - I cut out the whole image from the Picnic paper, leaving a thin green border, and then cut out just the flowers (not leaving any border) from the Let's Play paper.  I then mounted the flowers onto the green stamped image using foam squares.  I did the same for the smaller stamps and built up my clusters.  I cut out some words from Good Vibes and used the Noteworthy arrow as a template to make the same sort of shapes from my hand-cut ones.

Smell the Flowers Scrapbook Page  by Katherine Sutton for BoBunny using Weekend Adventures

Here is a close up of the stamped flowers.

Smell the Flowers Scrapbook Page  by Katherine Sutton for BoBunny using Weekend Adventures

For my next version of the page I used the new Mandala Garden stencil (this is already a favourite) and the new Stencil Pastes - I carefully mixed up my stencil paste colours to create a marbled effect with the stenciling - I used apricot, silver and black diamond along with a little bit of gold.  I also added in a few of the new dies - Mandala and Darling Doily - which are beautiful

Smell the Flowers Scrapbook Page  by Katherine Sutton for BoBunny using Weekend Adventures

Here you can see the marbled effect you get by adding a mix of colours through the stencils - I was really careful not to mix my paints up, so started with the lighter colours and wiped my palette knife between each application of paste.


Smell the Flowers Scrapbook Page  by Katherine Sutton for BoBunny using Weekend Adventures

For the final steps I added some gauze that I coloured with yellow ink and gold glimmer mist and then tucked it around my photo.  I used lots of the beautiful Pearlescents to add shimmer to my page - I used gold, sugar and butterscotch adding pearl drops on the Mandala die cut, around the photo and banners as well as some Licorice glitter paste and Gold Pearlescent drops to the centre of the flowers.  The final step was to add some of the new acrylic metallic glamour paints in Rich Gold.  I watered it down a little bit, covered my photo and then flicked it all around the edge.  I also switched my butterflies for the more glittery layered chipboard ones.

Smell the Flowers Scrapbook Page  by Katherine Sutton for BoBunny using Weekend Adventures

 Here you can see all the Pearlescent drops and glittery butterflies


Smell the Flowers Scrapbook Page  by Katherine Sutton for BoBunny using Weekend Adventures

This shows the lines of pearls you can make with Pearlescents.


BoBunny Supplies:

Patterned Paper: Weekend Adventure - Let's Play, Stripe, Picnic and Good Vibes
Double Dot: Licorice
Noteworthy: Weekend Adventure
3D Layered Chipboard: Weekend Adventure
Stamps: Perfect Petals and Posies
Dies: Fly Away, Darling Doily and Mandala
Blossoms: Buttercup bouquet
Stencils: Mandala Garden
6 by 6 Pad: Double Dot Chevron
Pearlescents: Gold, Butterscotch and Sugar
Glimmer Spray: Gold

Pentart Supplies:

Stencil Paste: Apricot, Silver and Black Diamond
Metallic Glamour: Rich Gold

Saturday, May 27, 2017

Serendipity,Stencils, Stamps and Dies with Katherine


Hello everyone, welcome to paper crafting Saturday and I have a new page to show you using Serendipity and lots of the new dies and stamps that have been released.

Your are Amazing - Katherine Sutton

You are Amazing Scrapbook Page by Katherine Sutton for BoBunny using Serendipity

I started the page with some stenciling using the Backsplash stencil and Pentart Structure paste, I then used the Lots of Love stickable stencil with some of the new Apricot Pearl stencil paste.  Continuing to layer up my media I used some Mint and Gold glimmer mist and then the text stamp from the Take Note stamp set.  

I used the Mandala, Darling Doily and Ever After Card dies.  For the Doily and Mandala die I added a golden edge using the new rich gold Glamour Acrylic (it is loaded with golden sparkle).  I used a mixture of the Serendipity papers for my photo mounts - Aviary, Branches, Take Flight and Stripe - I distressed and tore portions.  In the corner I created a cluster of flowers from the Natural Earth Pansy and Clover Green Zinnia ranges, and then added a bit more interest with some of the die cuts from the Ever After Card flower dies.  A few gems, some chipboard and Noteworthy and the page was done.


You are Amazing Scrapbook Page by Katherine Sutton for BoBunny using Serendipity

The butterflies are in the Noteworthy collection and you can see the layers of mist and stamping and stenciling.


You are Amazing Scrapbook Page by Katherine Sutton for BoBunny using Serendipity

I added a little bit of twine to highlight the chipboard.


You are Amazing Scrapbook Page by Katherine Sutton for BoBunny using Serendipity

A flower cluster backed with die cut flowers and a few gems.


BoBunny Supplies:

Patterned Paper: Serendipity - Aviary, Branches, Take Flight and Stripe
Double Dot: Vanilla Cream
Noteworthy: Serendipity
Jewels: Emerald Green and Mocha
Flowers: Natural Earth Pansy and Clover Zinnia
Layered Chipboard: Serendipity
Stencils: Backsplash and Lots of Love
Stamps: Take Note
Dies: Mandala, Darling Doily and Ever After Card
Glimmer Spray: Mint and Gold

Pentart Supplies:

Structure Paste (white)
Stencil Paste: Apricot Pearl 
Glamour Acrylic Paint: Rich Gold


Tuesday, March 14, 2017

Life in Color and Pentart Metallic Wax Paste with Irene


Hello Everyone! It's Irene here and my assignment for today is to create a layout with 3 different looks using BoBunny's Life In Color collection with Pentart Metallic Wax Paste. Here is a collage of my layout in 3 versions.


Life Is A journey Layout by Irene Tan using BoBunny Life In Color Collection

Now, let's take a look at my first layout. It's a clean and simple layout which only involves some cutting and pasting onto the layout. I've cut out several images from the pattern papers and use them to layer on the layout.

Life Is A journey Layout by Irene Tan using BoBunny Life In Color Collection

Moving on to the second layout. This time, I've raised the difficulty a bit by adding some mixed media techniques on it. I've done some stamping, misting, inking and stenciling on it.

Life Is A journey Layout by Irene Tan using BoBunny Life In Color Collection

Finally, here is the third layout. This time, I've cut out more intricate images from the pattern papers to add to the layout. I've also added several different elements such as die-cuts and flowers to it. I've cut out some keys and key holes using the Royal dies by BoBunny. The die-cuts and flowers are painted with some Pentart metallic wax paste to create the shiny look on it. To give more dimension to this layout, I've added some brads and BoBunny transparent gel (extra shine!) to some of the embellishments.

Life Is A journey Layout by Irene Tan using BoBunny Life In Color Collection

Below are some close-ups on this layout.

Life Is A journey Layout by Irene Tan using BoBunny Life In Color Collection

Life Is A journey Layout by Irene Tan using BoBunny Life In Color Collection


Life Is A journey Layout by Irene Tan using BoBunny Life In Color Collection


Life Is A journey Layout by Irene Tan using BoBunny Life In Color Collection

Hope you all like today's layouts and see you all soon!


BoBunny Supplies:

Patterned Papers: Life In Color, Hidden Treasures, Eclectic, Graphic, Typewriter/Life In Color

Noteworthy: Life In Color

Blossoms: Natural Petals

Stamps: Stained Textures

Dot Brads: Aqua

Ink Pad: Emerald, Blueberry

Stickable Stencils: Alphabet

Dies: Royal

Transparent Gel


Pentart Supplies:

Metallic Wax Paste: Silver


Friday, February 10, 2017

Petal Lane and Pentart Lasur for Interiors with Ulrika


Fine Art on Easel by Ulrika Wandler


Hi all you scrappin' people out there! Ulrika here to show you this fine art piece and easel treated with Pentart Lasur which I made.

I started with using Pentarts Lasur for indoor use on the wooden easel.

When the lasur had dried I used the Pentart metallic Wax Paste and applied it gently with my fingertip. Both are easy to use.

You Make My Heart Smile Fine Art by Ulrika Wandler using BoBunny Petal Lane collection

Then I made this canvas, starting with making a crackle background with Pentart crackle paint. I have used papers and embellishments from the brand new Petal Lane collection!

You Make My Heart Smile Fine Art by Ulrika Wandler using BoBunny Petal Lane collection

I love how the ebony-colored lasur paint makes the perfect background for the pink and yellow fine art!

You Make My Heart Smile Fine Art by Ulrika Wandler using BoBunny Petal Lane collection

I used a lot of pretty chipboard pieces on my canvas.

You Make My Heart Smile Fine Art by Ulrika Wandler using BoBunny Petal Lane collection


BoBunny Supplies:
Patterned Paper: Petal Lane / Love Notes, Happiness, Blooms
Chipboard: Petal Lane Chipboard
Doilies: 4" small
Dot Jewels: Double Dot Citrus Jewels

Pentart Products:
Lasur for Interiors Ebony
Cracking Paint system 1 and 2 Victorian Pink
Wax Paste metallic Silver


Sunday, February 5, 2017

Petal Lane and Pentart Lasur for Interiors


Hello BoBunny Friends!

Emmy here today with a brand new project to post. And since it is Sunday Fun Day I've got something really fun to share with you today!

This week the design team has the pleasure to work with the amazing Petal Lane collection and since the colors are perfect for a girl's party, I decided to create sweet treats for the little guests.


And here are some close ups:

I used Double Dot 12 x12 cardstock and the new Emoji die to die cut cute shapes to put in the packages, almost for a confetti feel


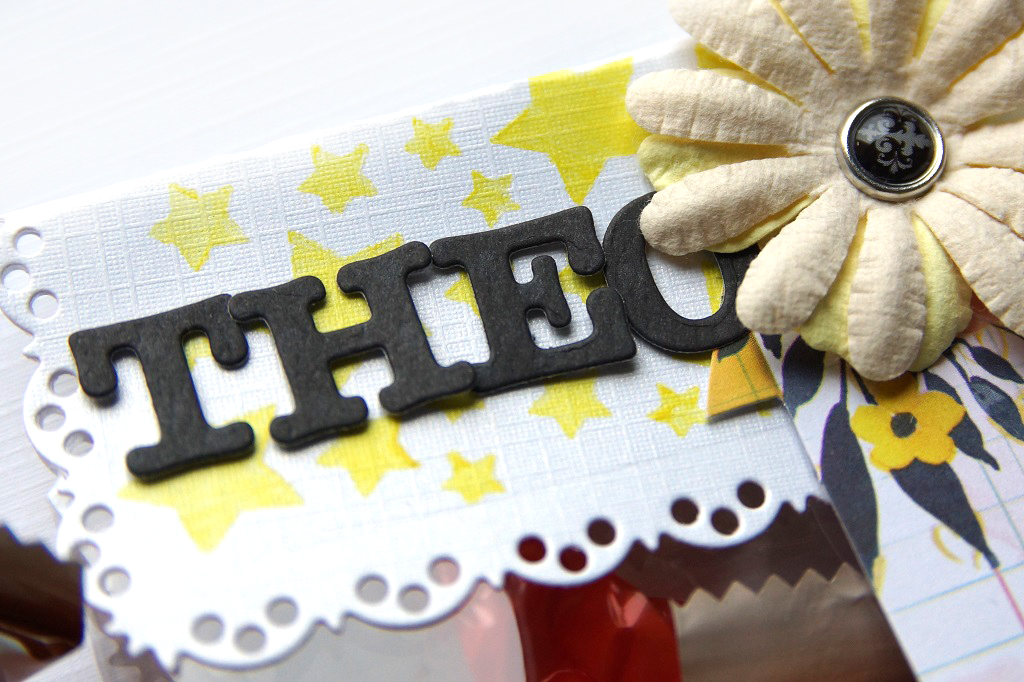
I used plain white cardstock and the Love Squared die to cut the labels. Then, I created the starry pattern using the Oh my Stars! Stickable Stencil and Lasur for Interior in yellow.  This medium has a different texture and finished look than any regular paints. Lasur has an almost watery texture to it so it goes on lightly and a bit like a wash vs a full body paint.


Using the ABC Die, cut the names of your little guests using die cut letters. Use pre-cut shapes, Blossoms and Double Dot brads to decorate the packages.


BoBunny Supplies: 
Pattern paper: Sunshine / Petal Lane
Noteworthy: Petal Lane
Clear Stickers: Petal Lane
Brads: Tuxedo
Blossoms: Buttercup
Double Dot Cardstock: Buttercup, Pink Punch, Licorice 
Dies: All Caps, Emoji, Love Squared
Stickable Stencil: Oh My Stars
Tools: Soft Grip Scissors

Pentart Supplies: 
Lasur Gel Indoor: Yellow