Showing posts with label Home Decor. Show all posts

Saturday, September 14, 2019

DIY Home Decor Project


Hi, Crafty friends!!

Elisa here from Italy!
Today I want to share with you my new project: A "Home Sweet home" decor. But, what is behind it?? A large straw trivet!! So this is an altered item, of course. And Boulevard collection was the best to create a floral decor for my home!!!


This is the original Straw Trivet:


A bit of glitter gold paste on the external circles of straw and really a lor of red, white and yellow roses!!!
As color background for the inner part, this time I chose green.
And then I layered some wood effect paper as base for the sentiment.


For the sentiment I used my Silhouette with We R Memory Keepers Foil Quill!!! The effect is great!


I used also other embellishment by Boulevard collection: chipboard stickers and normal stickers too!! And I also die cut that wonderful ornament with the dark yellow cardstock.


I love the roses chipboard stickers in this collection: some have a wonderful gold foil effect on the edge. Some have a normal border. And the combo is perfect!!


The wood effect is really delicate... As the whole project !!


So this was only a Straw Trivet... A bit of creativity, a wonderful BoBunny paper collection, and now I have a great home decor!!

BoBunny Supplies:
12x12" Boulevard Pad
Boulevard Chipboard Stickers
Boulevard Stickers


Hope you enjoy it!
Till next time!


Saturday, February 16, 2019

Valentine Decor: Framed Piece

Hi everyone!
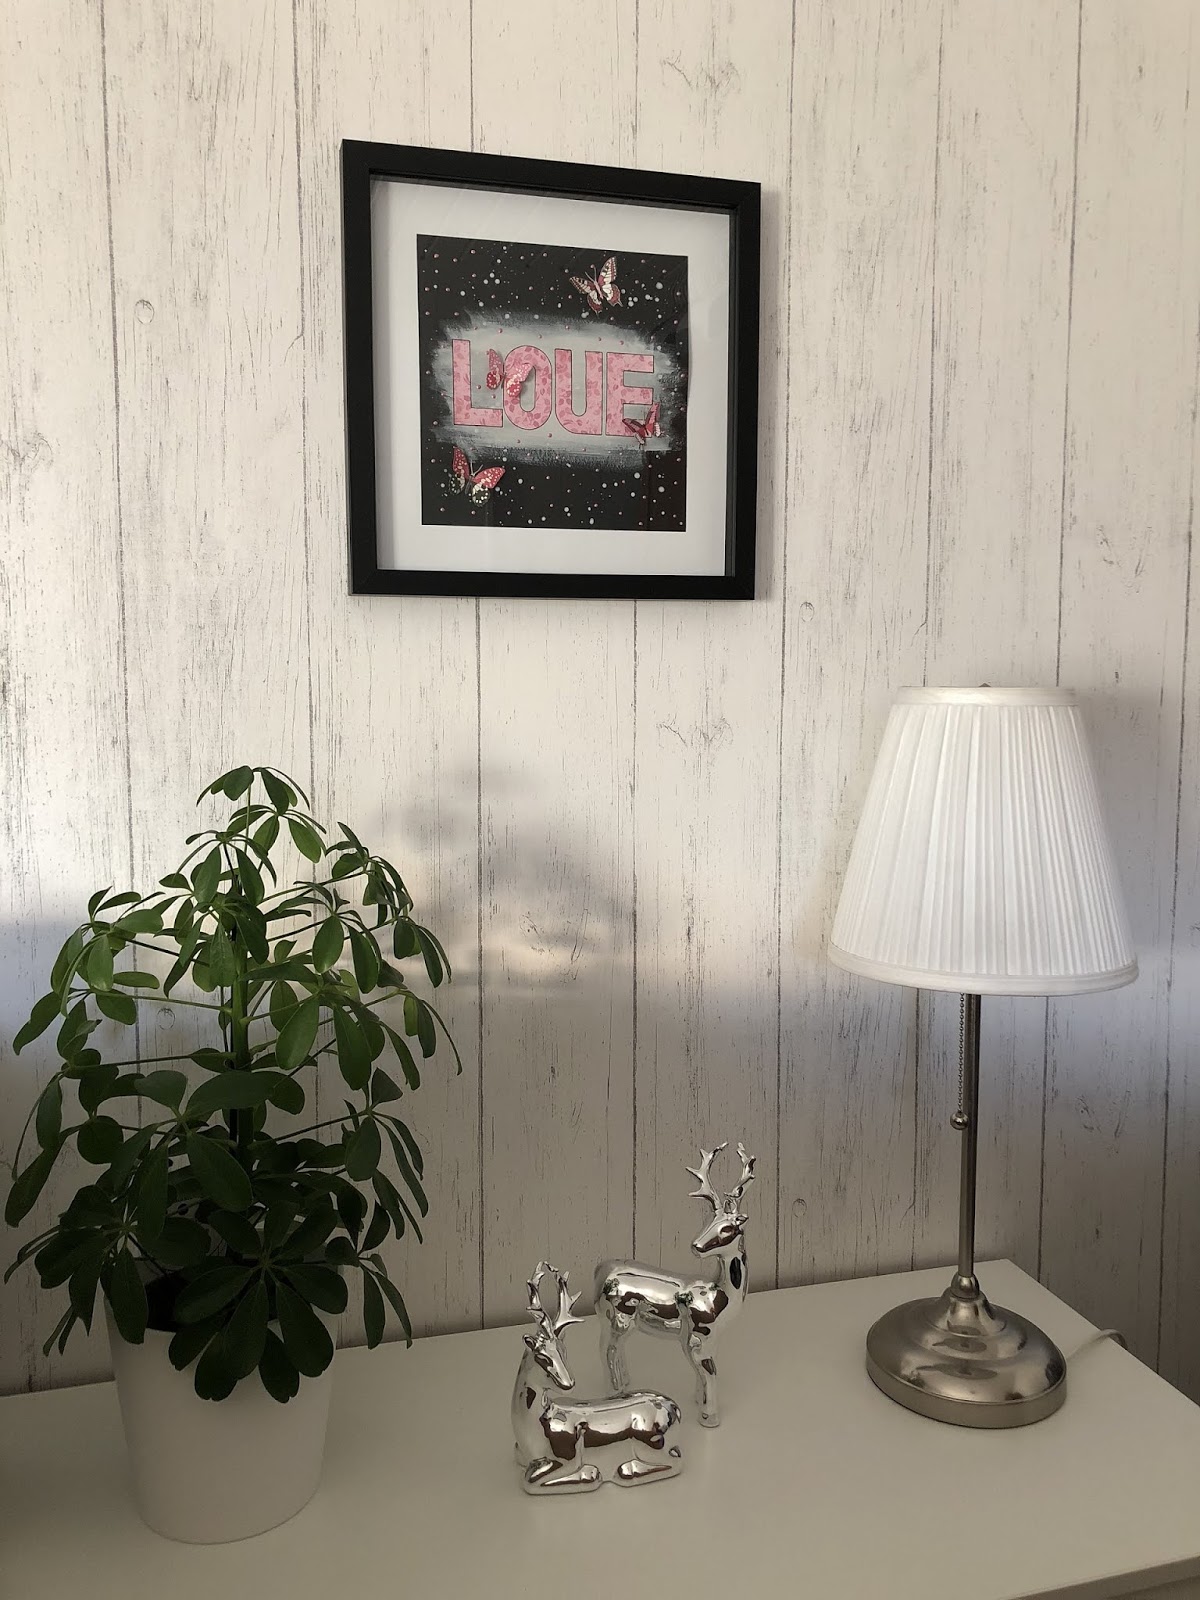
Today I´m back with a little valentines homedecor for you. I was thinking a long time of WHAT I wanted to do since I thought there were so many decorations in forms of lollipops, flags, pennants, festoons and so on on the internet. So I decided to make a painting to hang on the wall. Will be nice to have together with pennants and other decorations in my opinion.
So for today I have a painting for you and I really hope you will like it!
I made it black, with and pink, love these colors together and I also think it fits my home!
I used the mini alphabet punchboard to cut out the letters, black cardstock that I painted some white gesso on and also made some splatter with the white gesso. When I did the splatter I mixed it up with a little bit of water and then splatter on the painting with a brush.
Cut out the butterflies from a pattern paper from the collection and glue it on here and there.
I also made a lot of pink dots with the pearlescents blush.
And I really like it and love have it on the wall.


BoBunny Supplies:
Mini alphabet punchboard
Pattern paper from Sweet clementine collection
White gesso
Blush pearlescents

Other:
White and black cardstock
Ordinary black pen
Have a nice day!


Friday, November 25, 2016

Just like a snowflake!


Hi Everyone!  I have some gorgeous paint effects courtesy of the Pentart Dekor Paints and beautiful papers from the Winter Wishes collection.

"Just like a Snowflake You are Unique and One of a Kind", - Katherine 

Just like a snowflake mixed media by Katherine Sutton using BoBunny Winter Wishes

There are lots of layers on this project, starting on the frame so I will talk you through what I did.

Just like a snowflake mixed media by Katherine Sutton using BoBunny Winter Wishes

This is the frame I used, an old one that had a few knocks and scrapes.  I used the Pentart Primer Paste in order to nicely prime the surface and also to cover up some of those dents.  I used this rather than just the normal Dekor Paint Primer for the base coat as this has a bit more body to cover up some of those knocks.

Just like a snowflake mixed media by Katherine Sutton using BoBunny Winter Wishes

These Pentart Dekor Paints have a beautiful, chalky feel to them,  I started by covering the primed frame with the darkest colour - Soft Gray.  The coverage is very good on these, and they don't take too long to dry.  After the Soft Gray, I then added a layer of Victorian Pink and finally some Apricot to create a non-uniform look.

Just like a snowflake mixed media by Katherine Sutton using BoBunny Winter Wishes

Once I had my layers of paint, I used some fine sand paper to rub through the layers, so you can see patches of the gray and pink, I rubbed a little hard in a few areas and ended up with some of the wood showing, and I really liked the look. 

Just like a snowflake mixed media by Katherine Sutton using BoBunny Winter Wishes

After the sanding, I also added a layer of the clear transparent Wax Paste to help seal it.

Just like a snowflake mixed media by Katherine Sutton using BoBunny Winter Wishes

In this picture I have added some of the Wax Paste in silver, I was a little heavy handed so I added some more white primer over the top to tone it down, plus a little bit of Sugar Glimmer Mist.  I also then went back to add a few extra smudges of some pink and gray paints.

In the middle, I used one of the frames from the Noteworthy collection in Winter Wishes, as it has the most beautiful verse on it.  I backed it on a paper called Icicles and I used my Winter Fun stencil and the silver and sugar glitter paste to create the background.  Then, I added a few Graphite Pearlescent drops, a Christmas tree from the Noteworthy collection be-decked in tuxedo jewels.  Next, some gauze and silver thread and punched snowflakes and I was nearly there.  The final touch was a little more of that Sugar Glitter Paste to add a final touch of sparkle around the frame.


Just like a snowflake mixed media by Katherine Sutton using BoBunny Winter Wishes

You can see the layers of paints, and a little of the glitter shimmer.


Just like a snowflake mixed media by Katherine Sutton using BoBunny Winter Wishes

This shows some of the stenciling, using Winter Fun, that I did for the background - I started with the Sugar Glitter Paste first, and left some gaps, then went in with the Silver, giving a nice blended glittery background.

BoBunny Supplies:
Glimmer Mists: Sugar
Noteworthy: Winter Wishes
Papers: Winter Wishes Icicles
Pearlescents: Graphite and Sugar
Jewels: Tuxedo
Stencils: Winter Fun
Glitter Paste: Sugar and Silver

Pentart Supplies:
Paints: Pentart Primer Paste/Gesso, Dekor Paint Soft Gray, Dekor Paint Soft Victorian Pink, Dekor Paint Apricot
Wax Paste: Transparent and Metallic Silver


Wednesday, February 24, 2016

Inspirational Believe Canvas!


Wednesday greetings to you, For my assignment today, I went off the page creating some inspirational home decor on two 5x7 flat canvas panels featuring our new Believe collection.

Inspirational Canvas Home Decor by Rhonda Van Ginkel

Inspirational Panel Canvas Home Decor featuring Believe Collection and Keeping Tabs Die for BoBunny designed by Rhonda Van Ginkel

To begin, I used Frost Glimmer Spray and painted around the edges of both panels. I then went back and touched some Mint Glimmer Spray along the borders where my paper edges also have green accents.

Inspirational Home Decor Canvas Panels featuring Believe collection and Keeping Tabs Dies by BoBunny designed by Rhonda Van Ginkel

Next, I selected my pattern paper "Amen", and trimmed to fit. I adhered with Mod Podge. I selected a few of my favorite inspirational quotes in the collection from Noteworthy and the Chipboard. To accent the bible verse sentiment, I cut a tab using a Keeping Tabs Die from the "Marvelous" paper, then added a Clear Sticker to accent it.

Inspirational Home Decor Canvas Panels featuring Believe collection and Keeping Tabs Dies by BoBunny designed by Rhonda Van Ginkel


The second panel featuring a Noteworthy bible verse sentiment topped off with a Chipboard ribbon accent. To finish, I punched holes and attached the canvas with ribbon to hang together vertically. I love the bright vibrant colors and inspirational feel of this line!

BoBunny Supplies:
Patterned Paper: Amen, Marvelous / Believe
Glimmer Spray: Frost and Mint
Noteworthy: Believe
Chipboard: 6x12 Chipboard / Believe
Dies: Keeping Tabs Dies
Clear Stickers: Believe

Sunday, September 6, 2015

Feeling Festive for Autumn!


Hello everyone…anyone in the mood for a Autumn party?
Today we are featuring a table center piece worthy of a party!

I made three cubes from cardboard measuring 2” x 2”, 3” x 3”, 4” x 4”; all were painted in basic fall colors with acrylic paint, but could also be inked.

                 
 Cutting Enchanted Harvest Traditions into squares will provide the corresponding size for the sides of the cubes.

                
 Stacking the cubes make a fun, tall display! A postcard from the Enchanted Harvest Fall paper was added on top with a twisted wire.
   
              
 Many various Daisy, Pansy, Zinnia and Dahlia Blossoms were added around the cubes to give the affect of flowers growing from the base.
                    

 Use this craft as a fun centerpiece or as fall home décor!
Happy crafting! J

BoBunny Supplies:
1 Enchanted Harvest Traditions
1 Enchanted Harvest Fall
1 Enchanted Harvest Autumn
Misc Me 12 x 12 Chipboard Inserts

Various Blossoms

Wednesday, August 19, 2015

Home Decor!


Hello BoBunnies! My project for today - an altered house - was created with newest collection, You're invited. 
I love this color combo , a mix of pastels but also addition of black.
This house will be a simple decor element for a sweet girl.

altered_house-by_agnieszka_bellaidea_feauturing_youreinvited_collection_by_BoBunny

I added the new chipboards /heart and celebration/ and painted the second one with Glitter Paste.

altered_house-by_agnieszka_bellaidea_feauturing_youreinvited_collection_by_BoBunny

Flowers are great addition to anything "girly" :)

altered_house-by_agnieszka_bellaidea_feauturing_youreinvited_collection_by_BoBunny

You can go simple with a decor like this or you can add many more elements from papers or even from any collection you have already like dolls, mini cars or shells.

altered_house-by_agnieszka_bellaidea_feauturing_youreinvited_collection_by_BoBunny

BoBunny Supplies:
Patterned Papers: Sore, Bash /You're invited
Glitter Paste: Wasabi
Laser Cut Chipboard: Celebrate

Friday, August 8, 2014

Getting Ready for Back to School with Desktop Decor and Organizers

As we continue our week of Back To School projects, we wanted to share some ways to decorate and organize your child's desk with all the things they might need during the school year. From art supplies to school supplies, they will have it all right at their fingertips.


Desk Organizer by Gabrielle Pollacco


Who says organized has to be boring?  I used the beautiful and whimsical Enchanted Garden collection to add some 'pretty' to a desktop organizer.  I began with a bare/simple cardboard magazine/file holder and covered it with some of my favorite Enchanted Garden papers (Periodical).  I trimmed the edges with some lace trim from the Natural Earth Lace package.


I then created a tray for it all to sit in using some cardboard boxes I had in my stash.  I lined the tray with some Island Mist Double Dot paper.  I also made another tiered tray and covered this with the 'Spellbound' paper.  I added some stamping with the Distressted Textures and 'It is Written' stamp sets.


I wanted to stick with the 'nature' elements you see in the Enchanted Garden papers, to embellish this project, so on the spine of the magazine holder I fussy cut one of the frame designs from the 'Pixies' paper and then made a little nest design with some Spanish moss and added an egg I made from some air dry clay.


For the pencil cup I chose to use the striped paper from the coordination 6x6 paper pack so that I would get a thinner strip design on the cup.  I continued with the nature theme and made another small egg/nest design with some more Spanish moss and some little eggs that I made from air dry clay.

This was such a fun project to make and I think it would make a wonderful teacher's gift....or you might, like me, decide it looks just perfect on your own desk :)

Bo Bunny products used on this project:
Patterned Papers:  Periodical, Pixies, Spellbound, Moonlight/Enchanted Garden, Timeless/Somewhere In Time (backside of the magazine holder)
Cardstock: Island Mist Double Dot
6x6 Paper Pad:  Enchanted Garden
Lace: Bo Bunny Natural Earth Lace pack
Blossoms: Clover Bouquet package
Stamps:  It is Written, Distressed Textures
Jewels: Powder Mountain
Jewel Flourishes: Frosting


Back To School by Tracee Provis


What better way to brighten up your desk than a fun desk tidy to keep all your supplies close to hand.
The Pop Quiz collection is perfect for all things school related and I loved creating this project with it.


I started by painting this wooden cutlery holder from Ikea, I added some Washi tape around the bottom and some rulers from the Pincushion Collection along the top edges to cover up some of the plain wood. Using the Library sheet from the Pop Quiz Collection I created a perpetual calendar that hangs on the front of the tidy. I added tabs to the month stickers from the Zip A Dee Doodle collection to make them interchangeable and the ones you aren't using can be stored in the drawer underneath, along with all of your smaller supplies.


I used all 4 sides of the holder to hold my supplies, on the back I created a cork board for notes. I took the pencil chipboard sticker from the 12 x 12 pack and added a magnetic strip to hold the paper/tickets/notes. As it's cork you could also add some push pins as well.


For the drawer I used another of the 12 x 12 chipboard pieces on the front and as well as looking awesome it acts as a strengthener for the drawer front. I covered the rest of the drawer with the Graduation sheet using the houndstooth patterned side.
As a final touch I fussy cut some of the sweet monsters from the Our Lil Monster collection and they just peek out from here and there putting a smile on my face every time I see them.

Bo Bunny Supplies:
Patterned Paper; Graduation, Pop Quiz, Bookworm, Hall Pass, Library/Pop Quiz; Our Lil Monster/Our Lil Monster
6 x 6 Paper Pad; Pincushion
Cardstock; Charcoal Dot, Licorice Dot, Wildberry Dot
Stickers; Pop Quiz, Zip A Dee Doodle
Chipboard; 12 x 12 Pop Quiz
Brads; Pop Quiz
Noteworthy; Pop Quiz
Misc Me; Notepaper/Zip A Dee Doodle
Washi Tape; Black & White Patterned, Pop Quiz

Thursday, July 17, 2014

Lemonade Stand Home Decor Projects

We continue our week of Lemonade Stand inspiration with a couple of amazing home decor projects created by Denise and Tracee. Who knew this collection could make such a cute candy/cookie jar or an amazing summer wreath for your front door?!

Summer Sweet/Cookie Jar by Denise van Deventer


I created a sweet/cookie jar to place on my kitchen counter. I was inspired by the lovely fruit pieces in the noteworthy pack.  They remind me of all the things that I love about summer:- juicy watermelon, fruit on a stick and picnics in the park! I thought that I could even use it as an element in a summery table setting.


I used crackle paint for the foundation of my sweet/cookie jar and then added papers, some washi tape and lots of those gorgeous noteworthy pieces.


I also created these little umbrella's, which really were pinwheels to begin with and after some gentle persuasion, they became umbrella's. They took copious amounts of glue and patience, but I was really pleased with them in the end. I think they could be really cool for party features too!

BoBunny Supplies:
Patterned Paper: Lemonade Stand, Cream Pop, Squeeze Me/ Lemonade Stand
Noteworthy: Lemonade Stand
Buttons: Lemonade Stand
Chipboard:Layered Chipboard/ Lemonade Stand
Blossoms: Buttercup Daisy
Washi Tape: Modern Miss


Summer Wreath by Tracee Provis


The pretty vibrant colours of this collection lead you to imagine all things summer. I knew that I wanted to create a project that celebrated this gorgeous palette and what better way to display them all, than in a wreath for you to hang on the door or in your entrance hall.


I started by taking the Kraft Canvas Pleated Lace and attaching it to a circle of corrugated cardboard, for added interest I also attached a circle of the same corrugated cardboard that I wrapped in regular household string, I love the rustic look it gives to your projects. I then cut some scalloped borders from Double Dot cardstock to create and extra layer.


I cut rosettes from lots of the different papers in the collection both in the 12 x 12 and the  6x 6 paper pad. Using a hot glue gun I fixed them in a large cluster down the right hand side and a smaller cluster over on the left. I used lots of buttons and brads to create my centres and the summer stickers from the 12 x 12 sticker sheet made the perfect title. To finish it off I fussy cut a couple of tickets and tucked them into the rosette cluster, this now hangs in my hallway for all to see as they walk in the door.

Bo Bunny Supplies:
Patterned Paper: Lemonade Stand, Block Party, Chill Out, Cream Pop/Lemonade Stand
6 x6 Paper Pad: Lemonade Stand
Stickers: 12 x 12 Lemonade Stand, Pink Alphabet
Cardstock: Passion Fruit Stripe, Passion Fruit Flourish, Sugar Dot
Brads: Lemonade Stand, Avenues
Buttons: Lemonade Stand, Primrose, Modern Miss
Kraft: Canvas Pleated Lace