Showing posts with label Handmade flowers. Show all posts

Wednesday, September 18, 2019

How to Make Handmade Flowers with Denise

Hello BoBunny Fans

It's Denise here today to share how I make handmade flowers, using BoBunny cardstock. 

I created a Birthday card and used the flowers that I had handmade.

Boulevrad_Birthday Card_Denise_18 Sep 01

Here's a closer look at those handmade flowers.

Boulevrad_Birthday Card_Denise_18 Sep 02

The great thing about handmade flowers is that you can choose the shape, design and color to perfectly match any project.

I created a video of the process and I hope that you will see that it's really quite easy.


Thanks so much for stopping by the BoBunny blog today and we really hope to see you back for the next project. 

Have a marvelous day!


BoBunny Supplies:
Patterned Paper: De Belleville, Boulevard/ Boulevard
Cardstock: Blueberry VintageNoteworthy: Boulevard
Boxed Cards: Boulevard

Tuesday, December 18, 2012

Warm and Cozy Layout Tutorial

For technique Tuesday, Gabrielle is showing us how to make a 
layout that gives you the warm fuzzies using the 
Powder Mountain collection and some Tutu Double Dot!
I love it!

Cuddles
~ Use soft color palette (here I used a soft pink, grey and tan)
~ Decorating with soft fabric blooms (here I used Bo Bunny's crocheted blooms and made some felt  roses ...see a brief tutorial below to make these)
~ Add textural fabric elements (here I used some burlap, and paper lace as well as some crocheted lace) to give the page a homespun feel.
~ Add buttons and machine stitching, it's a quick way to give a page a soft fabric look. And don't forget the little details like tying some kitchen twine through the button holes, it gives a nice finish to the flower centers.
 Here are some close-ups of the page...
Here is a brief tutorial on how I made the felt roses, it's so easy with felt, you almost don't need glue because felt is almost like velcro at holding itself together!

Bo Bunny Supplies
Patterned Paper - Powder Mountain Flakes
Cardstock - Tutu Double Dot
Noteworthy - Powder Mountain
Stickers - Powder Mountain 
Buttons - Serenity, Welcome Home
Stamps - Midnight Frost
Flowers - Blush Dahlia, Blush Bouquet

Enjoy and go make some warm & cozy layouts of your own.
Then come visit us on Facebook and share.  
We love to see your creations.

Thursday, August 2, 2012

Quick & Easy 2 page layouts and more!

Today's post is LOADED!!

First of all we have some awesome 2 page layouts for you!
(okay...only 2 - 2 page layouts!  gggrrrrrrrr.... mine is sitting on my counter
top, so I DON'T forget to take it to work to scan)

A whole lotta good it's doing us there.  Sorry :(

And I'm sad cuz I used fun pictures at the beach in Cali when a couple
of my friends and I took a road trip 
and I was able to play with the new DETOUR collection.

I'm over it and moving on....
(but make sure to read all the way to the end... cuz there's more)

Today's formula for our layouts is:

4 patterned papers
1-2 pieces Double Dot cardstock
2 embellishment packs of your choice 

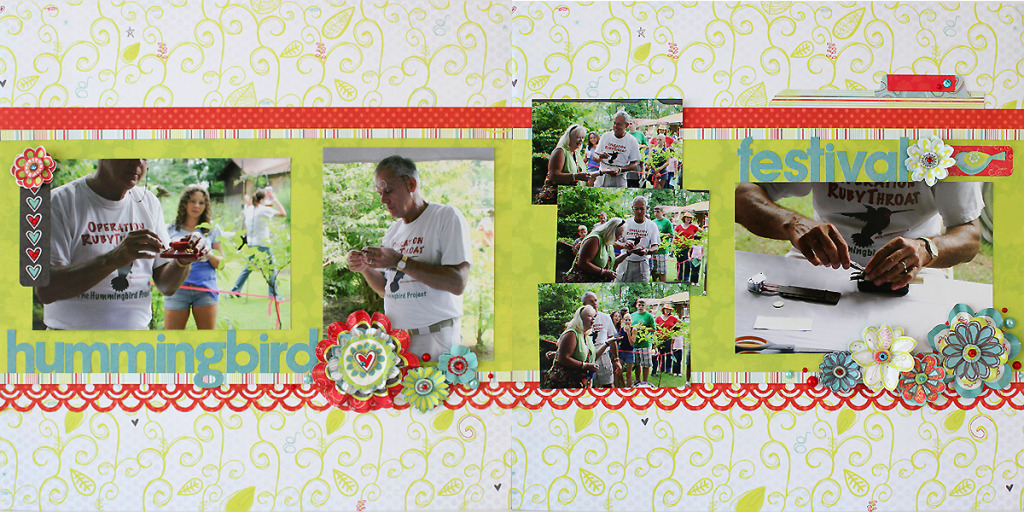
Hummingbird Festival
Juliana Michaels

Designer Tip:
The tabbed piece of paper contains my journaling 
about what I learned when I went to this festival. 
This is a great way to include journaling when you have a lot to say 
or if you want to keep it more private.

Create your own dimensional flowers from cardstock 
stickers or by fussy cutting like flowers
 from patterned paper and layer them with double sided foam tape. 

You can further embellish them by using Jewels as the center of the flower. For more details on how I created the flowers please visit my blog: 17turtles 
 How to use the left overs:

1. Create another layout by adding another full 12 x 12 sheet of paper and using the left over pieces of patterned paper and cardstock. 
2. Fussy cut more flowers to use on cards or another layout.
3. The extra stickers will certainly create another layout.
4. Use the jewels to embellish the left over stickers and use them on a card or layout.

 Bo Bunny Supplies:

Patterned Papers: Bubbles, Doodles, Wish/ Alora
(I used 2 of Bubbles)
Cardstock: Double Dot in Poppy Dot
Jewels: Alora
Stickers: 12 x 12 Combo Sticker/ Alora

Smile
Robbie Herring

 Designer Tips: 
1.    When choosing papers, be sure to consider both sides. The Apple Cider Journey paper has some really great shapes on the front side, and a plaid on the back side. I cut the shaped piece in the upper left side, the apple, the upper scalloped border and the word smile from the front side. The plaid on the back made the perfect print for layering punched flowers.

2.    Another way I used the backside was to choose the Apple Cider Dot paper. It had a nice word print that I used to help center my design and a dark dotted backside to punch a border and use for the back layers of my punched flowers.

3. Don't forget the packaging! In addition to using the layered chipboard for added dimension around my page, I also used the packaging to punch out leaves for my flowers.

4. Pull out your old scalloped scissors and use them to cut a contrast border around select pieces. I used mine to cut the scalloped border around the shaped piece.

 Left Overs: 
1. I have a LOT of the combo stickers left over. I will be using both the alphabets, borders and other shapes on future layouts. Those stickers go a LONG way and are such a great embellishment to buy to help stretch your supplies.

2. I also have quite a bit left of the Coffe Dot Cardstock. I keep a file folder for all my Double Dot Paper scraps. It will go into that folder to be used when I need accents.
Bo Bunny Supplies:
Patterned Papers: Apple Cider Collection-Apple Cider, Apple Cider Bounty, Apple Cider Dot and Apple Cider Journey
Cardstock: Double Dot in Coffe Dot
Layered Chipboard: Apple Cider
Stickers: 12 x 12 Combo Sticker/ Apple Cider


Now... for our next item of business...
It's a sad and a happy day.


We have love, love, loved having our fabulous guest designer Julie
play along with us all summer!  She has been amazing and exceeded any expectations we had.
I seriously don't know how she does it... she is so on top of things and is such a wonderful mom and wife and we have thoroughly enjoyed having her.
(And lucky for us... she has been playing and commenting and facebooking 
with us for a long time and we're not really losing her...) 


We love you Julie!  Thanks for playing.


And now.... 
We would like to introduce our next guest designer:


Lynn Shokoples
(and Jax and Daisy)


Hi Everyone! My name is Lynn Shokoples and I live  in Alberta Canada. It's a honor to be a guest designer at Bo Bunny. I've been scrapbooking since the beginning of time when all there was available was some paper, pens and scalloped rulers. I started my first baby album in 1992. Let's just say my style has evolved since then. I love to try new techniques and go between a shabby style to cute and fun layouts.  I've been a Bo Bunny fan right from the start and will admit to stashing some of eachcollection for that "special layout".   When I'm not scrapbooking, I'm a wife and a  mom to two wonderful young adults Nicole 24 and Ryan 20, a new son-in-law Christopher. I'm also a new mom to two rambunctious Goldendoodle puppies. Keeps my life interesting! I'm excited to be a part of this amazingly talented group of ladies whom I've admired for years, so thank you Bo Bunny!


Thank you Lynn... we can't wait for you to play!!!


Tuesday, July 10, 2012

July Card Challenge - Handmade Flowers

What a fun treat we have in store for you today... 
A few of our DT girls have made some darling handmade flowers
and added them to cards. (they've also given us lil tutorials on them)

Have you tried your hand at making flowers yet???
If you have, you know, and if you haven't, watch out...
It is soooo addicting!!

With Love 
by: Jolanda Meurs

 Tip: Put some glitter on the Bo Bunny Petals. Then use your Melting pot with clear ultra thick embossing powder. Make some layers and put one jewel in the middle of the Flower. Make ribbon bows. Make a knot as shown on the picture.
Glue the ribbon under the Petal.
 Supplies:
Patterned Paper: Hello Sunshine, Cut Outs/ Hello Sunshine
Rubons: Hello Sunshine
Jewels: Hello Sunshine
Petals: Hello Sunshine

Thnanks
by: Gabrielle Pollacco
 I used an EK Success Retro flower punch to make my 'carnation-like' blooms....first I spritzed the paper with some pink ink, then used a pair of Deco-edged scissors to give the petals the jagged edge that carnations have. I also crinkled the petals up a bit.
 I then took some floral wire, made a small fold at the tip of it and strung 3 of the punched blooms on the wire and adhered with glue.
 Supplies:
Patterned Paper: Welcome Home; Dreams, Et Cetera; Symphony
6x6 Paper Pad: Welcome Home
Cream Lace: Et Cetera Ribbon Trim
Butterflies: Cut from Country Garden Patterned paper. 

She lets her imagination run away with her
by: Romy Veul
 Designer Tip: To make the tiny flowers on my layout, I used a Donna Salazar die. I cut four flowers and slightly crumpled their leaves. I then stapled them and added a chipboard pearl (from the layered chipboard pack) together with a jewel in its center.

Supplies:
6x6 Paper Pad: Little Miss
Stickers: Little Miss Combo Sticker, Little Miss Dimensional Stickers
Chipboard: Little Miss Layered Chipboard
Jewels: Little Miss
Noteworthy: Little Miss


AND... The winner of June's card sketch challenge is.....
Alicia F
She made this adorable card with the Little Miss collection

Coffee anyone??
Thanks for joining us today and come play along with us in our Handmade flower challenge.
Just add an image of your card here with inlinkz and you'll be entered to win a fun prize!!


Alicia... e-mail us your mailing info so we can send you out a bag of happiness!