Showing posts with label Christmas Cards. Show all posts

Tuesday, December 10, 2019

Christmas Cards with BoBunny Time and Place

Hello BoBunny fans!

Emmy here today sharing my first post for December. With Christmas just a few weeks away, I thought I should try and finish my Christmas cards on time this year. And what a better collection to design Christmas (or any type) cards with than "Time and Place" from BoBunny.


To create the bases for the cards I used white cardstock. I used decorative edge punch to shape the long edge of one of the cards and a corner punch - to shape the other. 

To create the layers on top, I used pattern paper from the Time and Place collection and Double Dot Damask cardstock. I inked their edges with a brown ink pad and then I distressed them using a paper distresser. 


I added a silver dimensional layer on the horizontal cards using stenciling paste and a stickable stencil. 


To create the design on the cards I used different images from 12" pattern papers and pre-cut embellishments from the Noteworthy pack. I've adhered everything using foam dimensional dots. 


As a final touch I added rhinestones and I sprinkled white shimmering mist on top of all layers.

I hope I managed to inspire you today!

Have a great week!


BoBunny Supplies: 
12 x 12 Paper Pad: Time and Place
Pattern Paper: July, November, December / Time and Place
Noteworthy: Time and Place
Double Dot Damask Cardstock: Wild Berry, Kiwi  
Double Dot Jewels: Ruby Red
Stickable Stencils: Oh My Stars


Other: 
American Crafts Permanent Tape Runner and Refill
American Crafts Foam Dimen Dots
Ink pad - brown
White cardstock
Decorative edge punch
Corner punch
White Shimmering Mist
Silver Stencil Paste
Velvet flowers

Saturday, December 8, 2018

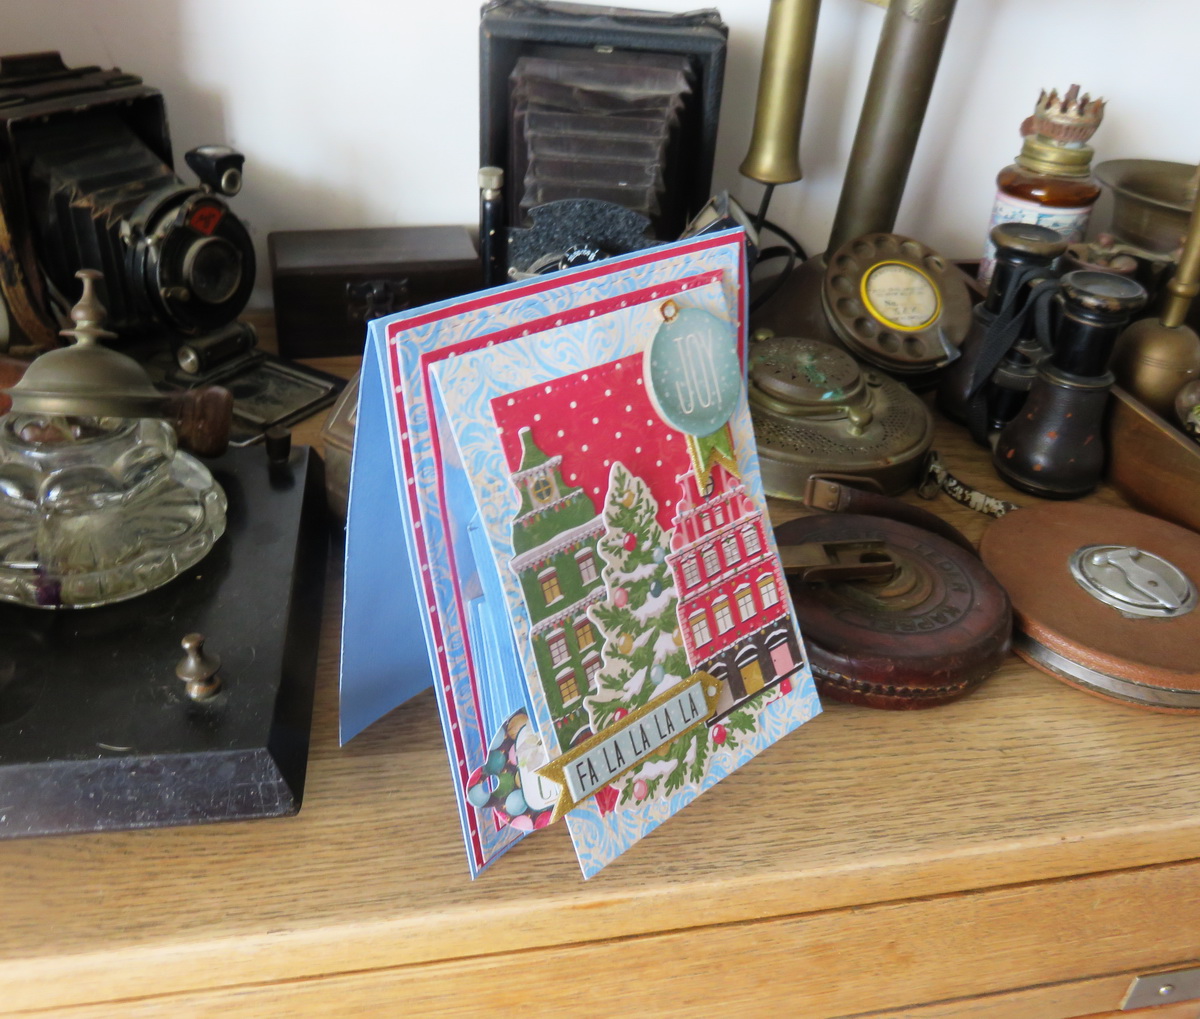
Fa La La La Christmas Card with Irit

Hello my dear crafty friends!
Irit is here today and I welcome you to my first Christmas in August post.
The new BoBunny adorable Christmas collections are here!
So today I made an interactive and very fancy card and there is a full video tutorial too, so you can recreate my card if you like it. I used this Christmas in the Village collection and I am really in love with this collections lovely graphics and non- traditional Christmas colors.
My card this time has no Mixed Media add- ons, it's easy to make, and fits each and every crafter.
This is how it looks when standing as a regular card:


But wait- you are going to be amazed!
Let's open the topper :


 And now it's full opened!


Usually this kind of a card is made without  all bottom layers; the pop- up part is the actual card where you write the greetings.
I made it in a bit more layered style: the pop- up part is just the card topper/front and then there are a few more cardstock layers and the actual light blue card where you add your greetings/sentiments/ thoughts or whatever you wish.
 So here you can see all the layers on this standing card:


And if you want to try to make this  kind of card- HERE is a video tutorial for you to use.
Just a word about it: in the video the final part was mis- glued upside down and there were no way to change it in the video. But the final project was re- done and the pop- up part is glued in the correct direction.
As the video is mostly to teach the mechanism of this card the inside ornaments direction is not the issue and you can see the finished re- done project without any mistakes.


Product list:

Christmas in the Village 12'' cardstock Ornaments, Countdown
Chriastmas in the Village Combo Stickers
Christmas in the Village Layered Chipboards
Christmas in the Village Noteworthy die cuts
Double Dot Powder blue Damsk 12'' cardstock
American Crafts Light blue texture  solid cardstock 12''

I really hope that you like my card and my tutorial and see you in a week with more wonderful BoBunny Christmas projects

Irit


Tuesday, December 10, 2013

Gift Wrapping Ideas

With the holidays quickly approaching we wanted to give you a few quick gift wrapping ideas!

Wine Bottle Gift Set - Lisa Novogrodski

BoBunny has done an amazing job with the elegant appeal of the Silver and Gold Collection. I've created a beautiful way to dress up an ordinary wine bottle cylinder box by mixing some of the pattern papers and adding some shabby trims. My matching tag ties around the wine bottle and acts as a card with the sweet Christmas sentiment from the Holiday Wishes Stamp Set.


I dressed up the papers with velvet and gold ribbons and created my own shabby chic fringe crepe paper trim for the sides.


These snowflakes and bells were dollar store finds. I dressed them up with glitter and mica flakes for sparkle and shine! My dimensional stickers are wishing you "Peace, Love and Joy" all tucked into a beautiful bow and frosty bells.


My tag is a delight for those who love a vintage shabby chic look. I've used the Santa Chipboard and covered it in Rock Candy Crackle then inked with Vintage Photo Distress Ink. The little tag wishes you a seasons greeting stamped with the Holiday Wishes Stamp Set completing my VERY MERRY gift set!


BoBunny Supplies:
Pattern Paper: Silver And Gold, The List, Yuletide, Red/ Silver And Gold
Stickers: Silver And Gold Dimensional Stickers
Chipboard: Silver And Gold 12 x 12 Chipboard
Noteworthy: Silver And Gold
Brads: Silver And Gold
Stamps: Holiday Wishes


Christmas Card and Ring Gift Box - Maria Potapovich (mellpellmell)


I made a Christmas card and gift box for a ring. 


To begin, I will show the card. I decided to use the technique of layering which makes any card a winner.


In the following photo you can see the dimension a little better.


The box was easy to make and there is "snow" and "gold threads" inside. This is my gift box and the ring is already inside it.


This is how the gift box looks from a different angle.


BoBunny Supplies:
Pattern Paper:  The List, Dots/Silver And Gold
Noteworthy: Silver And Gold
Jewels: Silver And Gold
Stamps: Autumn Song 
Doilies: 6.5 in Medium


Pillow Box and Card by Evgenia Petzer


This time I made a gift set from the gorgeous Silver and Gold collection. It's a small pillow box that can fit a gift card and some sweet chocolates to accompany it.


This is the pillow box for a special little gift.


BoBunny Supplies:
Patterned Paper: The List, Winter, Trees, Red/ Silver And Gold
Stickers: Combo Sticker, Cardstock Sticker/ Silver And Gold
Jewels: Silver And Gold
Trinkets: Silver And Gold
Chipboard:12 x 12/Silver And Gold

Monday, December 10, 2012

Blog Class - Week 2 - Rejoice Cards

Hey friends,
Welcome back to our blog class. We're making cards 3 and 4 with the
Rejoice collection.

I'm just going to do a picture and text tutorial today...

Holiday Countdown
 Card #3
Vintage Wild Berry: 6 x 12" (fold in half)
Rejoice Days: Circle punch out random numbers from the paper
in varying sizes from 3/4" to 2".

Apply foam squares to all circles and 12 x 12 chipboard
piece "Holiday Countdown"

Adhere to from of card as shown. Add bling in random holes.

Flower and Bells
Card # 4
Evergreen Dot: 10 1/2 x 5 1/2" (fold in half)
Chiffon Flourish: 3" Circle
Clover Dot: Place Chiffon Circle on Clover Dot and cut around it
with decorative scissors leaving a border.
Rejoice Adorned: 3 x 5 1/4"

Place chiffon/clover circle on card as shown. 
Tie or Wire Santa and hang from center of circle.
Cut Adorned piece on angle as shown on card and adhere to front.
Cut 5 1/4" piece of scallop border from Combo Sticker and place along the
top of Adorned piece.
Cut 5 1/4" piece of green lace and adhere to card on top of scallop border.
Use foam squares on the noteworthy bells and adhere in top right corner.
Adhere flower to center of circle.
Place bling in random spots on card.

Ta Da.... You are done!
How easy was that?? I hope all your Christmas prep is going well and
you all are taking the time to enjoy the season!


Monday, December 3, 2012

December Blog Class - Week 1

This month, we're making Christmas Cards with Rejoice!

Each year we come out with 2 Christmas collections,
One fun and whimsical and the other more traditional.

Friday's post was with Mistletoe's fun and whimsical style,
This month's cards are from the traditional collection.


All I Want for Christmas Card
Harvest Dot:
6 x 12" (fold in half)
3 3/4 x 3 3/4"
3 3/4 x 2 1/4"

Rejoice Holly:
5 3/4 x 5 3/4"
2 x 3 1/2"

Rejoice Adorned:
2 3/4 x 5 3/4" (watch direction of ornaments)

Rejoice Glad Tidings:
Use cut diagram

Clover Dot:
3 x 12" (cut in half at 6" so you have 2 pieces 3 x 6)

Believe Card
Clover Dot:
7 x 10
a piece that layers with your believe piece

Vintage Wildberry Dot:
3 7/8" circle (cut out of corner)

Evergreen Dot:
Use cut diagram


Tuesday, November 17, 2009

Santa Dear!

Today I wanted to share with you how you can take one stamp and by stamping it on different materials or using various coloring techniques you can achieve a variety of different looks. I choose the St. Nick Santa Dear stamp to work with simply because I love all things Santa and it is the perfect time to start working on your Christmas and holiday cards! Plus, I believe that hand stamping really adds a wonderful handmade feel to any card you create.

On one card, I stamped with black ink on kraft paper. I colored in the design using colored pencils and then I gave it a more smooth, finished look by coloring over each area with a blender pencil.

On another card, I stamped with black ink on vellum. I colored on the back side of the stamped image with colored pencils and again used the blender pencil. I mounted the finished stamped image on off white paper so that the image would be more visible. It is hard to see online, but the vellum gives the image a pleasantly soft effect.
On the last card, I simply stamped with black ink on white cardstock. This time, instead of using the colored pencils, I used colored chalk.
So there you have it! 3 different, but similar cards created using the same stamp with 3 different coloring options. Each technique gives the image a slightly different look and yet they are easy to create. Some other options you could try include using colored markers, such as Copic markers, or even water color pencils.

I hope you enjoyed these stamping tips and happy stamping!

Juliana