Showing posts with label Lisa Novogrodski. Show all posts

Sunday, July 5, 2015

Once Upon A Time Layout!


Hello BoBunny Fans! I've created a beautiful shabby page today featuring the "Penny Emporium" collection. I love lavender and purple and paired with gray and yellow it is a show stopper!

Once Upon A Time- Lisa Novogrodski
Once Upon A Time Layout by Lisa Novogrodski for BoBunny using Penny Emporium

I planted this photo of my daughter amid a floral garden created with the BoBunny Blossoms and paper rosettes. I brought in shades of brown and yellow on my rosette florals to tie my color scheme together.

Once Upon A Time Layout by Lisa Novogrodski for BoBunny using Penny Emporium Close Up 01

The background has a tad bit of stamping with some of the "Stitches" stamped around the outside page edges and the bricks from the "Wall to Wall" textures stamp on the inside papers.

Once Upon A Time Layout by Lisa Novogrodski for BoBunny using Penny Emporium Close Up 02

I cut up some of the BoBunny Bouquet Blossoms to create smaller petals that would flow from my vines.

BoBunny Supplies:
Pattern Paper:  Alphabet, Captured, Portraiture, Mercantile, Gallery / Penny Emporium
Noteworthy: Penny Emporium
Buttons: Penny Emporium
Blossoms: Pansy, Bouquet Plum Purple, Pansy Natural Earth
Stamps: Stitches, Wall to Wall Texture Stamp
Wood: Iron Works Wood Shapes
Pearlescents: Chocolate, Island Mist
Glitter Paste: Gold

Monday, June 22, 2015

Summer Fun Mini!


I have a fun project to share today featuring the beautiful Boardwalk Collection. I have created a wallet mini album with lots of little pockets and tags, flip pages and an insert book! Tons of room for those summer photos!

I was inspired by a tutorial I saw on youtube by "SuperHappyScrapper" you can find it here. Once the basic format of the book is put together you can go crazy with embellishing it in your style! I'm a mixed media girl so I just had to add some texture and messy splatters and stenciling to mine!

Wallet Mini Album - Lisa Novogrodski

Wallet Mini Album by Lisa Novogrodski using BoBunny Boardwalk Collection

I stitched the edges of the cover and used seam binding for my tie closure. The front cover of the mini is embellishment with chipboard, cheesecloth and frayed twine. I used some modeling paste for the background along with some misting.

Wallet Mini Album by Lisa Novogrodski using BoBunny Boardwalk Collection Close Up 01

The page to the left has a little booklet insert to store photos, tickets or other memorabilia. The center sections is a flip book and I used Misc. Me notepaper on the back of each one to mat a photo or use for journaling.

Wallet Mini Album by Lisa Novogrodski using BoBunny Boardwalk Collection Close Up 02

The final section contains another page for random notes or photos and pockets for tags. You can also use the tags for photos or journaling. A super fun project to document your summer vacation! Enjoy!

BoBunny Supplies:
Pattern Paper: Boardwalk Drift, Sandcastle, Sandcastle, Summer Fun/ Boardwalk
Double Dot: Bright and Bold Collection Pack
Sticker Sheet: Boardwalk Combo
Layered Chipboard: Boardwalk
Noteworthy: Boardwalk
Stickable Stencils: Brocade, Butterflies
Misc. Me Pocket Squares: Boardwalk
Misc. Me: Notepaper
Glitter Paste: Gold
Glimmer Spray: Gold, Frost
Blossoms: Denim Daisy

Thursday, May 28, 2015

Mixed Media Memories!


Hello BoBunny Friends! Today I have a mixed media layout to share with you featuring the Heritage collection and lots of BoBunny stamps!

Memories Layout- Lisa Novogrodski

This layout features a photo of my grandfather along with his brother taken in the early 1900's. I love playing with my photos and staging them in different style layouts. I'm heavily into mixed media these days and worked up a grungy page with lots of mists, stamps and stencils. Mixed Media pages are as much about technique as they are the photo.

 First up I layered my papers with paper tearing techniques then blended the edges in with stamping. I stamped around the edges of the page and my inner papers using "To The Point" and "Stitches" stamps. I used the "Flutter" stamp all over my page in a mixed media way. Mixed Media is all about layering and stamps are a fun way to do this. Layering your stamps in a random way and then stamping over them creates interesting effects. You want to achieve the "Is it there or not there - Is that what I think it is" effect!


I love to use the Butterfly Stickable Stencils for my modeling paste. I usually use the inner design of them rather than creating a butterfly stencil.


One favorite technique I use is adding a little texture and medium to my photos to blend them into the page. I use my photos as another embellishment on my pages rather than the page being mainly about the photo.

BoBunny Supplies:
Pattern Paper: Heritage,  Census, Belong, Family Record/ Heritage
Layered Chipboard: Heritage
Brads: Heritage
Stamp Stickers: Heritage
Chipboard: Heritage
Trinkets: The Avenues
Stickable Stencils: Brocade, Butterfly
Stamps: Flutter, It Is Written, Stained Texture, Stitches, To The Point
Stamp Block Set
Ink Pad: Licorice, Blueberry, Wildberry
Wood: Kraft Wood Keys and Butterflies
Pearlescents: Island Mist, Butterscotch
Glimmer Spray: Bronze, Frost, Gold

Sunday, May 3, 2015

Practically Perfect Teacher Gift!

Hello BoBunny Fans! Today I am sharing a teachers gift I created my daughters 3rd grade teacher. My daughter loves her so much I wanted to do something special. This tag has a pocket with a Kraft envelope and I've included some seed packets. I'll throw in some garden gloves and little pots and hope it makes her smile!

I used the Garden Journal collection and the Alphabet Gold Foil Rub Ons. I love how the gold rub ons look against the white tag with a little brown ink for distressing. These rub ons are the best I have ever used! So easy and they come off beautifully! I created a video tutorial to show you how I put this tag together. You could use the pocket for a gift card as well. I know I like to drink coffee so a coffee card would work for me. ;)

Pocket Tag Tutorial - Lisa Novogrodski
Pocket Tag Tutorial by Lisa Novogrodski for BoBunny using the Garden Journal Collection 01

I used the new Flutter Dies for my butterfly embellishment. Did I mention how much I love the new dies?


I hope you enjoy the video!

A little close up of the sweet bow, tag, and doily.

Pocket Tag Tutorial by Lisa Novogrodski for BoBunny using the Garden Journal Collection 02

Another close up of the tag and envelope containing the seed packets. I love how the gold looks against the white.

I did a little masking on the Kraft pocket. The journaling card attached to the front is perfect for my daughter to write a little note to her teacher.

Pocket Tag Tutorial by Lisa Novogrodski for BoBunny using the Garden Journal Collection 03

BoBunny Supplies:
Pattern Paper: Garden Journal/ Bloom, Freehand
Dies: Flutter
Stickable Stencil: Brocade
Doily: Medium
Glitter Paste: Gold
Rub Ons: Alphabet Gold
Kraft: Plain Gift Bag
Brads: Garden Journal
Pearlescents: Butterscotch, Island Mist

Sunday, March 29, 2015

Girls Night Gift Bags!


Having some friends over for a little wine and cheese party and want to have them know how much you love hanging out? I've got just the ticket! A little linen bag filled with their favorite treats. Maybe chocolate? Know their favorite lipstick or perfume? Whatever their guilty pleasure they will be delighted that you thought to package it in these.

I put together a few little bags with special embellishments of lace and glitter pastes, buttons and butterflies and left them all a message with my "Sweet Life Pocket Squares."

I like a lot of fuss on my projects. I'm someone who loves to layer and really pile it on. I love that my friends get excited to see all the little details I put into my projects. (You know, the love is in the details.)

Girls Night In Gift Bags - Lisa Novogrodski


I adore ribbons, bows, buttons and little clothespins. I've attached my tags with rusty pins and added all those tiny details. I want my gals to know that "Dreams do come true" and I encourage them all to "Fly by the seat of their pants." That's the way I roll...


I'm a mixed media girl as well as a shabby one. I couldn't resist stamping over the Kraft tag with the "Romance Stamps" It looked lonely all by itself and I love the added interest. There might also be a little stenciling with gesso. 


You may like to keep it simple without so much fuss so think of making up these sweet little bags with the Pocket Square Tags and a little lace or just use one of the Flutter Dies as I did and attach it to a clothespin. Fill it with something your friends love and enjoy their joyful faces when they leave with something special created by you!

BoBunny Supplies:
Pattern Paper:  Sweet Life/ Blessed
Misc Me Journal Cards: Sweet Life
Glitter Paste: Copper
Glimmer Spray: Tutu
Pearlescents: Blush
Buttons: Sweet Life
Stamps: Your Invited, Romance
Stickable Stencils: Butterfly
Dies: Flutter
Jewels: Zip A Dee Doodle

Tuesday, January 6, 2015

Rose Cafe Shadow Box!

Hey BoBunny Readers! Today is my turn to share the fabulous new "Sticker Stamps" and what fun I have had creating my little Dress Form Shadowbox with them. After painting and distressing this wooden box I chose to use my sticker stamps as a sort of "wallpaper." I wanted a very vintage distressed look.  I layered them over my Rose Cafe Garden paper. I distressed them with a brown ink then used a heavy hand with Crackle Medium.

Dress Form Shadowbox - Lisa Novogrodski

Dress Form Shadowbox by Lisa Novogrodski using BoBunny Rose Cafe Sticker Stamps

Once it dried I used some brown ink over the cracks so they would be more visible. The dress form was created in a 3D fashion using Rose Cafe Pattern Paper. I also distressed my buttons by dying them in alcohol ink.

Close Up of Dress Form Shadowbox by Lisa Novogrodski using BoBunny Rose Cafe Sticker Stamps

You can see in this photo how beautifully vintage these stamps look with that crackle finish! I highlighted the crackled look by adding some acrylic blocks over each sticker to magnify them!

Close Up Two of Dress Form Shadowbox by Lisa Novogrodski using BoBunny Rose Cafe Sticker Stamps

BoBunny Supplies:
Pattern Paper: Garden, Rose Cafe / Rose Cafe
Sticker Stamps: Rose Cafe
Blossoms: Natural Earth Pansy

Tuesday, December 9, 2014

Breathtaking Christmas Collage Cards!

Hello Everyone! Today I have two super cute cards I created with the beautiful Christmas Collage collection and Leaky Shed chipboard.

I love love love Christmas Collage! The vintage feel of this collection just sings Christmas Cards to me.

I hand cut the mittens out of pattern paper and stitched around the edges with a sewing machine. I layered a few elements from the Christmas Collage collection and inked the edges. A little modeling paste was added with the Lace stencil.

Mitten Cards - Lisa Novogrodski

Joy Card by Lisa Novogrodski using BoBunny Christmas Collage

My chipboard was painted with red paint and then sprayed with Gold Glimmer Mist. I  then added a layer of crackle. Once it was all dry I  randomly dusted gold embossing powder over spots of it. The effect is just gorgeous!


Merry Card by Lisa Novogrodski using BoBunny Christmas Collage

I used the same techniques on my second card. I painted my chipboard in red and green and again added embossing powders for the last step.  I also added some eyelash yarn on the cards and created some big beautiful bows! I love wispy strands and loose bows. They speak to my shabby chic side.

Joy Card Close Up 01 by Lisa Novogrodski using BoBunny Christmas Collage 01

These cards have beautiful texture and tiny details.  I love how interesting the chipboard is with all the layered color.

Merry Card Close Up by Lisa Novogrodski using BoBunny Christmas Collage  01

You can see the deeper green of the leaves where I used some embossing powder to make them pop! I topped off the centers of the chipboard flowers with some tiny beads.

Thanks so much for taking a peek today! Happy card making!

BoBunny Supplies:
Pattern Paper: Evergreen, Festive Stamps, Comet, Caroling / Christmas Collage
Brads: Christmas Collage
Chipboard: Christmas Collage
Gimmer Spray: Gold
Stickable Stencils: Lace


Sunday, November 9, 2014

Gorgeous, Glistening Glimmer Sprays!

Hey BoBunny fans! It's Lisa here today sharing a layout using simple techniques for your glimmer misting pleasure! I am the type of scrapper who enjoys using lots of pattern and layering within my papers so I tend to use my mixed media work as an enhancement to my page rather than the focus.  I love the pattern and color of the Wild Card Billiards paper. As you can see it's a busy pattern. I added a messy but not overpowering splattering to the background with a combination of Bronze and Frost mists.

Tune Up - Lisa Novogrodski

Tune Up Scrapbook Page by Lisa Novogrodski using BoBunny Wild Card Collection

I just dip my paintbrush directly in the mist bottle and then splatter or I water it down a bit by spraying some on a craft mat and then spritzing with water. I also push my stamp into it on the mat and then stamp.

 Scrapbook Page by Lisa Novogrodski using BoBunny Wild Card Collection

 I tore a piece of cardboard and peeled off a layer then misted with the Bronze Glimmer Mist then just dabbed a bit of red acrylic paint here and there. The Bronze mist is my favorite color so far. What's yours?

Tune Up Scrapbook Page by Lisa Novogrodski using BoBunny Wild Card Collection

I don't mind a bit of splatters on my photo especially if I'm using something vintage. I also like it to hit my flowers and leaves to make them more interesting!  I also love the contrast between the grungy cardboard, masculine photo and the sparkly jewels. BoBunny has it all!

I've got a few more close ups on my blog. Stop by and take a peek.

BoBunny Supplies:
Pattern Paper: Wild Card/ Billiards
Double Dot:  Denim Flourish, Burnt Orange Vintage
6 x 6 Paper Pad: Wild Card
Jewels: Chocolate, Autumn Song
Blossoms: Denim Blue Daisy, Natural Earth Pansy
Noteworthy: Wild Card
Brads: Primrose
Glimmer Sprays: Bronze, Frost
Kraft: Wood Keys and Butterflies
Stamps: Distress Texture Stamps

Saturday, October 18, 2014

Madeleine 8x9 is Sublime!

Hello friends! You are going to love what Lisa has for you today! I love the creativity and out of the box thinking in this album. Tons of inspiration here! Take a look!

Here's The Story - Lisa Novogrodski

This time around I was inspired to do something totally different and FUN with my Misc. Me collection. I decided to focus on the Pocket Page Protectors but use them in a more 'out of the box" way!  I also wanted to incorporate larger scale photos to show you how those work.

I started with the recipe dividers and set my first photo against that to begin my story. I've embellished with contents from the Madeleine collection.


Heres The Story Misc Me by Lisa Novogrodski for BoBunny using the Madeleine Collection

As you turn to look at my next page I have actually filled a full 8 x 9 page protector with confetti that I punched from Madeleine Paper and some vellum. I added little sequins from my collection.  On the outside of the page protector I adhere the wood "That's Life" embellishment. I used the Pearlescents and glitter paste to enhance the wood.

You can see my photo from the following page underneath. I took a large scale photo and cut it in half to fit that page which is the 8 x 9 Recipe Page Protector.

Heres the Story Misc Me by Lisa Novogrodski for BoBunny using the Madeleine Collection

I love how it looks with the peeking through.

My next page is a collage I created in Photoshop. I prefer black and white photos when I am working with a busy theme. I like the continuity between the pages. I added many different photos from different times in my daughters life.

Heres The Story Misc Me by Lisa Novogrodski using BoBunny Madeleine Collection

On the page following this one I used two different size photos and once more added sequins to the pocket to step it up a notch and make it more playful.

Heres The Story Misc Me by Lisa Novogrodski using BoBunny Madeleine Collection

I love the unexpected in my albums. I again cut apart the page protector and added some sequins and stamped images. I sewed up the opening and made a little flip book.

Heres The Story Misc Me by Lisa Novogrodski using BoBunny Madeleine Collection

For this little flip up see through pocket I simply cut one of the pockets from the Page Protector Variety Pack and filled it with confetti. I sewed along the bottom and embellished the front. I punched a hole through my the protector for my collage page and attached the little pocket with a ribbon.

Heres The Story Misc Me by Lisa Novogrodski for BoBunny using the Madeleine Collection

I've started this book with a variety of photo and playful elements for my daughter to enjoy in years to come! I hope you are inspired to add a few of these little treasures to your Misc. Me books as well!

BoBunny Supplies:

Misc Me Binder: Black Binder 8 x 9
Misc. Me Contents: Madeleine Recipe Contents
Misc. Me Page Protector: 6 x 8 Page Protector,  8 x 9 Recipe Page Protector, 8 x 9 Page Protector Variety Pack
Wood Shapes: That's Life
Doilies: 4" Small
Stamps: Captured
Combo Sticker: Madeleine
Chipboard: Madeleine
Noteworthy: Madeleine
Stamp Block Set
Stencils: Brocade
Jewels: Baby Bump, Emerald, Think Pink
Buttons: Madeleine
Pattern Paper: Grace/ Madeleine
Glitter Paste: Gold
Ink Pad: Pink Punch, Licorice
Pearlescents: Blush

Wednesday, September 10, 2014

Artists Trading Blocks

Souvenir Artists Trading Blocks- Lisa Novogrodski

Hello BoBunny Fans! It's Lisa here today and I have a fun and artsy project to share with you. Artists Trading Blocks! Who knew? While I was perusing the internet seeking inspiration for my project I stumbled upon a world where artists were trading "blocks." Blocks of all sizes handmade with dies, digital cutters or instructions off youtube videos. What fun these are! Not only are they fun but it is so cool to be able to create a project just for the joy of creating! Then if you so desire you can exchange them with other artists and have a piece created by someone else for you to treasure. I love this idea!

Artists Trading Blocks By Lisa Novogrodski Using The Souvenir Collection

Although it seems the Souvenir collection is for scrapping travel photos I have used it here in an artful way. I LOVED the little chipboard pieces like the plane and word "TRAVEL" which I arranged on my blocks in a collage like manner. BoBunny now has FABULOUS mixed media products. I smeared some glitter paste for sparkle, used the "DOTS" on my Brocade Stencil and I've listed in supplies all the new inks I used. I LOVE the quality of the BoBunny ink pads. They work well with masking, stamping and edging. The little legs on my largest block are spools. I used tissue paper, masked it with the "Brocade" mask and "Emerald" ink  and Pearlescents and then outlined it in a black Pitt pen. Then I used Modge Podge to adhere the tissue paper to the legs.

Artists Trading Blocks By Lisa Novogrodski Using The Souvenir Collection

You can see the way I wrapped the "Travel" word I created around the block. I randomly selected pattern papers and used random stamping to achieve these effects.

Artists Trading Blocks By Lisa Novogrodski Using The Souvenir Collection

I used the "Souvenir" chipboard "You Are Here" on top of one of my blocks. I should also mention I cut my blocks out in a plain black cardstock and then covered it in the beautiful Double Dot Cardstock listed below.

I highly encourage you to get lost in the world of creativity by trying your hand and imagination at a few of these. I would love to see them so don't forget to stop by my blog and let me know how you were inspired!


BoBunny Supplies:
Pattern Paper: Souvenir/Sightseeing, Souvenir, Relax
Double Dot: Wild Berry, Charcoal, Maize Chevron
Chipboard: Souvenir Layered Chipboard, Souvenir 12 x 12 Chipboard
Noteworthy- Souvenir
Buttons- Souvenir
Stickers- Souvenir
Kraft-Wood Mustaches
Stickable Stencils- Brocade
Ink Pads-Blueberry, Licorice, Emerald, Wild Berry
Glitter Paste- Gold
Pearlescents- Island Mist

Monday, August 18, 2014

BoBunny August Mood Board Inspiration - Mini Album Video Tutorial

We continue our BoBunny August Mood Board Inspiration week with a tutorial by Designer Lisa Novogrodski. She made a mini album using a unique combination of BoBunny collections and is sharing a video tutorial on how she created it.

This was probably one of the most fun projects I have ever created! The mood board this month was so inspiring my imagination simply took off! I pulled the color theme of my project from the board- focusing on the purple, blue and white. The "You Are My Sunshine" pillow inspired me to incorporate Zip A Dee Doodle along with Enchanted Garden. I wanted a "Happy" "Fun" project theme and photos to pull it all together. I show you how to put this little mini album together below in my video tutorial.

Accordion Fold Tag Pocket Mini Album by Lisa Novogrodski using BoBunny Enchanted Garden and Zip A Dee Doodle Collections

I've created this Accordion Fold album with lots of little pockets for you to tuck in tags, tickets, photos and journaling. I've used the tags for my "Photo Mats" and also for journaling spots. You just have to love little pockets. This type of project can be used not only for "scrapbooking" but you could create one and do art journaling on your tags and have an artsy little file to store them in.

Accordion Fold Tag Pocket Mini Album Mood Board Tutorial by Lisa Novogrodski using BoBunny Enchanted Garden and Zip A Dee Doodle

I was also inspired by the doilies in the mood board and I incorporated some in most of my tags. I chose a Spellbinder Die to mimic a "frame" shape picking up on that beautiful blue frame in the mood board. The clock and globe prompted me to use Kraft style tags as my base. I like the "earthy" appeal mixed with the feminine blues and purples.

Accordion Fold Tag Pocket Mini Album Mood Board Tutorial by Lisa Novogrodski using BoBunny Enchanted Garden and Zip A Dee Doodle

I hope you enjoy the video and can't wait to see what you all make with this mood board as your jumping off point!


Accordion Fold Tag Pocket Mini Album Tutorial- Lisa Novogrodski

BoBunny Supplies:
Pattern Paper: Somewhere In Time/ Somewhere In Time, Passage;
Enchanted Garden/ Fantasy, Imagine; Zip A Dee Doodle/ Zip A Dee Doodle, Creative
Stickers: Zip a Dee Doodle
Chipboard: Zip A Dee Doodle 12 x 12, Pop Quiz 12 x 12, Zip A Dee Doodle Layered Chipboard
Doilies: 4" Small
Stamps: To The Point, Stained Textures
Buttons: Woodland Winter
Blossoms: Denim Blue Dahlia

Thursday, August 14, 2014

Kraft Gift Bags, Cards and Tags

Today we have some more fun projects created with the Kraft Gift Bags. You can use the gift bags as they are, or maybe you want to jazz them up a little with some paper and embellishments! Let's go one step further. What can you tuck inside? A tag? A card? Maybe some goodies??

Hello Gift Bag by Lisa Novogrodski

I love to come up with different ways to use products. How many ways can I use the BoBunny kraft bags? Here I created a gift bag with the plain kraft bags, then I layered two bags on the front. The first bag is adhered to the front and you are able to open it as the flap wraps around the back. You can use this for a gift card or treat. The second bag I layered over the first and left it open as a pocket on the front to slip a card or tag in.


I also used the kraft bags to create a rosette in the center of my bow as well as cutting strips of the bag itself to create my bow.


Oh and few curly cues too...


This little tag fits perfectly in the layered pocket on the front of the gift bag! A simple tag that acts as a card and can be saved by the recipient.


The tag was created by tearing off pieces of the Kraft Dot Bag and mixing it up with stamps, stickers, washi tape and ink!


Here is a close up of the back of the tag. This tag slips right in the pocket to complete your gift set.

BoBunny Supplies:
Pattern Paper: Somewhere In Time, Antiquity, Timeless, Evening Mist, Elegance/ Somewhere In Time
Kraft: Dot Gift Bags, Plain Gift Bags, Wood Shapes Elegant, Wood Keys and Butterflies
Brads: The Avenues
Jewels: Pop Quiz, Mistletoe, Modern Miss
Combo Sticker: Somewhere In Time
Stamps: Captured Stamp, Stitches Stamp, To The Point Stamp


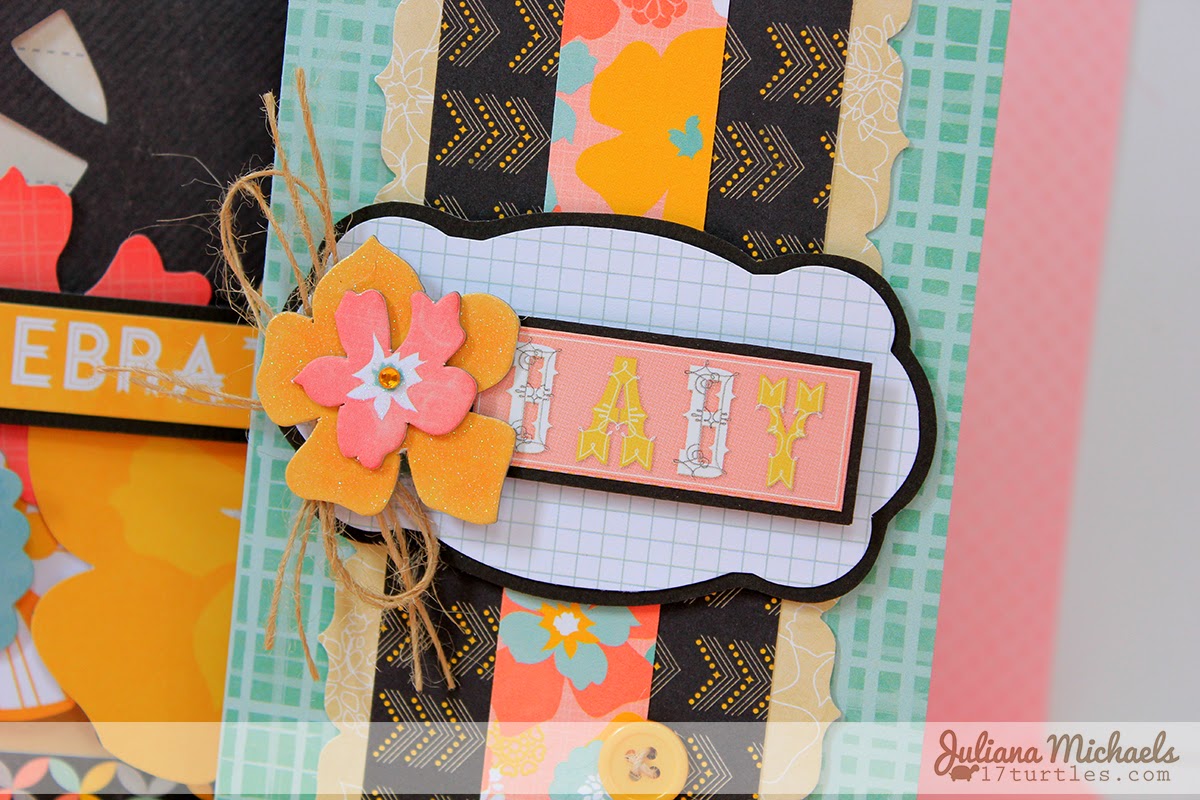
Welcome Baby Card by Juliana Michaels


The BoBunny Kraft Bags come in a wide range of patterns, however, I thought it would be fun to pull out the Plain Kraft Bags and personalize them with some of the new BoBunny stamps. I used one Kraft bag to create an envelope and I used another one to create a gift bag. I choose to create a baby card and envelope along with coordinating gift wrap to give to my next door neighbor who is due with a baby girl in December! 


The card was created using paper from the 6x6 Baby Bump Paper Pad. I created the embellishment that I used on the front of the card by layering a Noteworthy shape and the Baby sticker on black cardstock. To create added dimension, I adhered them to my card using double sided foam tape. I then added the floral shaped chipboard, jewel, twine and buttons.


The envelope is a Plain Kraft Bag, that I stamped with one of the small button stamps from the Stitches Stamp Set. I then selected a label from the Baby Bump Noteworthy and layered it with some black cardstock before I attached it to the front of the envelope.

Celebrate Life Baby Gift Wrap by Juliana Michaels


To create my baby gift wrap, I selected the large Plain Kraft Bag. I again used the tiny button stamp to add detail to the bag. Next, I selected a variety of the Baby Bump Noteworthy shapes and layered them to decorate the front of the bag. I used double sided foam tape to give some of the flowers more dimension. The "celebrate life" die cut was layered on black cardstock before I attached it to my bag with double sided foam tape. I then cut a strip from the Bundle paper and attached it to the bottom of the bag.


I also cut a strip from the Oh Baby paper and cut it into a banner shape before attaching it to the top right hand side of the bag. To complete the embellishment of my bag, I added some jewels, twine, a chipboard button and some glitter glue. This was such a fun set to create and I really love how the stamped buttons added to the whole baby theme of my gift wrap. 


BoBunny Supplies:
Patterned Paper: Bundle, Oh Baby / Baby Bump
6x6 Paper Pad: Baby Bump
Noteworthy: Baby Bump
Chipboard: Baby Bump Layered Chipboard
Jewels: Baby Bump
Buttons: Baby Bump
Stickers: Baby Bump Combo Sticker
Cardstock: Island Mist Dot
Kraft Gift Bag: Plain
Stamps: Stitches Stamp