Showing posts with label Combo sticker. Show all posts

Saturday, December 8, 2018

Fa La La La Christmas Card with Irit

Hello my dear crafty friends!
Irit is here today and I welcome you to my first Christmas in August post.
The new BoBunny adorable Christmas collections are here!
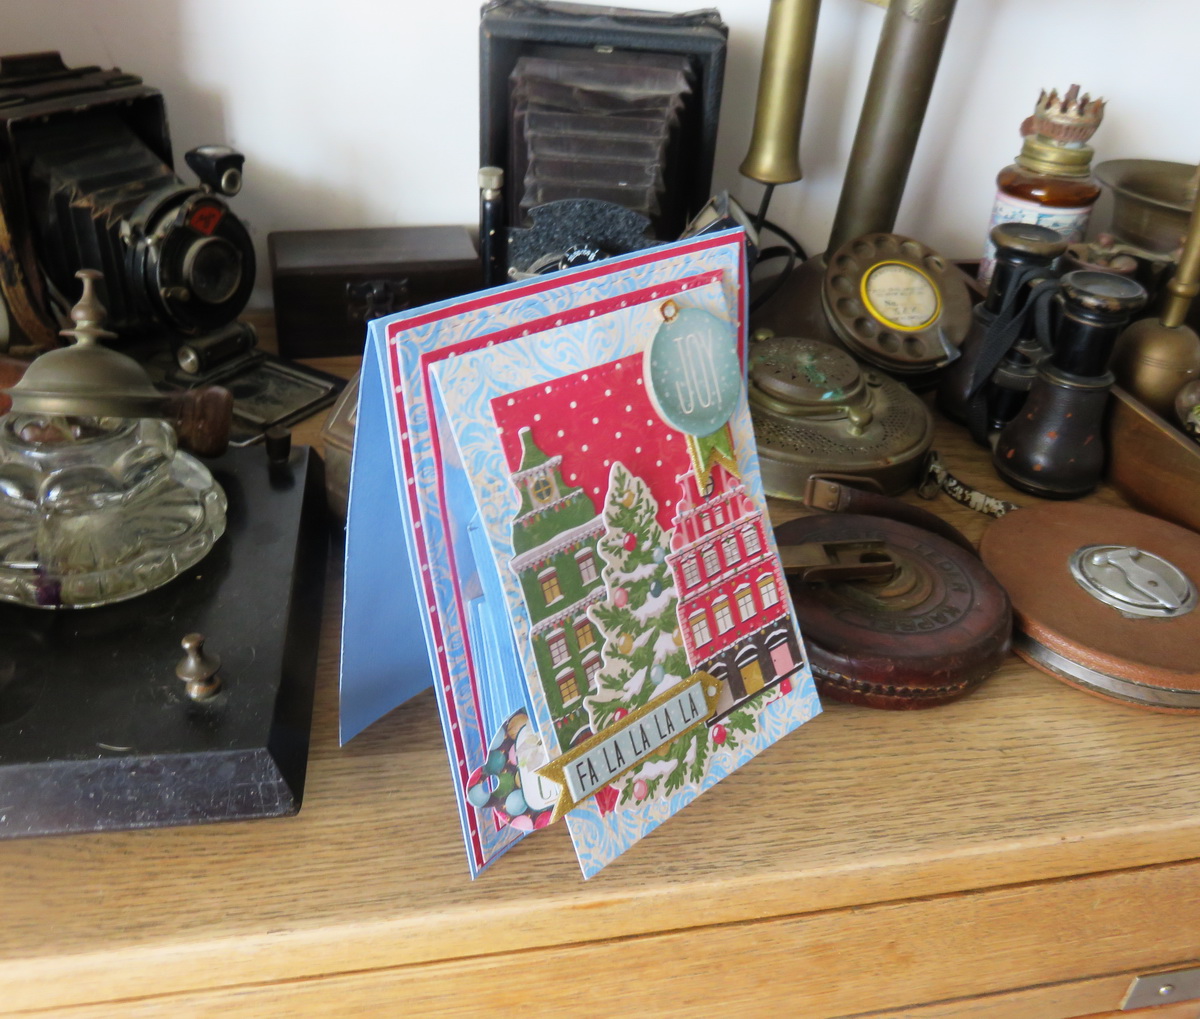
So today I made an interactive and very fancy card and there is a full video tutorial too, so you can recreate my card if you like it. I used this Christmas in the Village collection and I am really in love with this collections lovely graphics and non- traditional Christmas colors.
My card this time has no Mixed Media add- ons, it's easy to make, and fits each and every crafter.
This is how it looks when standing as a regular card:


But wait- you are going to be amazed!
Let's open the topper :


 And now it's full opened!


Usually this kind of a card is made without  all bottom layers; the pop- up part is the actual card where you write the greetings.
I made it in a bit more layered style: the pop- up part is just the card topper/front and then there are a few more cardstock layers and the actual light blue card where you add your greetings/sentiments/ thoughts or whatever you wish.
 So here you can see all the layers on this standing card:


And if you want to try to make this  kind of card- HERE is a video tutorial for you to use.
Just a word about it: in the video the final part was mis- glued upside down and there were no way to change it in the video. But the final project was re- done and the pop- up part is glued in the correct direction.
As the video is mostly to teach the mechanism of this card the inside ornaments direction is not the issue and you can see the finished re- done project without any mistakes.


Product list:

Christmas in the Village 12'' cardstock Ornaments, Countdown
Chriastmas in the Village Combo Stickers
Christmas in the Village Layered Chipboards
Christmas in the Village Noteworthy die cuts
Double Dot Powder blue Damsk 12'' cardstock
American Crafts Light blue texture  solid cardstock 12''

I really hope that you like my card and my tutorial and see you in a week with more wonderful BoBunny Christmas projects

Irit


Friday, November 9, 2018

Using Stickers: Mini Book in a Box with Irit

Hello my dear crafty friends!
Irit is here and today  am going to share my Girls Only mini album in the handmade box that was created with the new and most gorgeous BoBunny Something Splendid paper collection.


Something Splendid collection is vintage style girly collection with friendship orientation and as a such it's a perfect one for girlfriends albums, layouts, cards or tags.
So  as this week the DT members were challenged to make projects using stickers I made this mini album in the box using this paper collection, lots of this collection stickers, layered chipboards and some other BoBunny and American crafts products.


I tried to make this box pretty flat, so the recipient  can carry it in the handbag.
I used the collection tag cardstock as my reference for the size. There are 8 tags in this cardstock and the size of the box fits the tag mini album that is inside the box.
I didn't add the photos (should be on the back of each tag and trimmed to size), as this is a present for my own girl and she will add the photos of here own girlfriends later.
The front was embellished with cardstock pieces and then a few Combo stickers were added on the " seen" side on the front. The flap was embellished with layered chipboards and one single blue flower was added over the chipboard piece.


The opened flap was embellish with more Combo stickers and I even used the side leftovers as some sticker strips.

The top was embellished with one more layered chipboards and it actually looks like a book cover.


And now the tags that were connected with a simple binder ring into a mini album.As you can see I added some gold transfer sayings over some of them and some Combo stickers over the others.
Each tag was matted over American Crafts black textured cardstock; the same cardstock was used as the base of my handmade box.


 And now some more of the tags for you to see:


And just to say: this project is easy to make and you don't need any fancy  or expensive tools to make it in just two hours. Just buy Something Splendid BoBunny collection and you are done!

Product list:
BoBunny Products:
Something Splendid cardstock 12''- Ritzy, Attagirl,Something Splendid
Something Splendid Combo Stickers
Something Splendid Layered chipboard
Something Splendid Thickers
Sentiments gold foil transfers
Denim Blue lace
Double Dot Aqua Jewels
Double Dot Aqua Flourish Jewels
Denim Blue Dahlia flowers

American Crafts:
Black textured cardstock
Color Wheel Blue inks
Sticky thumb glue runner
Sticky thumb adhesive foam dots

Thanks for being here with me today!
See you soon with more inspiration made with another great and new BoBunny collections!

Irit

Monday, May 28, 2018

Destination Happiness Mini Album with Ginny

Well hello there friends and BoBunny fans!
Today I'm sharing a fun mini album created with the World Traveler collection.

Word Traveler_Mini Album_Ginny_May28_01
A mini album is such a great way to document a special trip. It's a walk down memory lane and can also be used as home decor propped on a shelf or table. That way your friends and family know they are invited to flip through and enjoy your pictures and journaling.
Word Traveler_Mini Album_Ginny_May28_012
I started by gathering the collection and embellishments.  This is where the layering process really begins for me as I'm choosing elements that fit my project and look good together.
Word Traveler_Mini Album_Ginny_May28_013
I originally thought I would create a card...but once I started layering I decided that I could make this a layout for the cover of a mini album.
Word Traveler_Mini Album_Ginny_May28_014
I created a mini album base so I would have the perfect size for these elements. Mat board works great for the cover as it's easy to cut but still very sturdy.
Word Traveler_Mini Album_Ginny_May28_02
The inside cover has a nice large area for bigger pictures. The little tag is from the Combo Sticker sheet. I used foam tabs to pop this up to build dimension. The banner is also from the sticker sheet.
Word Traveler_Mini Album_Ginny_May28_03
The cut apart sheet has fabby postcard images that I used to create a pocket. There's a uniquely shaped die cut from the Noteworthy collection to provide a place to add journaling.
Word Traveler_Mini Album_Ginny_May28_04
I'm alternating the patterns and scale to create raised sections for pictures.
Word Traveler_Mini Album_Ginny_May28_05
Tabbed topped stickers and Layered Chipboard Stickers are great accents for this set of pages.
Word Traveler_Mini Album_Ginny_May28_07
This pocket is created by layering a strip of tags cut from the patterned papers onto the stripe. Matting is very important to keep this from looking busy.
Word Traveler_Mini Album_Ginny_May28_09
I fussy cut a few of the tags and popped them up just for a little extra detail. The tag in the pocket is a section of the large die cut from Noteworthy.
Word Traveler_Mini Album_Ginny_May28_010
You can never have enough pockets in a mini to tuck in all the little bits and pieces so here's another for the last page.  Those tiny suitcase stickers are so charming! One more die cut in the pocket for journaling.
Word Traveler_Mini Album_Ginny_May28_011
The back cover is finished similar to the front with a tag and some stickers and twine.

Wishing you all a happy and productive day : ) Ginny

BoBunny supplies:Patterned Paper- Word Traveler-Wanderlust, Culture, Foreign, Postage, JourneyNoteworthy- World TravelerCombo Stickers- World Traveler Layered Chipboard Sticker- World Traveler6x6 Paper Pad- World TravelerDouble Dot Jewels- AquaDouble Dot Brads- Blue HuesDies- Ornate DoiliesBoBunny Blossoms- Natural Earth BouquetAmerican Craft:Sticky Thumb Adhesive RunnerSticky Thumb foam dots 

Sunday, March 4, 2018

Easel Fold Card Duo featuring Stay Awhile with Katherine


Hello Everyone, 

Katherine here with some really easy Easel Fold cards using Stay Awhile.  This sort of card is great because it folds flat which is great for posting.


My basic design is a 12" by 4" piece of double dot card stock which I fold at 6" and then 9", both of those fold are mountain folds.  To make the card stand up you add an area on foam pads (in the case above the flower square) on the inside of your card, so you can tuck the front of the card behind it.

To decorate my cards I added a 5 3/4" by 3 3/4" purple panel from the paper Welcome on the base of my card and then as there is a fold in the middle of the front cover I added 2 panels to the front of my card (you can see this best in the last photo where both cards are flat).  To disguise the fold I created my colourful hills and just stuck them to the bottom panel, the same with the house so that they pop-up when you fold the card.


I snipped the hills to make it look like grass and inked the edges of all the papers to add a little more definition.


Here you can see the square that the front cover tucks behind, I added some of the Double Dot Blue Hues jewels on the flowers to coordinate with the ones on the main card to tie the looks together.


The same template, but this time I cut out lots of the coffee cuts, the perfect card for a coffee lover!  I stuck the coffee cups just to the bottom fold so that they pop up.


My sentiment is on foam pads which meant I could tuck all the cups behind it, and I added a few coordinating jewels for just a bit of shine.


Another coffee cup to provide the stop and hold the card up.


This should give you an idea of what the cards look like when flat, you can see the panel at the base and top on the front of the cards and how it  has been disguised with the hills and coffee cups.


BoBunny Supplies

Patterned Papers: Stay Awhile  - Welcome, Neighbours, Mugs,Cozy and Warm
6" Pad: Stay a While
Double Dot: Rust and Vintage Dot Kiwi
Stickers: Stay Awhile
Wooden Shape: Hears
Jewels: Blue Hues and Mocha
Paint: White Gesso

Sunday, February 11, 2018

"You are Amazing" - 12 x 12 Layout featuring Charmed with Emmy


Hello BoBunny fans!

Emmy here today with a brand new creation to share with you. I just love the new Charmed collection - and since I have a little ballerina at home - this paper line is perfect for all of my daughter's professional pictures.


And here are some close ups and a few tips and tricks of my steps to creating this layout

Use different pattern papers to create the layers on the background. Add a dimensional layer using texture paste and stickable stencil. 


To decorate your page use various fussy cut paper elements and stickers from the sticker sheet. 


Combine different size flowers to create pretty paper blooms.


Add a fwew well placed pearly swirls to finish off your design.


BoBunny supplies: 
Collection pack - Charmed
Pattern Paper - Imagine, Perfection / Charmed
Paper pad - Charmed
Combo Sticker - Charmed
Jewels - Frosting
Double Dot Jewels - Tuxedo
Stickable Stencil - Lots of Love
Paper Doilies 
Tools - Palette Knife Assortment, Scissors

I hope you enjoyed today's post!

Have fun creating!

Emmy xx


Wednesday, November 30, 2016


Hello BoBunny Fans!

It's Denise here today to share my layout, 3 different ways.

One layout 3 ways by Denise van Deventer using BoBunny Kiss the Cook and Pentart Dekor Varnishes

The 2nd and 3rd layouts are just degrees of the first page. I added more and more detail to each subsequent version.

Here's each page individually.

One layout 3 ways by Denise van Deventer using BoBunny Kiss the Cook and Pentart Dekor Varnishes

I used black gesso and one of our stickable stencils, along with some stamps.  I also used the crackle mediums from Pentart, along with some acrylic paint on the background.

On the 2nd version I added some more noteworthy pieces and some stickers.

One layout 3 ways by Denise van Deventer using BoBunny Kiss the Cook and Pentart Dekor Varnishes

On the final version, I added even more stamping, some extra bits and pieces and distress ink splashing to finish.

One layout 3 ways by Denise van Deventer using BoBunny Kiss the Cook and Pentart Dekor Varnishes

Here are some close-ups of the final version.

One layout 3 ways by Denise van Deventer using BoBunny Kiss the Cook and Pentart Dekor Varnishes

One layout 3 ways by Denise van Deventer using BoBunny Kiss the Cook and Pentart Dekor Varnishes

I used the Pentart Dekor varnishes on the wood pieces and then emphasized the cracks with some paint.

One layout 3 ways by Denise van Deventer using BoBunny Kiss the Cook and Pentart Dekor Varnishes


One layout 3 ways by Denise van Deventer using BoBunny Kiss the Cook and Pentart Dekor Varnishes

I love this photo of my brother.  We as South Africans "braai" rather than "barbeque" and when he was out here last year, he was about to braai these huge t-bones. As I took the photo, he gave me the biggest and cheekiest smile ever.

Thanks so much for stopping by the blog today.  We hope to see you back tomorrow.

Have a super day!

Denise x


BoBunny Supplies:
Patterned Paper: Kiss the Cook, Delicious, / Kiss the Cook
Stickers:  Combo Sticker/ Kiss the Cook
Noteworthy: Kiss the Cook
Brads: Carnival
Jewels: Double Dot Ruby
Stamps: Stitches, Distressed Textures
Misc Me Journal contents: Kiss the Cook

Stencils: Oh My Stars
Wood Shapes: Iron Works
Pentart: Crackle Varnish Sets, Cracking Paint system - Lichen Green
Gesso: Black