Showing posts with label Christmas in the Village. Show all posts

Monday, December 24, 2018

Christmas Gift Card Holder and Bookmark with Irit


Hello my dear crafty friends!
Irit from Irit Shalom Designs is here today with my second project made with the most adorable and newest Yuletide Carol collection.
This is a totally traditional Christmas collection- colors, designs and sayings .
 So I decided to make the totally traditional Christmas Gift card holder/card and to add a lovely interactive bookmark made with the same collection.


 As you can see the gift card holder is a standing card and the bookmark is made with the frame and inside moving piece.

I made the front with book shaped dies using different cardstocks and added distressing to the edges as this is a pretty much vintage collection.
The book pages were glued one over another and then embellished with Combo stickers, Layered chipboard, jewels and a couple of BoBunny dies were used to add the interest to this project.


 Here you can see all layers of this project when closed:


 And this is the " step" that holds this piece standing: made with cardstock, die cuts, stickers and BoBunny die cut sentiment arranged in 5 layers as a " chipboard" piece.


 The inside tag is glued on the top and on the bottom , so you can put your cash or your gift card under the tag.


 And here is the book mark- the " Joy" part can be used as a separate bookmark too.


 Product list:


Yuletide Carol collection 12'': O Tannenbaum, Presents, Joyous, Carol, Christmas
Yuletide Combo Stickers
Yuletide Layered chipboards
Yuletide Noteworthy die cuts
Christmas card dies
Tick Tock die
To and from dies
Belief dies
Double Dot Red Flourish jewels
Double Dot Emerald jewels
American Crafts Bottle green cardstock
American Crafts Sticky thumb glue runner
American Crafts Sticky thumb 3d foam glue

Thanks for being here with me today!
This was my last Christmas project made with two newest collection and see you soon again!

Saturday, December 22, 2018

Darling Christmas Cards with Christmas in the Village

Hello BoBunny fans!

Emmy here today sharing a few darling Christmas cards created with the lovely Christmas in the Village collection from BoBunny's latest release.


For the card base I used smooth white cardstock. I cut two 10 x 30 cm stripes and folded them in the middle. Then I used slightly smaller panel from pattern papers to create the colorful layers. Before adhering the layers together, I inked their edges. 


I die cut doily like embellishments out of cardstock to add as an extra layer between the pattern papers.

For my sentiments I used images from a pattern paper from the Christmas in the Village collection. I embellished with pre-cut images from the Noteworthy pack.


As a final touch I added rhinestones and rhinestone-swirls. 


BoBunny Supplies: 
Pattern Paper: Countdown, Merry, Yule, Square / Christmas in the Village
Noteworthy: Christmas in the Village
Paper pad: Christmas in the Village
Double Dot Damask Cardstock: French Vanilla 
Double Dot Jewels: Glaze Flourish Swirls
Double Dot Jewels: Citrus, Ruby Red
Decorative Dies: Belief, Congratulations, Mandala

Other: 
American Crafts Permanent Tape Runner and Refill
American Crafts Foam Dimen Dots
American Crafts Smooth Cardstock 12" White
Ranger Glossy Accents Medium
Brown ink pad


Thursday, December 20, 2018

Pockets Full of Christmas Treasures with Irit

Hello my dear crafty friends!
Irit is here today and I welcome you to my new Christmas in September post.
I know that Christmas is still far away, but new BoBunny adorable Christmas collections are here and now and this is a time to share our new Christmas projects with you all.
So today I made this card full of pockets added on the card front and filled with topper and tags.
 I used this Christmas in the Village collection and I am really in love with  this collections lovely graphics and non- traditional Christmas colors.


I used this collections cardstocks, Combo stickers, Layered chipboards and Noteworthy die cuts and added a few die cut pieces made with BoBunny dies. Some more BoBunny embellishments were added over the tags and toppers.
You can see the whole " collection" that fits three card pockets here.
You can use some to go with your presents or to add them to your other Christmas decorations; you can also use the tags as your Christmas tree ornaments.


Here is the pocket card with 3d pockets that were made with Double Dot cardstock and covered with Christmas in the Village collection cardstocks.
I added some Combos stickers and Layered chipboards over the  pockets front and this can be kept as an organiser for the later use.


 Here are the oval toppers made with Double Dot cardstock and patterned cardstock on the top.


 Two large tags for the upper pocket are here:


And three medium sized tags here:


 And the last, but not least- three small tags that were added inside the lower pocket.


 So here is this beauty full of treasures again- full standing as  it is actually the standing card.


Product list:


Double Dot Wasabi 12'' cardstock
DoublE Dot Pink Punch 12'' cardstock
Double Dot Blue Vintage 12'' cardstock
Double Dot Brilliant Blue 12'' cardstock
Christmas in the Village collection 12'' cardstock: Merry, Ornaments, Square, Houses, Christmas in the Village
Christmas in the Village Layered chipboards
Christmas in the Village Combo stickers
Christmas in the Village Noteworthy die cuts
Nested Terrific tag dies
Banner tag dies
Darling Doily die

Congratulations card dies
American Crafts Sticky thumb glue runner
American Crafts Sticky thumb 3d foam glue

Monday, December 10, 2018

Christmas layout with Christmas in the Village

Hello BoBunny fans!

Emmy here today sharing my newest creation with you! This month we are all focused on Christmas here on BoBunny's blog and what a better time to scrap your last year pictures then in December!

For this post I've designed a cute Christmas layout featuring the Christmas in the Village collection from BoBunny's latest release. 


For my background I used a pattern paper from Christmas in the Village collection. To create the white dimensional layer I combined Texture paste with a winter themed Stickable stencil.


I fussy cut stripes from different pattern paper to decorate my picture. I added a decorative edge to some of them using an edge punch.


I also used various pre-cut embellishments from the Noteworthy pack matching the collection to create the banner and to give more dimension to my page.


For my title I fussy cut a cute quote from one of the pattern papers. I adhered it to the background using mounting foam tape. 


As a final touch I added Christmas coloured pearls, brands and rhinestone-swirls. 


BoBunny Supplies: 
Pattern Paper: Countdown, Merry, Yule, Square / Christmas in the Village
Noteworthy: Christmas in the Village
Paper pad: Christmas in the Village
Double Dot Jewels: Ruby Red Flourish Swirls
Double Dot Jewels: Aqua
Double Dot Brads: Ruby Red
Stickable Stencils: Winter Fun

Other: 
American Crafts Permanent Tape Runner and Refill
American Crafts Foam Dimen Dots
Texture paste
Edge Punch


Saturday, December 8, 2018

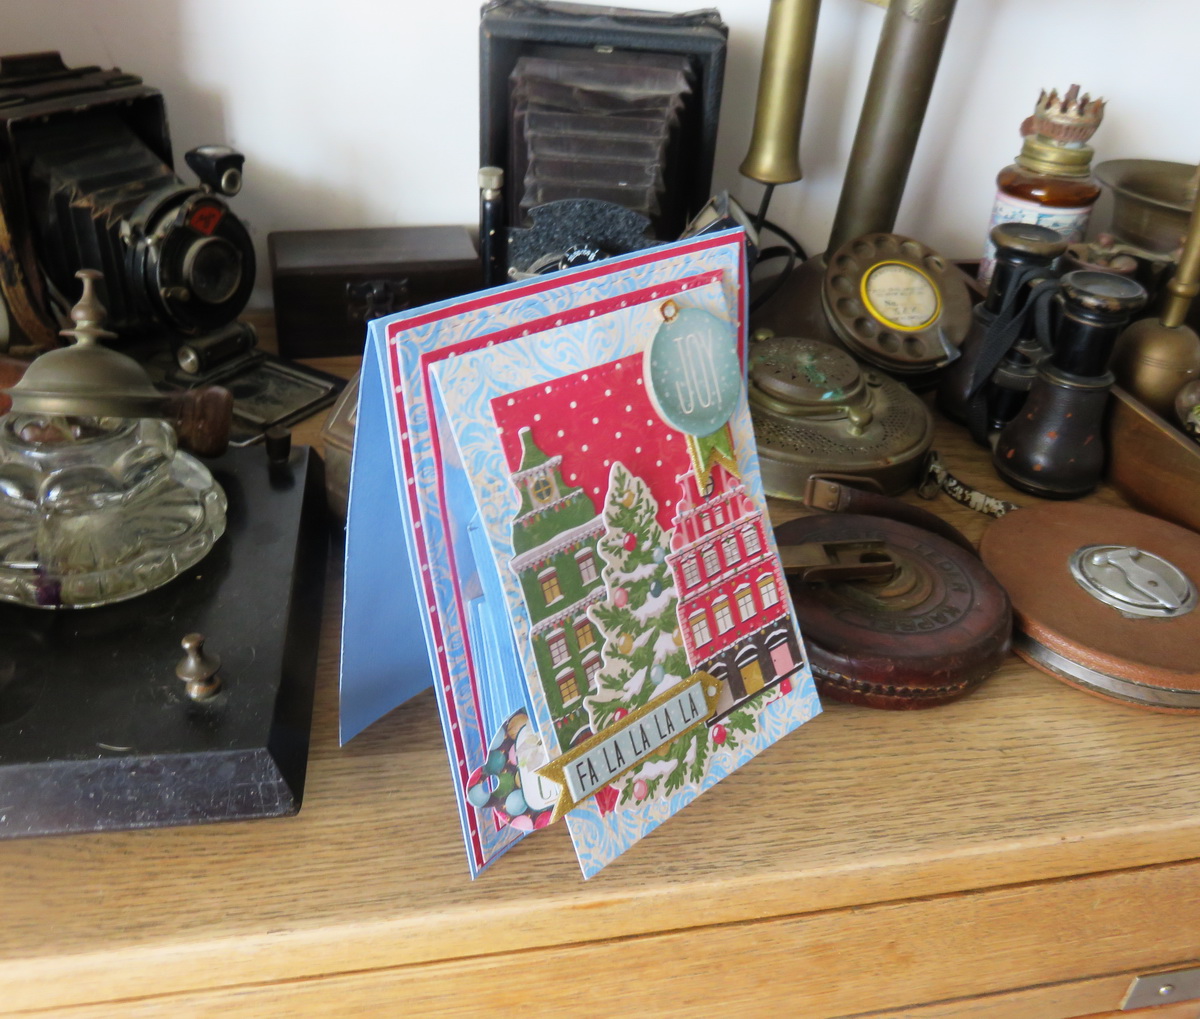
Fa La La La Christmas Card with Irit

Hello my dear crafty friends!
Irit is here today and I welcome you to my first Christmas in August post.
The new BoBunny adorable Christmas collections are here!
So today I made an interactive and very fancy card and there is a full video tutorial too, so you can recreate my card if you like it. I used this Christmas in the Village collection and I am really in love with this collections lovely graphics and non- traditional Christmas colors.
My card this time has no Mixed Media add- ons, it's easy to make, and fits each and every crafter.
This is how it looks when standing as a regular card:


But wait- you are going to be amazed!
Let's open the topper :


 And now it's full opened!


Usually this kind of a card is made without  all bottom layers; the pop- up part is the actual card where you write the greetings.
I made it in a bit more layered style: the pop- up part is just the card topper/front and then there are a few more cardstock layers and the actual light blue card where you add your greetings/sentiments/ thoughts or whatever you wish.
 So here you can see all the layers on this standing card:


And if you want to try to make this  kind of card- HERE is a video tutorial for you to use.
Just a word about it: in the video the final part was mis- glued upside down and there were no way to change it in the video. But the final project was re- done and the pop- up part is glued in the correct direction.
As the video is mostly to teach the mechanism of this card the inside ornaments direction is not the issue and you can see the finished re- done project without any mistakes.


Product list:

Christmas in the Village 12'' cardstock Ornaments, Countdown
Chriastmas in the Village Combo Stickers
Christmas in the Village Layered Chipboards
Christmas in the Village Noteworthy die cuts
Double Dot Powder blue Damsk 12'' cardstock
American Crafts Light blue texture  solid cardstock 12''

I really hope that you like my card and my tutorial and see you in a week with more wonderful BoBunny Christmas projects

Irit