Showing posts with label Stamping Tutorial. Show all posts

Tuesday, April 9, 2013

Technique Tuesday with Gabi

Today's tute is awesome!!!
First of all it features Mammarazzi²
and then the new texture background stamps.
It can't get much better than that.

Oh wait! It can... this is brought to you by the letter G.
G for Gabi

CLICK
Gabrielle Pollacco
 Hi, it's me Gabrielle here with you today to share with you a little step by step on how I layer the new background stamps to create a unique and fun page design. I love the new background stamp designs and for the above page I combined a number of my favorite new stamps. In a few easy steps you can create a page that is different from any out there.
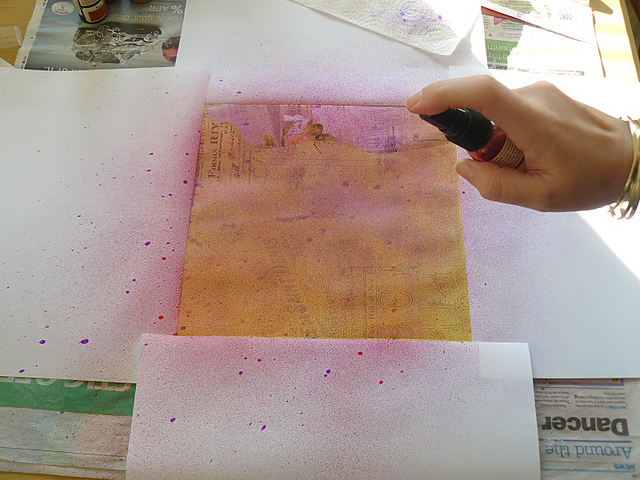
 I began with a piece of BoBunny Cardstock, here I used the ledger design paper in the Chiffon color. I trimmed off about a quarter inch from the outside edges so that when I later mount the paper on a patterned paper you'll have a nice peek of the paper behind, framing the design. Lightly ink the edges with some chalk ink (I used a brown and a grey chalk ink).
 The next step is to begin creating a soft frame around the edges using the chicken wire stamp from the Distressed Textures stamp collection. Try stamping the design a little heavier in the corners, lighter along the edges. I also used one of crest stamps from the Prairie Chic collection in the top left corner.
 Next I marked in pencil the placement of my photo and inked all around the edges of it in a random pattern. I used Versa Magic 'Sea Breeze' and 'Aloe Vera' chalk inks.
Here's the fun part! I started stamping around the edges of the frame of my photo, over-top of the inked area's with a variety of background stamps. I used the Geometric Patterns stamps, On This Day stamp collection and the Stained Textures stamp (I love the water ring stamps!). As you can see I had a little mishap when I stamped the checker design on the right side of my page (I accidently dropped the stamp lol...but no worries, you can always work around it with some strategic placement of your embellishments).

Finish up by adding your photo and embellishing with the beautiful coordinating stickers, blooms, chipboard, buttons and trinkets that go with the Mama-razzi² collection. Mount your stamp designed paper on a coordinating piece of patterned paper and you have yourself a special page that is your own unique design!


BoBunny Supplies:
Patterned Paper - Mama-razzi2 (Focus)
Stamps - Background Stamps (Distressed Textures, Geometric Patterns, On This Day, Stained Textures), Prairie Chic Stamp.
Rub-on's - Mama-razzi2
Dimensional Stickers - Mama-razzi2
Combo Stickers - Mama-razzi2
Chipboard - Mama-razzi2
Trinkets - Mama-razzi2
Buttons - Mama-razzi2
Lace - Clover
Flower - Natural Earth Daisy
Other Supplies: Burlap, Tim Holtz Washi Tape

Enjoy and scrap happy!!!

Tuesday, March 19, 2013

Tutorial Tuesday with Evgenia Petzer

I love toot Tuesday.... I always learn something new
from these girls.  There awesomeness never seems to cease!!

Today Evgenia is teaching us how to make a fun stamped embellie
made from the cute log stamp from the Family is... Collection.

 "Today I will show you how to make these embellishments, then you can easy use them in your work.
 and here is a closer look of how thick they are
 and step by step tutorial:

Here is what we will need. I decided to make a main focus on the clear stamps from the Family is line. Other stuff includes: acrylic block, embossing powders (i used clear, black and white), embossing gun, glimmer mist (or other brownish spray), nail file, chalk and a thick cardstock (i used the one from which they make the beer coasters, its light, but quite thick)
 Take your stamp out of the package and stick it onto acrylic block
 Using your embossing pad or embossing dabber, stamp your image

 It then should look like this:
 Cover it with some embossing powder
After you will heat it, it will look like this:
 After repeating these steps with 3 different embossing powders you will have that result:
 Now we need to take the light brown color of your mist and spray it generously over our stamped and embossed images.
 because of the resist effect (which our embossing powder gives), you will have some drops of paint that still will remain on the surface
 using the dry baby wipe, place it on top of our area and gently push it to absorb all the extra paint
 Now it looks like this:) Prepare your scissors, with what you will cut them out.

After you finish cutting they will look approximately like this:
now you can take a rough nail file and file them around, on the edges, it wll give them better, smoother look

Dream
Evgenia Petzer
 and here is card that you can make, using these handmade embellishments:
Bo Bunny Supplies:
Patterned Paper: Prairie Chic Yard Sale
Brads: c'est la vie
Jewels: Snow Day
Stamp: Family is
6" Paper Pad: Prairie Chic

Thanks for the fun tutorial Evgenia and
thanks to all of you for hanging out with us today.
Have a happy scrappy day!!  

Tuesday, March 12, 2013

Guest Designer - Vicki Boutin

I'm so excited about today's blog post for 2 reasons...

1. Cute Vicki Boutin is going to be with us over the next few days.
2. We have a fun giveaway of a CardMaps Volume 3


Hey there!  My name isVicki Boutin and I am so happy to be sharing a few projects with you this week.  I have been a BoBunny fan for years!  Love the products and I love the people behind the scenes at BoBunny.

A little about me, I have been a paper crafter for over 10 years and I love this hobby.  Beyond paper and glue I love stamps, paints and inks and techniques focused projects.  If my hands are covered in ink, I am a happy girl!  I am a lazy blogger and addicted to Pinterest.  You can find me with my hubby and two kids in St Catharines, ON Canada.  If you like to mess around with techniques you might enjoy my book, Creative Foundations.

With today being Technique Tuesday I decided to play with the amazing new stamps from BoBunny!!!  I love layering background stamps so that is what I did for today’s projects.


I started with a white card based and then layered away with inks and stamps.  Take a look.


1.  Layer linear stamp patterns and ink the edges of the card.  
Distress Ink colors- Rusty Hinge, Scattered Straw.


2.  Punch 1” circles from scrap paper and ink inside the circle “mask” with Faded Jeans Distress Ink.  Stamp hexagon images inside circle “mask” with the Faded Jeans Distress Ink.  Let dry.


3.  To add the metallic “shadow” place the mask over the inked circles and rub a small 
amount of Viva Décor Inka Gold in Platinum.  Add layered black circles around the 
each inked circle by rubbing a paint lid or small cap in black ink.

4.  Stamp film strip images in black.  Stamp numbers.  
Add a bit of the Mamarazzi 2 rub on in the lower right corner of the card.  
Stamp more background images if desired to file in the space.


5.  Add camera, gems and card phrase.


Hope that gives you a few ideas for using these awesome new stamps!!!  
See you on Wednesday with one of my other FAVORITE BoBunny products!!!!

And now... one lucky fan can win this fabulous magazine

CardMaps Vol. 3 is full of inspiration, techniques and creative ideas. There are over 70 
gorgeous cards, 40 card  sketches and, step-by-step instructions for every card!  
You'll want to hand onto this book for a long time to come!

Just leave us a comment today and we'll pick one lucky winner tomorrow morning!!!

Good luck and enjoy your day!!!

Tuesday, February 26, 2013

Background Stamps & Gesso

Are you ready for Technique Tuesday with Carin???
I am.  If you've wanted to try a little of the mixed media look,
and have been a little skeptical... Here is a fun way to try it.

If you've already been dabbling in mixed media and want a fun new technique to use with Gesso.... this is for you too.

Old Bag Young Bag
Carin McDonough


 Bo Bunny Products:
Patterned Paper: C'est La Vie, Decoupage, La Vie En Rose, Belle/C'est La Vie
Noteworthy : C'est La Vie
Chipboard : C'est La Vie layered Chipboard
Brads : C'est La Vie
Petals : C'est La Vie
Jewel Flourishes : Frosting Jewels
Doilies : 4" Small Doilies
Stamps : Flourishes and Such Stamps

Today I am going to show you how to create a textured background for your layouts using some of the new Bo Bunny Background stamps (I am soo in love with these!!) and Gesso.

I started by adding a bit of colour with some mists under the area I was going to Gesso. You don't have to do this step but I like to do it as sometimes the background colour shows through when you do the stamping. I marked off the area I wanted to colour with some pieces of paper.
 Next spray your paper with your chosen mists
 Allow your paper to dry or dry with a heat gun. Make sure it is completely dry before the next step otherwise your paper can end up peeling up from too much moisture.
 Paint a very thick layer of Gesso 
over the area you want to use.
 You now need to let your Gesso dry a little bit. It must still be quite soft but not totally wet, when it just starts loosing a bit of it's wet shine it is ready. I am impatient so I have used my heat gun again and I probably used it for 2 or 3 minutes to dry the Gesso.
 Get the stamps you want to use and press them very firmly where desired. You will have to carefully hold the paper down to remove the stamp as it does stick to it a bit. I also gave the stamp a very quick wipe inbetween each stamping to get rid of a bit of the excess Gesso. Once you have finished stamping wash your stamps immediately in warm soapy water so the Gesso doesn't dry in them. This is also a good time to sprinkle any seed beads, glitter or other small textural item you would like to add onto your Gesso.
 You will have to let your Gesso dry completely after you have finished your stamping, I left mine overnight. Once the Gesso is dry then spray with some mists or paint with some acrylic paint.
 Use a heat gun to dry again as Gesso can get a bit soggy if left with the spray on too long.
 Use a bit of sandpaper to lightly sand over your stamped images to make them stand out even more. I have used very light blue and gold so it does not show up too clearly on mine but the darker the inks/paints you use the better the sanding works.
 You are now finished and can put your layout together!

How great is that??  I can't wait to go home and play with this idea...
and did you catch a glimpse of the title of Carin's layout??
That is hilarious. Love everything about it.
Happy Tuesday Scrappers!!!  

Saturday, February 11, 2012

Serenity & Stamping Tutorial

Don't you just love the Bo Bunny stamps? Each collection comes with a beautiful set of coordinating stamps, but you can perfectly mix stamps with other collections too. This layout was made with the new Serenity collection and I used stamps from the Weekend Market and Ambrosia collections to further decorate it. To show you how versatile these stamps are, I'd like to show you several ways to incorporate stamps in your creations.

"N&R"
by Romy Veul

Bo Bunny supplies:Patterned Paper: Blossoms, Damask, Garden, Love, Stripe, Tomoko/ Serenity
6x6 Paper Pad: Serenity
Chipboard: Serenity 12x12 Chipboard
Stickers: Serenity Combo Sticker, Serenity Dimensional Stickers
Rub-ons: Serenity
Buttons: Serenity
Trinkets: Serenity
Noteworthy: Serenity
Clear stamps: Ambrosia, Weekend Market

1) Adding a pattern to your cardstock backgroundThe Ambrosia collection comes with an elegant oval frame stamp. I wanted to add a baroque touch to the corners of my layout and the oval frame was perfect for it. Since I didn't want to stamp the entire image on the cardstock, I only inked the lower side of the stamp. I stamped three of these elements in both the left upper corner and the right downer corner of my layout.

I used red glitter glue and liquid pearls to add a bit of colour to the stamped images. In this way you can easily adapt the stamped images to the colours of your creation. 

This is what the images looked like after I 'coloured' them with glitter glue and liquid pearls:

2) Creating vintage embellishmentsStamps are also perfect to add some vintage touches to your layout. You can easily create your own (dimensional) embellishments with it. For example I used the beautiful ruler stamp from the Weekend Market collection to create a vintage touch below my photo:

To add dimension to the ruler, I slightly folded it with my fingernails. I adhered it to my page using both foamtape and simple doublesided tape. In this way you can make some parts of the ruler pop off the page.  

I did a similar thing with the Bingo card stamp, which comes from the Weekend Market set too. But this time I took out my distressing tools to give it a weathered look. 

I rolled the stamped Bingo card inbetween my fingers and also teared the edges a bit.


 In the end I used my sanding tool to accentuate the folds.

3) Adding a pattern to stickersThe Bo Bunny alphabet stickers are beautiful as they are, but you can give them an extra touch in only a few seconds time. Again I used the Bingo stamp to create a pattern on my alphabet stickers, but almost all stamps will work well for this technique.
I first stuck down the stickers on a sticker sheet, so they won't get rid of the self-adhesive backside. I simply stamped the Bingo card on the sheet with black ink. The alphabet stickers now have a beautiful black pattern.

4) Finishing off your pageMy favourite embellishments by far are butterflies - all kinds and sorts of them. I recently fell in love with the cute Ambrosia stamp set, which contains three butterflies in different sizes.
To add finishing touches to my layout I stamped a few butterflies with black ink and fussy cut them. I wanted the butterflies to look like they're really flying of my layout, so I slightly folded their wings.

I then decorated the butterflies by adding a jewel and adorning their wings with glitter glue.

These butterflies will make a wonderful finishing touch on your layout. The easy part of stamps is that you can use the same image over and over again, without having to buy more papers. You can also easily adapt the images to the paper collection you're using by stamping them on cardstock or paper in a matching colour.  

I hope you enjoyed my stamping tips and that I inspired you to use stamps on your creations too. The possibilities are endless. We'd love to see how you use Bo Bunny stamps on your layouts, cards and altered items. If you add a link to your creation in the comment box, I'd love to check it out!

Thank you so much for taking a peek today and have a wonderful weekend!