
Are you ready for Technique Tuesday with Carin???
I am. If you've wanted to try a little of the mixed media look,
and have been a little skeptical... Here is a fun way to try it.
If you've already been dabbling in mixed media and want a fun new technique to use with Gesso.... this is for you too.
Old Bag Young Bag
Carin McDonough
Carin McDonough


Bo Bunny Products:
Patterned Paper: C'est La Vie, Decoupage, La Vie En Rose, Belle/C'est La Vie
Noteworthy : C'est La Vie
Chipboard : C'est La Vie layered Chipboard
Brads : C'est La Vie
Petals : C'est La Vie
Jewel Flourishes : Frosting Jewels
Doilies : 4" Small Doilies
Stamps : Flourishes and Such Stamps
Patterned Paper: C'est La Vie, Decoupage, La Vie En Rose, Belle/C'est La Vie
Noteworthy : C'est La Vie
Chipboard : C'est La Vie layered Chipboard
Brads : C'est La Vie
Petals : C'est La Vie
Jewel Flourishes : Frosting Jewels
Doilies : 4" Small Doilies
Stamps : Flourishes and Such Stamps
Today I am going to show you how to create a textured background for
your layouts using some of the new Bo Bunny Background stamps (I am soo
in love with these!!) and Gesso.
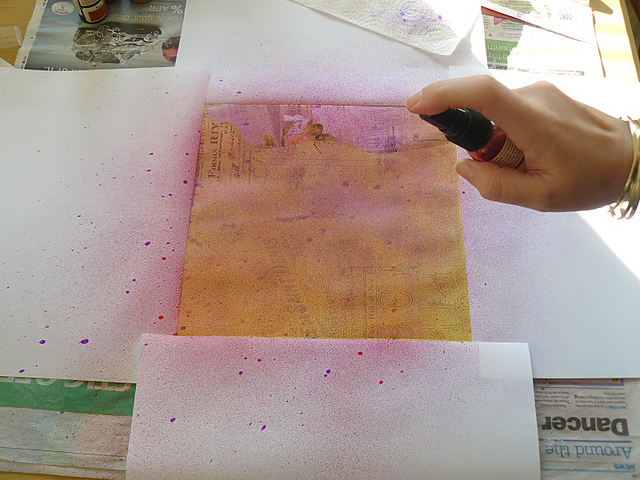
I started by adding a bit of colour with some mists under the area I was going to Gesso. You don't have to do this step but I like to do it as sometimes the background colour shows through when you do the stamping. I marked off the area I wanted to colour with some pieces of paper.
I started by adding a bit of colour with some mists under the area I was going to Gesso. You don't have to do this step but I like to do it as sometimes the background colour shows through when you do the stamping. I marked off the area I wanted to colour with some pieces of paper.

Next spray your paper with your chosen mists
Allow your paper to dry or dry with a heat gun. Make sure it is
completely dry before the next step otherwise your paper can end up
peeling up from too much moisture.

Paint a very thick layer of Gesso
over the area you want to use.

You now need to let your Gesso dry a little bit. It must still be quite
soft but not totally wet, when it just starts loosing a bit of it's wet
shine it is ready. I am impatient so I have used my heat gun again and
I probably used it for 2 or 3 minutes to dry the Gesso.

Get the stamps you want to use and press them very firmly where desired.
You will have to carefully hold the paper down to remove the stamp as
it does stick to it a bit. I also gave the stamp a very quick wipe
inbetween each stamping to get rid of a bit of the excess Gesso. Once
you have finished stamping wash your stamps immediately in warm soapy
water so the Gesso doesn't dry in them. This is also a good time to
sprinkle any seed beads, glitter or other small textural item you would
like to add onto your Gesso.

You will have to let your Gesso dry completely after you have finished
your stamping, I left mine overnight. Once the Gesso is dry then spray
with some mists or paint with some acrylic paint.

Use a heat gun to dry again as Gesso can get a bit soggy if left with the spray on too long.

Use a bit of sandpaper to lightly sand over your stamped images to make
them stand out even more. I have used very light blue and gold so it
does not show up too clearly on mine but the darker the inks/paints you
use the better the sanding works.

You are now finished and can put your layout together!
How great is that?? I can't wait to go home and play with this idea...
and did you catch a glimpse of the title of Carin's layout??
That is hilarious. Love everything about it.
Happy Tuesday Scrappers!!!


