Showing posts with label doilies. Show all posts

Thursday, September 14, 2017

Full of Flavor Family Recipes Binder-with Rhonda

Misc Me Recipe Binder featuring Family Recipes by Rhonda Van Ginkel


Misc Me Recipe Binder featuring Family Recipes Collection and Pentart Mixed Media designed by Rhonda Van Ginkel
Thursday greetings to you, it's Rhonda here today to host the blog. For my project today, I've used one of our Misc Me 8" x 9" Kraft Binders and added some Pentart Primer Paste Gesso and then a bit of Pentart's Creamy Acrylic Gold Paint. I liked the gold dot design of the binder, but for this project, I wanted to soften the look to subtle texture.

Misc Me Recipe Binder featuring Family Recipes Collection and Pentart Mixed Media designed by Rhonda Van Ginkel

After the base was dry, I then used the Cascade Stickable Stencil along with Pentart Structure Paste for the quatrefoil pattern. I let it dry, then added Glimmer Spray splatters in Bronze, Frost, Sugar and Gold. The Structure Paste absorbed those colors so nicely.

Misc Me Recipe Binder featuring Family Recipes Collection and Pentart Mixed Media designed by Rhonda Van Ginkel

After the paste was dry, I applied some random stamping and then added a bit of the Gold Confetti Paste and a bit of the Gold Foil Transfers in Accents.

Misc Me Recipe Binder featuring Family Recipes Collection and Pentart Mixed Media designed by Rhonda Van Ginkel

I used one of the small 4 inch doilies and painted it with Pearlescents in Sugar, Gunmetal and Butterscotch. I stamped it also and then adhered to the binder using Pentart Media Glue.

Misc Me Recipe Binder featuring Family Recipes Collection and Pentart Mixed Media designed by Rhonda Van Ginkel

I selected the blue paper and the black metal flower accent from the Ephemera Pack. I found the sentiment embedded in my "Cuisine" patterned papers and cut it, then did a simple border punch. A few more layers and some simple alpha stickers brought the cover all together.

Misc Me Recipe Binder featuring Family Recipes Collection and Pentart Mixed Media designed by Rhonda Van Ginkel

I've kept the interior pages very simple and functional. The Recipe Cards pages here are fantastic! I'm a real fan of slow cookers and now the new electric pressure cooker too. This recipe binder is the perfect go-to place to keep all of my recipes. I'm going to make 2 sections, one for Pressure Cooker Recipes and the other for Slow Cooking only.

BoBunny Supplies:
Patterned Paper: Delicious, Cuisine and Recipe Cards / Family Recipes
MiscMe Binder: 8" x 9" Gold and Kraft Binder
MiscMe 8" x 9" Recipe Page Protectors
Stickers: Licorice Alphabet Cardstock Stickers, Glitter and Foil Chevron Stickers
Ephemera: Family Recipes
Washi Tape: Kraft Patterned
Stickable Stencils: Cascade
Glitter Paste: Gold Confetti
Glimmer Spray: Bronze, Frost, Gold and Sugar
Stamps: Stained Textures, To The Point, It is Written, 
Doilies: 4" Small
Pearlescents: Graphite, Sugar and Butterscotch
Gold Foil Transfer: Accents
DoubleDot Jewels: Blue Hues

Pentart Supplies:
Creamy Acrylic Metallic Gold
Primer Paste White Gesso
Structure Paste
Media Glue

Monday, January 2, 2017

Felicity and Pentart Contour Liners with Rhonda


Misc Me Felicity and Pentart Contour Liners by Rhonda Van Ginkel

Misc Me Pocket Pages featuring Felicity Collection by BoBunny and Contour Pen Liners by Pentart Designed by Rhonda Van Ginkel

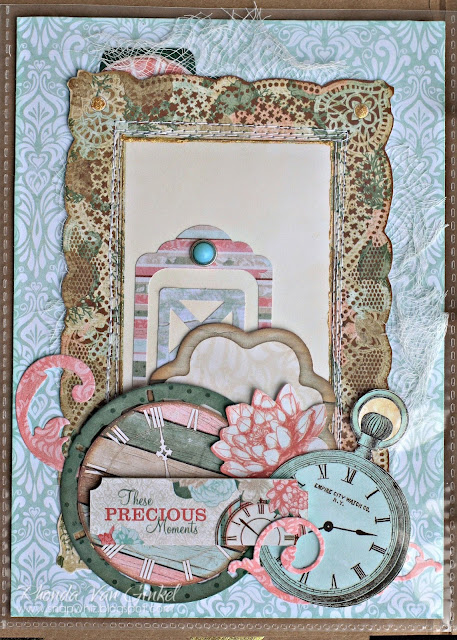
The soft and pretty design of the Felicity Collection was perfect to create a few pages for my Misc Me project. I paired the Pentart Contour Liner Pens in Sparkling Gold with the clock and frame cut outs to add a bit of accent. 

Misc Me Pocket Pages featuring Felicity Collection by BoBunny and Contour Pen Liners by Pentart Designed by Rhonda Van Ginkel

Here I used the Sparkling Gold Contour Pen Liners by Pentart to add a bit of shimmer to the interior border of the frame. I then used the Transparent on some of the florals to add texture without bulk.

Misc Me Pocket Pages featuring Felicity Collection by BoBunny and Contour Pen Liners by Pentart Designed by Rhonda Van Ginkel

I did a bit of cutting, mixed in a few Noteworthy elements along with some designs that I cut using the Fanciful Flourish and Picture This dies on this page.

Misc Me Pocket Pages featuring Felicity Collection by BoBunny and Contour Pen Liners by Pentart Designed by Rhonda Van Ginkel

Here I have added the Pentart Sparkling Gold Contour Liner to the border inside of the clock.

Misc Me Pocket Pages featuring Felicity Collection by BoBunny and Contour Pen Liners by Pentart Designed by Rhonda Van Ginkel

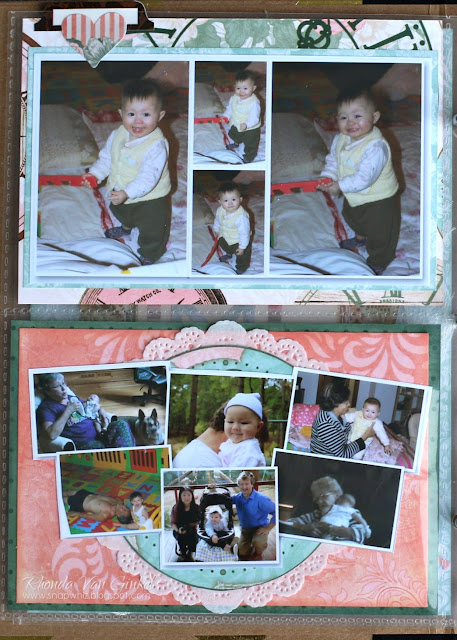
As I'm giving these pages as part of a gift, I've left a few journaling cards with designs and some plain for jotting down those special memories.

Misc Me Pocket Pages featuring Felicity Collection by BoBunny and Contour Pen Liners by Pentart Designed by Rhonda Van Ginkel

Simple collages of photos. The bottom collage is all about baby with family memories.

Misc Me Pocket Pages featuring Felicity Collection by BoBunny and Contour Pen Liners by Pentart Designed by Rhonda Van Ginkel

The bottom left card also has the Sparkling Gold accents on it and above you can see the Translucent texture on the larger green leaf.


BoBunny Supplies:
Patterned Paper: Always, Cherished, Dreamer, Parasols, Serendipity, Splendor and Trellis / Felicity
6x6 Paper Pad: Felicity
Foil Vellum Paper: Felicity
Noteworthy: Felicity
Stickers: Combo Sticker / Felicity
Layered Chipboard: Felicity
Dies: Fanciful, Ornate Doilies and Picture This
Double Dot Brads: Aqua and Think Pink
Doilies: 4" Small

Pentart Supplies:
Contour Liners: Sparkling Gold and Translucent

Saturday, December 10, 2016

Felicity, Pentart and Chalkboard


Hey there Peeps! Ginny here dropping in to share a set of cards I created with Felicity and Pentart Chalkboard Paint. I've been waiting for the right occasion to create some chalkboard tags and this is it! They were easy and fun and if you want to make a lot...well just set up an assembly line.  This paint dries really fast which is fabulous for impatient crafters like me...I'm always ready to move on to the next step.

Chalkboard Tag Greeting Cards by Ginny Nemchak using BoBunny Felicity

To create the tags I used the Nested Fancy Frame Dies to cut the shapes from 110 lb cardstock. Why did I choose that specific paper? First I wanted the paper to be thick enough to be sturdy when applying the paint. Second the thicker weight has a nice smooth texture so the painted finish will be nice and smooth, which is key to the project. The die adds a bit of an edge and I took advantage of that to apply adhesive and embossing powder then heat set to create a nice clean border. I also used my anti static "floofler" so the stray bits of powder wouldn't ruin my chalkboard finish. Floofler is my term for the tiny talc pillow. I'm sure there's a real name for it....but floofer is more fun to say. Add a metal eyelet and a bit of twine and the tag is done.

Chalkboard Tag Greeting Cards by Ginny Nemchak using BoBunny Felicity

Once I had decided to add a black tag to the card I knew it would need balance so I chose to add a black cardstock to border the pretty light colors of the Felicity Collection.


These Layered Chipboard Stickers are dreamy and the perfect floral accent.

Chalkboard Tag Greeting Cards by Ginny Nemchak using BoBunny Felicity

A crisp white doily and simple seam binding bow are the perfect finishing touch.

Chalkboard Tag Greeting Cards by Ginny Nemchak using BoBunny Felicity

The tag for this card is just a bit smaller and tucked into the die cuts and chipboard sticker.

Chalkboard Tag Greeting Cards by Ginny Nemchak using BoBunny Felicity

Rather than adding highly contrasting patterned paper I chose instead to add texture by layering in the quatrefoil diecut then top it off with the lovely floral frame.

Chalkboard Tag Greeting Cards by Ginny Nemchak using BoBunny Felicity

I wanted to add a bit of lace so I fussy cut some from the patterned paper and adhered a few pearly flower accents.

Chalkboard Tag Greeting Cards by Ginny Nemchak using BoBunny Felicity

This coral seam binding is the perfect match to the pretty flowers and give a little feminine touch.


BoBunny Supplies: 
Pattern paper: Felicity, Always, Cherished, Lattice, Romance, Serendipity,
Layered Chipboard: Felicity
Noteworthy: Felicity
6x6 Paper Pad: Felicity
Dies: Nested Fancy Frame
Pentart Supplies: 
Chalkboard Paint 

Okay that's all for me. Wishing all of you a happy and productive day with lots of time to be creative! : )

Sunday, November 13, 2016

Party time with Felicity!


Hello Everyone!

It's Denise here today to share some fun and party items, using the Felicity Collection and Pentart Acrylic paints.

Party Items by Denise van Deventer using the BoBunny Felicity Collection and Pentart Acrylic Paint

I created a banner, using the fabulous BoBunny party goodies and then also created some gift boxes and decorative flowers.

Party Items by Denise van Deventer using the BoBunny Felicity Collection and Pentart Acrylic Paint

These little gift boxes are great for small gifts and can even be used for little "Thank You" gifts.

You can see the handmade flowers too and these were made from BoBunny cardstock. They are going to be used on other projects, but are great for now as decorative pieces.

Party Items by Denise van Deventer using the BoBunny Felicity Collection and Pentart Acrylic Paint

Here's another angle of the little gift box and it's pretty bow.

Party Items by Denise van Deventer using the BoBunny Felicity Collection and Pentart Acrylic Paint

I used Pentart acrylic primer and paint to paint the banner backgrounds.  I then layered up doilies, die-cuts and various little goodies to create each piece.

Party Items by Denise van Deventer using the BoBunny Felicity Collection and Pentart Acrylic Paint

I used some Pearlescents to add add another layer of interest.

Party Items by Denise van Deventer using the BoBunny Felicity Collection and Pentart Acrylic Paint

Lastly here is a shot of the other decorative flowers I made, using pink card stock.

So have you got a party of function coming up soon? I hope I have inspired some creative party juices! ;-)

Have a super day! See you tomorrow again, on the BoBunny blog.

Denise x

BoBunny Supplies:
Patterned Paper: Romance, Serendipity, Wonderful, Parasols, Always/ Felicity
Cardstock: Blush Dot, Chiffon Dot
Noteworthy: Felicity
Jewels: Double Dot Aqua, Mocha
Pearlescent: Chocolate
Doilies: 4" small, 6.5" medium
Chipboard Banner Set
Juliet Party in a Box
Timepiece Laser Cut Chipboard
Butterfly Laser Cut Chipboard
Pentart Acrylic: Primer, Jade

Wednesday, June 1, 2016

1 Layout 3 Ways with Butterfly Kisses!


Hi!

I always love adding many details to my lay-outs, so most of my designs get quite complicated. But I know that some of you may prefer lay-outs that tend to be more clean & simple. For that reason I created one lay-out in three different ways: from clean & simple to more complicated. 


For this lay-out I used the gorgeous Butterfly Kisses collection, which is one of my new favourites from BoBunny. I love the combination of pink, blue and grey and of course I'm a huge fan of all the pretty butterflies in this collection too.


On my first lay-out I did some layering of different sheets of paper, a doily and a few die-cuts from the Noteworthy package. I also added a few chipboard embellishments both at the top of the photo and in the right lower corner, as well as two cut out butterflies. 


On my second lay-out I added a few flower die-cuts in the left lower and right upper corner. I also punched along the edges of a pink sheet of paper and tucked these borders alongside the left and right side of my lay-out. Besides, I added a tab die-cut in the left upper corner and attached a chipboard butterfly on top of it.


My third lay-out has even more details on it. I added a chipboard flower embellishment in the left lower corner of the photo. I also further decorated my lay-out with a few more die-cuts and chipboard pieces. As a finishing touch I added some pearls as well. 


BoBunny Supply List:
Patterned Papers: Breeze, Flutter, Peaceful, Petals, Sunlit
Chipboard: Butterfly Kisses Chipboard, Butterfly Kisses Layered Chipboard
Noteworthy: Butterfly Kisses
Doilies: 8in Large Doilies
Dot Jewels: Think Pink

Saturday, March 19, 2016

Beautiful Dreamer Curiosity Layout!


Curiosity Leads Us Scrapbook Page by Rhonda Van Ginkel

Curiosity Leads Us Scrapbook Page featuring Beautiful Dreamer and I Heart Stars Stamps by BoBunny designed by Rhonda Van Ginkel

Greetings and welcome to the blog today! It's Rhonda here to share with you a scrapbook page which I created with the Beautiful Dreamer collection and accented with stamps from our new "I Heart Stars" Stamp Set.

For my page, I am using a recent photo of our youngest dressing up as a 100 year old "rich man" for his 100 day of school celebration. I converted the photo to black and white to blend in with the collection and design.

Curiosity Leads Us Scrapbook Page featuring Beautiful Dreamer and I Heart Stars Stamps by BoBunny designed by Rhonda Van Ginkel

I stamped the heart clusters onto my light pink paper and then heat embossed with some white pearl superfine embossing powder just to give a sheen and gentle texture to the paper layer. I loved that the background papers here are green and with the circle clusters, resemble rolled up wads of money.

Curiosity Leads Us Scrapbook Page featuring Beautiful Dreamer and I Heart Stars Stamps by BoBunny designed by Rhonda Van Ginkel

Here you can see the texture and design that just a touch of stamping can add to your project! The I Heart Stars collection has a great mix of both stars and hearts, perfect for any type of project.

BoBunny Supplies:
Patterned Papers: Books, Imagine, Memories, Mirage, / Beautiful Dreamer
Chipboard: Layered Chipboard, 6 x 12 Chipboard / Beautiful Dreamer
Stickers: Combo Stickers / Beautiful Dreamer
Dot Jewels: Emerald and Mocha Double Dot Jewels
Stamps: I Heart Stars
Noteworthy: Beautiful Dreamer
Doilies: 4" Small Doily
Brads: Beautiful Dreamer
Buttons: Beautiful Dreamer

Thanks so much for stopping on over for a visit to the blog today!

Wednesday, June 24, 2015

Wedding Box Tutorial!


Hello Everyone! I am very busy preparing my daughter's wedding and I am making each detail for the reception.

Wedding Bathroom Box Tutorial

I thought a bathroom box be a really nice touch for your guests at the reception. So I did a tutorial for a wedding bathroom box using the versatile BoBunny Double Dot card stock and doilies.

Here are a few close ups:


I hope you enjoy this tutorial:


1. I used a box with divisors. First of all, I painted the edges that won't be covered with papers.


2. I used Island Mist Chevron Double Dot to cover the  inside of the box and dividers.


3. I mixed water and acrylic gesso on a spray bottle and I sprayed it on the papers.


4.  I used Bo Bunny Sugar chevron and Frost Dot to make envelopes for the products that I chose.  I       used the products to measure the envelopes.


5. I applied turquoise ink pad on the edges of the envelopes.


6.  I sprayed the acrylic gesso on the envelopes.


7.  I glued the doilies on each envelope and I removed the excess with a scissors.


8. Some drops of aqua acrylic paint on the envelopes.


 9. I covered the outside of the box using Sugar Dot. After, I applied turquoise ink pad.


10.  I printed monograms using free templates and cut out them. After I adhered them with 3D Foam.


11. I printed the names of the products on the vellum.


12.  I used Sugar Dot to make the cover. IT stamped it with" It is written" stamp. After, only some    drops of aqua acrylic paint.


13. I printed the monograms of the bride and the groom on the Frost Dot and I used a resin frame to finish it.


 14.   I glued it on the cover of the box and added Frosting Jewels an Flowers.


15. Now, it's only place each envelope on the box, and it is ready for the reception!


BoBunny Supplies:
Cardstock: Sugar Chevron, Island Mist Chevron, Frost Dot, Sugar Dot.
Stamps: It is written
Blossoms: Denim Blue Dahlia
Doilies: 4” small
Jewel Flourishes: Frosting Jewels