Showing posts with label Pentart Creamy Acrylic Paint. Show all posts

Thursday, November 9, 2017

Penelope and an Altered Art Frame with Katherine

Hi Everyone,

Katherine here with a fun project using one of the new chipboard frames from BoBunny and lots of papers from the Penelope collection along with a couple fun mixed media techniques.


I took the square chipboard frame which comes in pieces and then coated it with a layer of Eggplant Pentart Creamy Acrylic.  Once that was dry, I added Crackle Medium in a few places around the frame.  I then mixed my own "blue" using white, dark blue, jade and a bit of silver too, adding a coat to further distress the frame.  I then went around with some of the silver metallic wax paste, some greenish silver metallic paint mixed with a little bit of matching creamy acrylic paint!

Then I added papers to back of my frame which will hold a 6" by 4" photo, slotted my frame together and proceeded to decorate it with the Penelope papers.


In the Noteworthy sheet (Abbey) from this collection there are loads of beautiful blue peonies, I cut these out and snipped the petals right into the centre, then bent the leaves up and inked the edges, adding a pearl to the centre, for extra depth and texture.


Here you can see some of the layers of paint and the chocolate brown coat through the crackles.


The silver metallic wax paste is the perfect medium to cover some of the laser cut butterflies, and you can bend the wings up and they will hold their shape.  The wax also works beautifully on the wood veneers too.


I created little clusters of the flowers,  layering them up


Thanks for stopping by today!

BoBunny Supplies:
Patterned Paper: Penelope - Live and Abbey
Jewels: Emerald and Mocha
Chipboard Frame: Square Ornate
Wood Veneers: Bird cages
Laser Cut chipboard: butterfly, dream catcher

Pentart:
Acrylic: eggplant, silver, dark blue, cream, jade
Delicate Acrylic: greenish silver
Metallic Wax Paste: Metallic Silver
Crackle Medium

Tuesday, October 24, 2017

Layout LOVE!!! featuring Penelope-with Elena


Hello, Elena here to share this layout I made using this new Penelope collection.

Penelope_Layout_Elena_October_20_01.jpg

It's so very beautiful that I wanted to use every single sheet of paper at once from the collection pack!
However I started with the fussy cutting . I love these flowers really. They appear to have so much texture and depth!


Penelope_Layout_Elena_October_20_02.jpg

  I chose the dark background for my layout, as I wanted all of those colorful flowers to really pop up on it.

Penelope_Layout_Elena_October_20_03.jpg

 I also made some paper layering and added some paint splatters with the acrylic paints and the mist and a soft brush.

Penelope_Layout_Elena_October_20_04.jpg

It was fun to use the photo of my kids, sitting on the top of hay bale and the magic blue August sky behind them.  I so enjoyed the mixing of these several shades of blue colors here.

BoBunny Supplies:
Patterned Paper: Penelope/ Moments, Love, Laugh, Journey, Abbey
Gesso White
Spray- Frost, Gold Glimmer Spray
Pentart Creamy Acrylic-Blue, Sun Yellow

Thursday, October 5, 2017

Hello Fall! Layout featuring Dreams of Autumn with Marilyn


Hello Everyone! Marilyn here to share a seasonal fall layout using the beautiful Dreams of Autumn collection.


The Double Dot- Decaf Vintage is my base paper. I cut out one square from the Noteworthy paper (side B) then put three eyelets in each corner and put through a cord.


I painted some leaves from the Foliage Laser Cut Chipboard with the greenish gold metallic paint by Pentart.

I cut out the pine cone from the Noteworthy paper. I added some Double Dots Citrus jewels and white paint splatters.

The brown jute gives a rustic look to the page.

Finally, I cut the Fall word from the Noteworthy paper and adhered as the tittle on top of  the flower and the chipboard laser.

Bo Bunny Supplies:
Pattern Paper-  Double Dot- Decaf Vintage/
                              Dreams of Autumn- Noteworthy
Stencil- Autumn Delight Stickable Stencil
chipboard- Foliage Laser Cut Chipboard
Ephemera- Dreams of Autumn
Brads- Enchanted Harvest Brads
Double Dot Jewels- Citrus Jewels

Pentart Supplies:
Primer Paste
Glamour Metallic- greenish gold paint


Friday, September 22, 2017

Dreams of Autumn and a GORGEUS Mixed Media with Marilyn

Hello Everyone! It's Marilyn here with you today! I'm going to share a Mixed Media layout with the beautiful Dreams of Autumn collection. Let's take a look...


I adore this paper called "Fall" with the knitting design.  It goves so much texture and depth to this.  Yum! I started applying a light coat of gesso to the paper. I gave textures with the Primer Gesso and the Backsplash Thick Stencil.


I cut out all these pretty leaves and nuts from the Noteworthy paper. I cut by half a brown handcrafted blossom and adhered it behind the photo and the other half near the title.


I adhered 3D Powder with the Express Glue to give more textures on the background. I painted a piece of cheesecloth in green and brown colors to bring an organic look to the page, I cut it to pieces and adhered around the leaves and photo.


I cut the pennant with the beautiful word from the Noteworthy paper and used it as my title. Finally, I added some gems, brads and pearls.


You can see from this angle the dimension and textures on the page. 

Thanks for stopping by, I hope you find some inspiration.

Until next time!

Marilyn Rivera


Bo Bunny Supplies:

Patter Paper- Dreams of Autumn: Noteworthy/ Fall

Stencil- Backsplash

Double Dot Brads- Emerald

Blossoms- Natural Earth Bouquet

Double Dots Jewels- Emerald, Citrus


Pentart Supplies:

3D Powder

Paste Gesso

Creamy Acrylic- Brown/Blue/ Red

Express Glue


Thursday, September 14, 2017

Full of Flavor Family Recipes Binder-with Rhonda

Misc Me Recipe Binder featuring Family Recipes by Rhonda Van Ginkel


Misc Me Recipe Binder featuring Family Recipes Collection and Pentart Mixed Media designed by Rhonda Van Ginkel
Thursday greetings to you, it's Rhonda here today to host the blog. For my project today, I've used one of our Misc Me 8" x 9" Kraft Binders and added some Pentart Primer Paste Gesso and then a bit of Pentart's Creamy Acrylic Gold Paint. I liked the gold dot design of the binder, but for this project, I wanted to soften the look to subtle texture.

Misc Me Recipe Binder featuring Family Recipes Collection and Pentart Mixed Media designed by Rhonda Van Ginkel

After the base was dry, I then used the Cascade Stickable Stencil along with Pentart Structure Paste for the quatrefoil pattern. I let it dry, then added Glimmer Spray splatters in Bronze, Frost, Sugar and Gold. The Structure Paste absorbed those colors so nicely.

Misc Me Recipe Binder featuring Family Recipes Collection and Pentart Mixed Media designed by Rhonda Van Ginkel

After the paste was dry, I applied some random stamping and then added a bit of the Gold Confetti Paste and a bit of the Gold Foil Transfers in Accents.

Misc Me Recipe Binder featuring Family Recipes Collection and Pentart Mixed Media designed by Rhonda Van Ginkel

I used one of the small 4 inch doilies and painted it with Pearlescents in Sugar, Gunmetal and Butterscotch. I stamped it also and then adhered to the binder using Pentart Media Glue.

Misc Me Recipe Binder featuring Family Recipes Collection and Pentart Mixed Media designed by Rhonda Van Ginkel

I selected the blue paper and the black metal flower accent from the Ephemera Pack. I found the sentiment embedded in my "Cuisine" patterned papers and cut it, then did a simple border punch. A few more layers and some simple alpha stickers brought the cover all together.

Misc Me Recipe Binder featuring Family Recipes Collection and Pentart Mixed Media designed by Rhonda Van Ginkel

I've kept the interior pages very simple and functional. The Recipe Cards pages here are fantastic! I'm a real fan of slow cookers and now the new electric pressure cooker too. This recipe binder is the perfect go-to place to keep all of my recipes. I'm going to make 2 sections, one for Pressure Cooker Recipes and the other for Slow Cooking only.

BoBunny Supplies:
Patterned Paper: Delicious, Cuisine and Recipe Cards / Family Recipes
MiscMe Binder: 8" x 9" Gold and Kraft Binder
MiscMe 8" x 9" Recipe Page Protectors
Stickers: Licorice Alphabet Cardstock Stickers, Glitter and Foil Chevron Stickers
Ephemera: Family Recipes
Washi Tape: Kraft Patterned
Stickable Stencils: Cascade
Glitter Paste: Gold Confetti
Glimmer Spray: Bronze, Frost, Gold and Sugar
Stamps: Stained Textures, To The Point, It is Written, 
Doilies: 4" Small
Pearlescents: Graphite, Sugar and Butterscotch
Gold Foil Transfer: Accents
DoubleDot Jewels: Blue Hues

Pentart Supplies:
Creamy Acrylic Metallic Gold
Primer Paste White Gesso
Structure Paste
Media Glue

Wednesday, August 23, 2017

Life in Color Altered Mixed Media Canvas with Irit


Hello my Dear Crafty Friends!

Welcome to my new BoBunny post. Today I am going to share a pretty big altered Mixed Media canvas.  I am still waiting for my new BoBunny collections to come from the US and thanks to our very " fast" postal service it will take  a few more days or even weeks. So I decided to make a project with the Life in Color collection using BoBunny products which are just perfect for any Mixed Media project.
"Trust Your Journey" an Altered Mixed Media Canvas by Irit Shalom


The base was made over the flat 13.5*9.5'' canvas, but if you don't have any you  can use a thick chipboard piece as this is just a base for those chipboard rectangles glued over the canvas.
I used old recycled chipboard and just arranged them to fit the canvas size. Four brads were added in each and every  piece,  the very simple small craft store brads for the background. The larger, decorative ones are from BoBunny.
Then the background was first painted with black gesso, misted with bronze spray and waxes were added randomly.
Three BoBunny stencils were used with glitter paste mostly on the outer spots of the project with large clock added partly in the middle.
I used a couple of chipboard sets for the main spot in the middle as the background and the sentiment.
Die cuts were made from BoBunny Double Dot Cardstocks and painted to this vintage patina look with a combination of Pentart Paints.  BoBunny flowers were painted and misted too to achieve this metallic look (originally green).
 Now let me show the whole project again and then to show you some close-ups.


 This is the central spot from the front:


And here how it looks from the side:


 And my altered flowers :


 More close-ups to background:


 On this photo you can see the white stamped background and 3D powder mixed with gel paste and acrylic paint.
Also you can see the gold transfers, stenciled part and different mediums over the background.


I hope that you liked my Mixed Media project today.  Everything here is BoBunny or Pentart, except the recycled chipboard and small brads.  So you don't need to scroll a lot of shops, but to go to BoBunny shop and to get whatever you need to make the similar project.

BoBunny Supplies:
Double Dot cardstock Licorice
Double Dot cardstock Sugar chevron
Life in Color chipboards
Bella Rosa chipboards
Alphabet gold foil transfers
Backsplash Stencils
Timeless Stencils
Take Note stamp set
Congratulations card dies
Flourish dies
3x4 Ornate frames dies
Tick Tock die
Mandala die
Licorice Glitter Paste
Turquoise Glitter Paste
Bronze Glimmer Spray
Gold gGimmer Spray
Double Dot Aqua Brads
Double Dot Aqua Flourish Jewels
Zinnia Blossoms Clover Zinnia

Pentart Supplies:
Baroque Gold Creamy Acrylic Paint
Graphite Metallic Creamy Acrylic Paint
Teal Metallic Creamy Acrylic Paint
Iron Paste
Black Gesso
Gel Paste
Coarse 3D Powder
Crackle Medium Component 1
Wax Paste Metallic Copper
Wax Paste Metallic Gold
Purplish Silver Delicate Metallic Acrylic Paint
Greenish Gold Glamour Metallic Paint
Dark Gold Delicate Metallic Paint

 Thanks for reading this post and see you in a week!

Tuesday, June 27, 2017

Acrylic Pouring-Mixed Media Techniques with Katherine


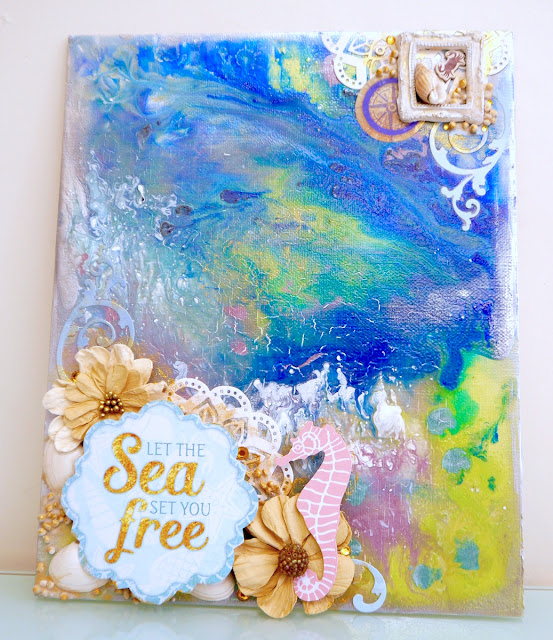
Hi Everyone, it's Katherine here with an "acrylic pouring" technique using lots of Pentart Acrylics as well as the beautiful Down by the Sea paper collection.

Let the Sea Set you Free by Katherine Sutton

Let The Sea Set You Free Altered Art by Katherine Sutton for BoBunny using Down by the Sea

This is a fairly messy technique - but it is great fun and gets super results.  To set it up I used a tray, covered in a plastic bag and several plastic cups to mix each of my paint colours in.  I used Dark Blue, Silver, Pink, Teal and Light Green acrylic paints - which are a thick acrylic so I watered them down with some of the Dekor Primer that Pentart has so that they were a thin cream-like consistency - you don't need a lot of paint as the pigment is quite strong, so I used about an inch long squirt of paint.  I also used some of the new Delicate and Glamour metallics in greenish silver and purplish silver as well as the rich gold glamour paint - again I thinned these with a bit of the Dekor Primer too.

I had quite a rough canvas board - you need your base to be something that doesn't warp with all the paint and water.  I then balanced it on some upturned cups so that the paint could run off onto my plastic covered tray - you need it to be flat so you can control how you tilt the canvas and where the paint ends up.  As the canvas was so textured it meant that I got some cracks on my pour which I really like, if you go for a smoother surface this doesn't happen, it did make me wonder about adding some crackle medium under a pour to see what happens.


Let The Sea Set You Free Altered Art by Katherine Sutton for BoBunny using Down by the Sea

For the first step I created a few blue puddles on my canvas.


Let The Sea Set You Free Altered Art by Katherine Sutton for BoBunny using Down by the Sea

I then added some of the greens in the centre of my blue puddles and then added lots of different colours around the canvas.

Let The Sea Set You Free Altered Art by Katherine Sutton for BoBunny using Down by the Sea

I put the edge of paint brush through the paint in a grid type pattern, just to start the mixing, then I tilted the canvas gently and just let the paints run into each other and some will run off the canvas onto the plastic tray.  I did use my paintbrush to encourage paint into the little areas of dry canvas you  can get.  You can also add more paint, at any time whilst it is wet, if you don't think you have enough  Once the canvas is covered in paint just leave it to dry

Let The Sea Set You Free Altered Art by Katherine Sutton for BoBunny using Down by the Sea

This is what it looked like after all my titling - I added a few drips into the top of the purplish silver, and little flicks of greenish silver in the bottom corners.  I then left my canvas to dry overnight.

Once dry I started to decorate it.

Let The Sea Set You Free Altered Art by Katherine Sutton for BoBunny using Down by the Sea

I used the Mandala die with the Sea Lagoon paper as well as a few flourishes from the Fanciful die set, and added some of the Earth Zinnia flowers in the bottom right hand corner.  I added some 3D balls and also 3D powder, dripping Gold Glimmer Mist on them and adding a little bit of the Rich Gold glamour paint too.  My sentiment is from the Noteworthy collection as well as the pink seahorse.  I added a few gems just for a little sparkle.  In the top corner I repeated a similar range of embellishments.


Let The Sea Set You Free Altered Art by Katherine Sutton for BoBunny using Down by the Sea

The paints have a really nice glossy effect and beautiful shimmer.


Let The Sea Set You Free Altered Art by Katherine Sutton for BoBunny using Down by the Sea

I added a little bit of silver wax paste around the edge of my canvas and extra gold glamour paint around my embellishment clusters.


BoBunny Supplies:

Patterned Paper - Down by the Sea - Sea Lagoon

Noteworthy - Down by the Sea

Dies - Mandala and Fanciful

Glimmer Mist - Gold

Blossoms - Natural Earth Zinnia

Jewels - Double Dot Citrus


Pentart Supplies:

Acrylics - Dark Blue, Silver, Teal, Light Green.

Gesso - White

3D Powder

3D Balls

Glamour Paints - Rich gold

Delicate Acrylics - Greenish Silver and Purplish Silver

Wax Paste - Silver


Friday, June 16, 2017

Fine Arts Friday with Ombretta


Hello and welcome to the BoBunny Blog today!

Today,  I propose to you a cut paper Art Project. This is my creation and I hope you like it!

Cut Paper Art by Ombretta Fusco using Bobunny Weekend Adventures

I drew the subject and started cutting the lines made with the pencil.

Cut Paper Art by Ombretta Fusco using Bobunny Weekend Adventures

Then, I lifted and bent back all the cut pieces of paper...all of them...one by one...to mimic the look of the fish scales and fins.

Cut Paper Art by Ombretta Fusco using Bobunny Weekend Adventures


I created a paper frame for my creation-this shows the back side of the paper:

Cut Paper Art by Ombretta Fusco using Bobunny Weekend Adventures

My next step is painting the fish with metallic acrylic colors, which is the fun part and wehre the whole look comes together. I used a few of my favorite BoBunny and Pentart mixed media goodies to accent certain parts so they would stand out, and contoured others to create depth. You can do even more than I did here if you like a more colorful finished project.

Cut Paper Art by Ombretta Fusco using Bobunny Weekend Adventures

And this is the result! It's a simple work if you have patience! I hope you like it!

See you soon!

Supplies:
Paper BoBunny Weekend Adventures Beachy
Glimmer Spray BoBunny Frost
Creamy Acrylic Metallic colors Pentart: Silver, Teal, Blue, Rose.
Creamy Acrylic Colors Pentart: Blue


Friday, June 9, 2017

Altered Shadow Box Frame with Down by the Sea and Irit


Hello, dear crafty friends and welcome to my BoBunny Fine Arts post this week. 

Today I am going to share an alteration of a cheap plastic $1 shadow box frame made with the newly released Down by the Sea collection, some of other new BoBunny released tools and products  and a lot of old and new Pentart mediums and paints.

Take Me to the Ocean Altered Shadow Box by Irit Shalom

  
It's not a tutorial post, but still I want to share the ways this plastic box was altered.

So as it's a plastic surface I first covered it inside and out with Pentart White acrylic primer.

When it was dry I painted it with all possible blue and greenish acrylic paints from Pentart that I have in my stash.  I included the full supply list is at the end of this post for you to see.

Then I added a layer of Pentart Classic Crackle Varnish and you can see the gorgeous result mostly inside the box as the outer frame was painted with more paints and mediums and a good portion of the of the result was obscured, but the effect is still quite strong.

Then the circles were added using Turquoise and Sea Foam Glitter pastes and the new fantastic Backsplash thick stencil.

Three different BoBunny glimmer sprays were added over the dry area and I added 3D Balls and powder on the bottom to plump up the texture and give it depth.

The inside of the box was made with four layers of torn cardstock and one single die cut from the Mandala die and then the chipboard pieces were added inside and over the frame.


 Here are some close-ups to the background on the frame:


Inside of the box:


And the close- up to the bottom background:


BoBunny Supplies

Down by the Sea Collection-

Down by the Sea Mermaids 12'' cardstock

Mystical 12'' cardstock

Coral 12'' cardstock

Fantasy 12'' cardstock

Down by  the Sea Noteworthy

Down by the Sea Chipboard

Down by the Sea Layered Chipboards

Mandala Craft Die

Backsplash Stencil

Glitter Paste Turquoise

Glitter Paste Seafoam

Glimmer Spray Gold

Glimmer Spray Mint

Glimmer Spray Frost

Double Dot Aqua brads


Pentart Supplies:

Acrylic primer white

 Delicate Metallic Dark gold  acrylic paint

Glamour Metallic Greenish acrylic paint

Creamy Acrylic paint White

Creamy Acrylic paint Blue

Creamy Acrylic paint Baby Blue

Metallic acrylic paint Teal

Creamy acrylic paint Jade

Classic Crackle varnish- 2 components

Crackling paste- 2  components

Crackle medium

3D powder - Course

3D balls

Gel paste

Bead paste

Express glue

I really hope that I inspired you with my altered full of mediums and paints project and you would try to make one by your own.