Showing posts with label Keri Babbitt. Show all posts

Sunday, March 13, 2016

Beautiful Dreamer with A Guest Designer!


We are so excited to welcome guest designer Keri Babbitt to the blog today! How adorable is she?!! Here's a little info on this sweet lady!


Hi there, I’m Keri Babbitt. I’m a mom of two, who’s been happily
crafting since high school. I love capturing life’s moments and expressing
myself artistically through scrapbooking.
I’m obsessed with anything vintage and love trying new art
techniques, as well as finding creative ways to make my supplies stretch.
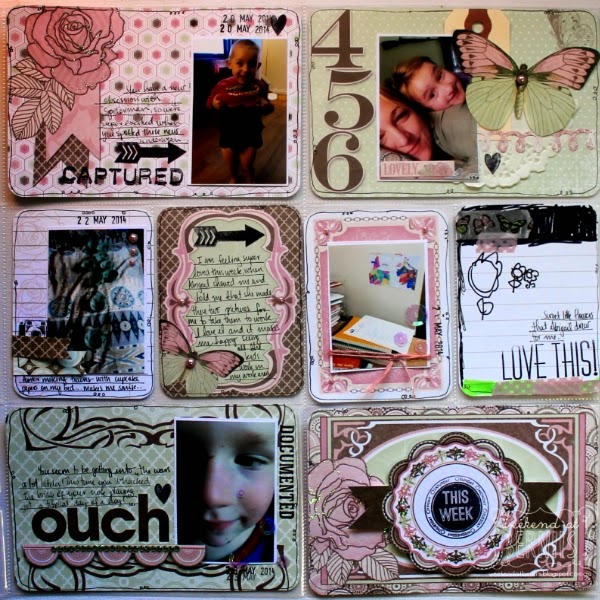
I love to experiment with any and every scrapping style, from minimalist to
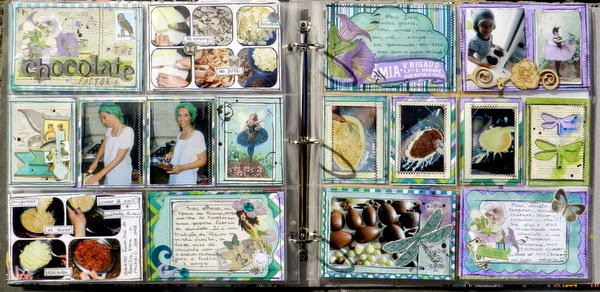
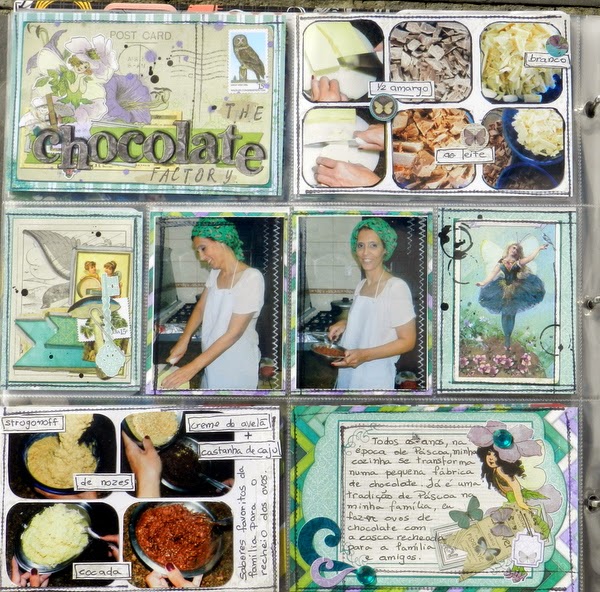
shabby chic. I am often a gridbased, multiphoto scrapper, and
enjoy finding well designed ways to include lots of photos.
Other than crafting, I enjoy reading, contemporary dance,
antiquing, music, and the outdoors. Currently, you can most often find me hard
at work, renovating our rustic fixer upper.

***************

Time To Party by Keri Babbitt


Give your next book club
or birthday party a timeless look with this quick and easy party decor,
showcasing the new Beautiful Dreamer collection from BoBunny!

Banner:  This no-fuss banner is a fun, graphic backdrop to any tablescape or party spread.  Simply cut the Beautiful Dreamer Journal paper into strips of letters, and then run each strip through your paper trimmer again, to separate out each letter and symbol.  With a straight stitch, just chain each letter through your sewing machine, leaving about 5-10 empty stitches in between paper pieces.  Look closely, and you might see the word "party" hidden in the design!


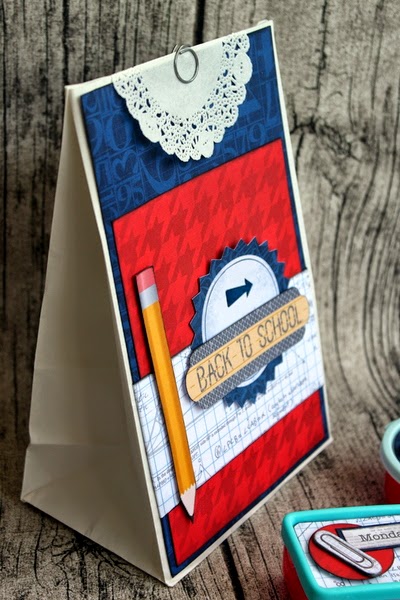
Custom gift wrap and card:
With the Beautiful Dreamer stamps, design a stamp "scene" on a large
acrylic block.  Use this "scene" for the front design of your
card or invitations. Then stamp the scene repeatedly along some tissue paper or
blank kraft paper, in a staggered pattern.  For a subtle, two-tone look, I
used Pink Punch ink on the entire scene, and then added Licorice ink in a few
places on the stamps before stamping the entire scene onto the paper.
Background tip:  To create a shadowed look, I placed the clock stamp backwards
on the large block along with the other stamps, to create a blank circle
background.  Then I came back in with just the clock stamp, stamped into
the center of each circle, using just the Licorice ink.  I topped off the
package with a bow, spritzed with Glimmer Spray in Silver and Gold.


Food table
toppers:  Wrap a few paper strips around utensil containers, layered with
a gold foil Noteworthy 
die cut.  Tip:  Add foam adhesive squares to
just the outside edges of the 
die cut, for a dimensional, curved look around the
jar.  Create cute and super-fast decorative toppers with 
die cuts and toothpicks.


 Confetti:  Create
"time to party" confetti with the clock stamp and a circle
punch.  Sprinkle these anywhere along the tablescape, or add into the gift
wrap, card envelope, or favor bag for a fun confetti surprise.
  
BoBunny Supplies:
Patterned Paper:
Beautiful Dreamer/ Journal, So Lovely
Double Dot: French
Vanilla
Noteworthy: Beautiful
Dreamer
Stamps: Dreamer, Acrylic Stamp Block set
6 x 6 Paper Pad:
Beautiful Dreamer
Pearlescents: Graphite
Ink Pad: Licorice, Pink
Punch


Glimmer Spray: Gold,
Silver

Thursday, September 4, 2014

Mix and Match 12 x 12 Misc Me

A little of this, a little of that, put it together and what do you get? A fabulous 12 x 12 Misc Me project!

Keri gives some fabulous tips about working with multiple collections, and how to bring them all together for a complete project.

Where We Live by Keri Babbitt

For this month's Misc Me project, my challenge was Mix & Match...I love to do that!

So, when I sat down to create this project, I challenged myself to use at least two items from EVERY collection in BoBunny's new release.  To refresh your memory, this new release includes two holiday lines: Candy Cane Lane & Christmas Collage.  An elegant/botanical line called Madeleine. A travel line, Souvenir.  And a masculine/games collection, called Wild Card.  So, how did I combine all these together?  Take a look:

Where We Live Misc Me by Keri Babbitt using BoBunny Mix and Match Collection

 For inspiration, I chose nature snapshots that my husband took of the yard of our new country home.  What a treat to see his love of nature captured through the camera lens!  To lay the foundation for this Mix & Match challenge, I began with color palette.  My collection of nature photos feature a palette of magenta, lavender, blue, and green, so I took this as my starting point.

Where We Live Misc Me by Keri Babbitt using BoBunny Mix and Match Collection

Choosing products based on color palette is a great way to use leftovers and themed collections.  Start by searching for colors and images that might work in a nontraditional way.  Here, I chose the elk/deer sticker from the Christmas Collage collection.  It is generic enough to not scream "Christmas", and is perfect for my country/outdoorsy theme.  Behind it, I chose a woodgrain paper from the Wild Card collection.  The green/magenta palette of Madeleine came right into play next, along with carefully selected green/magenta stickers from Candy Cane Lane.

Where We Live Misc Me by Keri Babbitt using BoBunny Mix and Match Collection

That's four collections down, and one to go.  The Souvenir collection, with its map paper and camera/film motifs, fit right in.  Since this page is about our little "place on the map", I used the map paper for the 2nd page background.  And the retro camera/film diecut complemented the idea that all these photos are a rare peek into seeing our yard through the lens of my husband's camera.

Where We Live Misc Me by Keri Babbitt using BoBunny Mix and Match Collection

For my final touch of embellishing, I added wood accents, misted with the amazing new gold Glimmer Spray.  The gold-star flower is a great neutral from Candy Cane Lane, as is the "lucky" button from the Wild Card collection.  I topped it off with a pop of color - brads from Souvenir.

Where We Live Misc Me by Keri Babbitt using BoBunny Mix and Match Collection

So there you have it!  I hope this project gives you some inspiration and motivation to use up some leftovers, and mix collections in a way you might not have thought of before. 

BoBunny Supplies Used:
Patterned Paper: Sightseeing/Souvenir; Billiards/Wild Card
Stickers: Candy Cane Lane Combo Sticker, Christmas Collage Combo Sticker, Madeleine Combo Sticker
Noteworthy: Souvenir
Buttons: Wild Card
Brads: Souvenir, Wild Card
Chipboard: Candy Cane Lane, Christmas Collage Layered Chipboard, Madeleine Layered Chipboard
6x6 Paper Pad: Madeleine
Petals: Candy Cane Lane
Misc Me Binder: Black 12x12
Misc Me Page Protectors: Variety Pack
Wood: Iron Works
Glimmer Spray: Gold

Thursday, August 28, 2014

Every Day Life 12 x 12 Misc Me

Misc Me scrapping is the perfect solution for all your everyday life photos! Our everyday life is worth scrapping, and with a 12 x 12 system you can fit tons of photos!

 Check out how these ladies have incorporated some mixed media into their pocket systems!

Apricots & Teaparties by Keri Babbitt

Apricots and Teaparties by Keri Babbitt using Madeleine Collection

As my summer comes to a close, I enjoy adding more everyday photos to my Misc Me 12"x12" album.  Soon the hustle and bustle of school time will be upon us, and I want to capture the relaxed feeling of these fleeting days before they're gone!

Apricots and Teaparties by Keri Babbitt using Madeleine Collection

This summer was our first with a large apricot tree, so several of our days were filled with picking, bottling, and gifting apricot preserves.  Of course, that also meant that multiple tea parties were a MUST, so we could cook with and enjoy our fruity bounty.

Apricots and Teaparties by Keri Babbitt using Madeleine Collection

I had a lot of photos for this two-page spread, so the products I used are minimal but lovely.  The new Madeleine collection was a great match with its pinks, oranges, and greens.  I loved adding a hint of mixed media with the gorgeous new stencils, sprays, and inks from BoBunny.

Apricots and Teaparties by Keri Babbitt using Madeleine Collection

I stenciled with the sugar ink pad, topped and blotted with Glimmer Spray in Tutu.  After I removed the stencil, I spritzed on a bit of Mint Glimmer Spray, and finished off the look with gold thread.  I adore this layered look!  For a final touch of dimension, I layered chipboard over the top of the page protectors.

Apricots and Teaparties by Keri Babbitt using Madeleine Collection

BoBunny Supplies:
Patterned Paper: Stripe/Madeleine
Cardstock: Aquamarine Dot
Stickers: Candy Cane Lane Combo Sticker; Madeleine Combo Sticker; Pop Quiz Combo Sticker
Noteworthy: Madeleine
Chipboard: Madeleine
Misc Me Binder: Black 12 x 12
Misc Me Contents: Madeleine Recipe Contents
Stickable Stencils: Brocade
Ink Pads: Sugar
Glimmer Sprays: Tutu, Mint


Week 22 By Bernii Miller


I love to record my everyday life, and even more so now that BoBunny have their very own 12 x 12 Misc Me range. I love their pocket page formats and the pocket cards are of a very high quality, so you are able to ink, mist and even watercolour them if you wanted and they will not warp! 


I used the Primrose collection cards and teamed them with the brand new release Romance, Captured and In life Alpha stamp sets. They are so versatile and I was able to use them through out the spread. I also used the brand new release Double Dot - Licorice Ink Pad.


Then to add a cohesive look across my week I used some glitter glue to decorate the cards in parts of the pattern and then used a fine tip black pen to outline boarders on each of the cards. 


BoBunny Supplies:
Stickers: Primrose Combo Sticker; Primrose Cardstock Stickers
Noteworthy: Primrose
Buttons: Primrose
Jewels: Primrose
Chipboard: Primrose 12 x 12
Stamps: Romance; Captured; In Life Alpha
6 x 6 Paper Pad: Primrose
Misc Me: 12 x 12 Page Protector Variety Pack
Doilies: 4" small
Ink Pad: Double Dot - Licorice Ink Pad

Wednesday, August 6, 2014

Lunch Box Treats and Notes

Can you believe it's already time to start packing lunches for your children again?! Make your kids sack lunch extra special by adding a crafty touch! Your little darlings will smile when they have a fun note, or a crafted lunch sack!

What other fun things do you do for your children to remind them you love them once they start back to school?

Schoolday Treats by Ulrika Wandler


My country, Sweden, is one of the few countries in the world that offers school children free lunch every day. It's healthy and nutritious food, and I think it's great! So this was quite a challenge for me since I never provide my kids with lunch boxes. But if I did, maybe this is what it would look like? A paper bag filled with yummy sandwiches!


And two small boxes to put some treats in!


As you can see I have used BoBunny's cool school themed collection Pop Quiz. The papers are perfect for this one!


Maybe a couple of granola bars for a snack?!

 
I also altered a box with chewing gum.


BoBunny supplies:
Patterned paper: Pop Quiz, Bookworm, Library, Hall Pass/Pop Quiz;
Stickers: Pop Quiz Sticker, Pop Quiz Combo Sticker
Noteworthy: Pop Quiz
Chipboard: Pop Quiz 12x12
Doilies: 4" small


Lunch Notes by Keri Babbitt

 
During the school year, I find myself scrambling to find notepaper for my kids' daily lunch notes.  I start out the year well, but I have to admit, by halfway through, they are lucky to get a note scribbled onto a paper-towel-heart or the back of a grocery list!


So, this year, I'm getting it done right, by preparing the entire year's worth of notecards in one day, ready to go.  I covered a wooden box with some pretty paper and washi tape, to match my kitchen countertop, and then filled it with left-over journaling cards from various Misc Me kits.  The 3x4" size is perfect for slipping into their meal container.  I added a few pens, and the result is a quick, attractive set of note cards ready for each day's lunchbox.


BoBunny Supplies:
Patterned Paper:  Fairies/Enchanted Garden
Cardstock: Deep Sea Dot
Stickers: Lemonade Stand Combo Sticker; Pop Quiz Sticker
Jewels: Modern Miss
Chipboard:  Pop Quiz 12 x 12
Misc Me Contents: Baby Bump Journal Box Set, Modern Miss Journal Box Set, Pop Quiz Journal Box Set
Misc Me Notepaper: Baby Bump, Primrose
Washi Tape: Pop Quiz

Tuesday, July 29, 2014

Creating Cards with BoBunny Stamps

Did you enjoy the reveal of all of the new amazing BoBunny products coming your way very soon? What is your favorite? If you missed out on seeing them, make sure you check out all of the blog posts from last week.

This week, our design team is sharing fun ways to use our BoBunny Stamps.  Today, we are sharing how to use them on cards for every occasion you can imagine.

Parfum Astris by Romy Veul


For this card I used the gorgeous It is Written stamps on my background paper. I stamped with embossing ink and sprinkled white embossing powder on the stamped image, which I embossed with a heat tool. This will give your card just a little extra.


I used the gorgeous Enchanted Garden Layered Chipboard and some Noteworthy die-cuts to embellish my card. With all the pre-made embellishments that come with each collection it becomes really easy to add details to your project.


Bo Bunny Supply List:
6 x 6 Paper Pad: Enchanted Garden
Patterned Paper: Periodical, Fairies/ Enchanted Garden
Chipboard: Enchanted Garden Layered Chipboard
Noteworthy: Enchanted Garden
Stamps: It Is Written Stamps


Hello by Romy Veul


I don't make masculine cards very often, but the gorgeous Somewhere In Time collection is just perfect for making them and made it really easy to come up with a card for my friend very quickly.
I used lots of layers of embellishments on this card and used the gorgeous doilies from the Stitches Stamps to add eeven more circular shapes to my card.


On this card I also heat embossed the stamped images, but this time I used brown instead of white embossing powder to create a more bold look. The beautiful doilies stamps suit the vintage theme perfectly, so they complement the Somewhere In Time collection really beautifully.

The 'Hello' text was stamped with the To The Point stamps. 


Bo Bunny Supplies:
6 x 6 Paper Pad: Somewhere In Time
Chipboard: Somewhere In Time Layered Chipboard
Noteworthy: Somewhere In Time
Stamps: Stitches Stamps, To The Point Stamps


You're Invited card by Maria Potapovich (mellpellmell)


You know, I decided to use a simple materials for this card I've made for the card stamped project...
Why not? This card is an invitation for a "horror party".  I've used only kraft paper, stamps and a little bit of inks.

When the gates are opened, card looks like this.


Bo Bunny Supply List:
Stamps: Stitches Stamps, Gateway Stamps, Fright Delight Stamps


Meeeow... Card by Maria Potapovich (mellpellmell)


This time I also tried to minimize the materials used in this card. However, here I have added some more gesso and patterned paper to the kraft background. Creases on the paper added a little volume.


Bo Bunny Supply List:
Patterned Paper: Cat Nap/Happy Tails, Woodland Winter
Kraft: Gift Bag Chevron
Stamps: Stitches Stamps, Gateway Stamps


Sunshine card by Keri Babbitt


I love stamping on cards, because the small size is a great backdrop for any of the BoBunny stamp sets.  Here, I used the Stitches stamp set to create a fun sunburst background for my card.  I used shimmer spray for stamping the long stitches, and permanent ink to layer stars over the top.  The medallion in the middle has been fussy-cut after stamping a doily shape onto patterned paper. 


The sunburst pattern is easy to create, by rotating the stamp block around the center point 8 times.  You could use the same stitch stamp each time, or alternate patterns like I did here.  I love the added summer-shimmer effect I achieved by lightly brushing the spray ink onto the stamp with a foam brush before each stamp.


BoBunny Supplies:
Patterned Paper: Best Day Ever, Cream Pop/Lemonade Stand
Cardstock: Sugar Dot
Stickers: Lemonade Stand Combo Sticker
Brads: Lemonade Stand
Stamps: Stitches


 Hello Summer by Keri Babbitt 


The stamping idea for this card was inspired by the lovely Megan Hoeppner, who created sno-cones out of geotag clips.  Here, I created ice cream cones by combining two stamps from the To The Point stamp set - a geotag and a striped triangle.


I used both opaque and glitter embossing powder here, to give some variety and shine to my creamy treats.  The dimensional adhesive helps their shape to pop.  For the "hello" sentiment I used a tone-on-tone technique.  I stamped the washi tape stamp with brown, and then the hello stamp in the same brown, but darkened and glossed-up with embossing powder.


BoBunny Supplies:
Patterned Paper: Best Day Ever, Staycation/Lemonade Stand
Cardstock: Chiffon Stripe, Sugar Dot
Stamps: To The Point

Wednesday, July 9, 2014

Enchanted Garden 12 x 12 Misc Me

This week, as we share some projects using our new Enchanted Garden collection, we thought you might enjoy seeing it used in our 12 x 12 Misc Me Binders and Page Protectors. As you will see, it works perfectly!

The Chocolate Factory by Solange Marques


At Easter time, my kitchen becomes a small chocolate factory. My family loves getting and eating my chocolate eggs stuffed, everyone is waiting for the Easter morning, that's a family tradition! Enchanted the Garden is a fabulous collection, I love those colors, fairies and butterflies!


I stamped around photos to look like sewing, I love BoBunny stitched stamps. I also used a little of watercolor.


BoBunny Supplies:
Patterned Paper: Fairies, Mosaic, Periodical, Pixies/Enchanted Garden
Stickers: Enchanted Garden Combo Sticker
Jewels: Modern Miss
Stamps: Stitches Stamps,Gateway Stamp
6 x 6 Paper Pad: Enchanted Garden
Misc Me Binder: Baby Bloom 12 x 12"
Misc Me Page Protectors: 12 x 12" Variety Pack
Kraft: Kraft Wood Shapes


Fairy Garden by Keri Babbitt


Building a fairy garden was high on our summer to-do list, so when BoBunny revealed the new Enchanted Garden collection, I was instantly smitten.  With the Misc Me pocket system, it's easy to work ahead, so I created this two-page spread before we even took fairy garden photos. Once the fun day came, I was able to print-and-place photos and jot in the journaling right away...layout complete!


I wanted a see-through element to these pages, so I trimmed down the journaling cards and added glitter.  This see-through effect bring a lightness and magic feel to the layout, and since the BoBunny elements are all double-sided, I can use the reverse sides of the page protectors for even more fairy photos as summer progresses.  Love that.


BoBunny Supplies:
Patterned Paper: Fairies, Periodical, Pixies/Enchanted Garden
Stickers: Enchanted Garden Combo Sticker
Trinkets: The Avenues
Misc Me Binder: Black 12 x 12"
Misc Me Page Protectors: 12 x 12" Variety Pack
Kraft: Wood Keys and Butterflies
Jewel Flourishes: Glaze Jewels