Showing posts with label Pentart Creamy Acrylics Metallic. Show all posts

Thursday, November 2, 2017

Holiday Mixed Media Techniques featuring Carousel Christmas with Marilyn

Hello everyone! It's Marilyn here with a mixed media layout with the gorgeous Carousel Christmas collection and products by BoBunny and Pentart.


 I started giving textures to my base paper (Joy) with the Winter Fun Stickable Stencil and the Sugar Glitter Paste. It created bright snowflakes on the background, then I added white paint splatters. The Joy paper has a few spots of yellow paint, so I created more yellow spots on the background with a mix of Pentart Acrylic Gold paint and Gesso Primer Paste.


I cut out different images from the Wonder paper that I gave distress ink and added 3D foam tape to create dimension with them.  I placed the photo and then I added the different images to create the design on my layout.


I used the Happy Holidays as my title and to enhance it,  I cut the pink banner from the Floral paper and adhered it behind the quote with foam tape. I draped the Joy paper and place under the believe paper.


To make the project more interesting I tied a white cord to the jingle bells. I made some dots with the Pearlecents to create more textures on the background.


I applied with a paintbrush the Gold Confetti Paste on the background and added pieces of cheesecloth between the embellishments.


Finally I added some buttons from the Ephemera package and some pearls.

I hope you find some inspiration,  Thanks for stopping by...until next time!!

Marilyn


Bo Bunny Supplies:

Pattern Papers: Carousel Christmas/ Joy, Floral, Wonder, Believe

Buttons- Ephemera: Carousel Christmas

Stickable Stencils- Winter Fun

Glitter Paste: Sugar

Confetti Paste: Gold

Jewels: Double Dots Tuxedo Jewels

Pearlescents: Sugar, Butterscoth


Pentart Supplies:

Creamy Acrylic: Baroque Gold

Primer Paste Gesso


Thursday, October 26, 2017

Penelope Altered Wooden Printer's Tray Project - with Irit


Hello My Dear Crafty Friends!
It's Irit here and today I am going to share my altered wooden printers tray that I made with BoBunny new and most gorgeous Penelope collection.

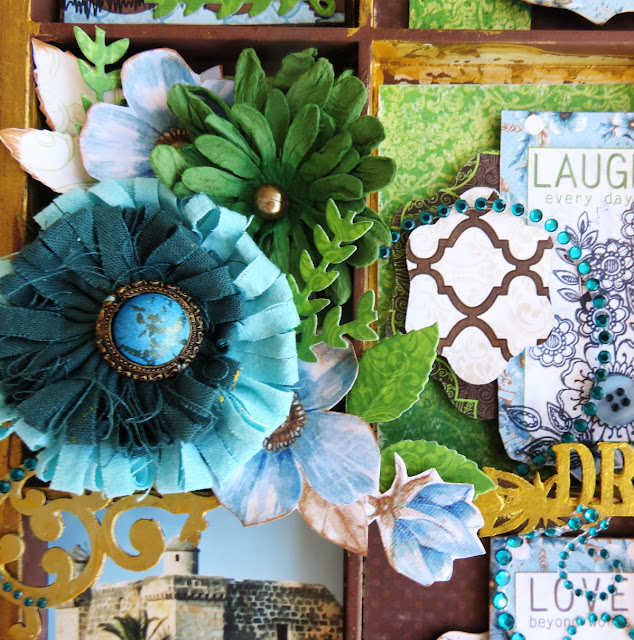
 Dream- A wooden altered tray by Irit Shalom


This 12*12'' wooden tray was already embellished once and was dirty white.
I decided to make the new tray as my small tribute to our family trips to some not so known countries The first step was to paint it to dark brown with the touch of gold.
I used Pentart Primer for Dekor paint as the first layer and then painted with brown Dekor paint and added some top touches of Creamy Acrylic Baroque Gold and now the tray was ready to be embellished.
The printers tray is a kind of Project Life type "blank canvas". So I decided to make " a page" from our trip to Albania.
I am just going to show our own photos and a bit of the country around.
The colors of Penelope collection where just the perfect fit to my photos that were mainly natural, blue and green.
Each cardstock piece was cut to fit the tray slot and then embellished with die cuts, hand cuts, wooden shapes, flowers and rhinestones.
Here are some close- ups to the slots:


As you can see  I also embellished over the tray to add more interest and more texture to the simple designs of the slots.


 All wooden and chipboard shapes were painted with the same Baroque Gold Acrylic paint.


Small die cuts were added as  the extra over the tray embellishments.


 Here you can see the depth of the tray and the imperfect painting inside the tray that was made on purpose to imitate the old wood.


 BoBunny flowers and die cuts made the most beautiful edge spot on the whole tray.
Here is the full BoBunny and Pentart long product list:

BoBunny products:
Penelope collection- 12*12'' cardstock- Penelope Live, Penelope Love, Penelope Abbey, Penelope Grace, Penelope Laugh, Penelope Journal, Penelope Dots
Double Dot cardstock- Vintage Kiwi, Vintage Ocean, Chocolate
Fancy Tags Dies
Keeping Tabs Dies
Ever After card dies
Bear Necessities dies
Darling Doily dies
Lovely Leaf dies
Congratulations card dies
Family Recipes Ephemera- ribbons and buttons
Denim Blue Dahlia
Clover Daisy flowers
Double Dot Emerald jewels brads
Elegant laser cut chipboard
Dreamcatcher laser cut chipboard
Double dot Aqua flourish jewels
Hearts wood shapes
Birdcages wood shapes
Stitches stamps
Pocket full of Posies stamps
Captured stamps
Flower Garden stamps
Doodle frames stamps

Pentart products:
Primer for Decor Paint
Decor paint Brown
Creamy Acrylic Metallic Baroque Gold

I hope that you liked my travel tray and see you  next week with a totally different projects from another new collection named Fa La La.


Wednesday, August 23, 2017

Life in Color Altered Mixed Media Canvas with Irit


Hello my Dear Crafty Friends!

Welcome to my new BoBunny post. Today I am going to share a pretty big altered Mixed Media canvas.  I am still waiting for my new BoBunny collections to come from the US and thanks to our very " fast" postal service it will take  a few more days or even weeks. So I decided to make a project with the Life in Color collection using BoBunny products which are just perfect for any Mixed Media project.
"Trust Your Journey" an Altered Mixed Media Canvas by Irit Shalom


The base was made over the flat 13.5*9.5'' canvas, but if you don't have any you  can use a thick chipboard piece as this is just a base for those chipboard rectangles glued over the canvas.
I used old recycled chipboard and just arranged them to fit the canvas size. Four brads were added in each and every  piece,  the very simple small craft store brads for the background. The larger, decorative ones are from BoBunny.
Then the background was first painted with black gesso, misted with bronze spray and waxes were added randomly.
Three BoBunny stencils were used with glitter paste mostly on the outer spots of the project with large clock added partly in the middle.
I used a couple of chipboard sets for the main spot in the middle as the background and the sentiment.
Die cuts were made from BoBunny Double Dot Cardstocks and painted to this vintage patina look with a combination of Pentart Paints.  BoBunny flowers were painted and misted too to achieve this metallic look (originally green).
 Now let me show the whole project again and then to show you some close-ups.


 This is the central spot from the front:


And here how it looks from the side:


 And my altered flowers :


 More close-ups to background:


 On this photo you can see the white stamped background and 3D powder mixed with gel paste and acrylic paint.
Also you can see the gold transfers, stenciled part and different mediums over the background.


I hope that you liked my Mixed Media project today.  Everything here is BoBunny or Pentart, except the recycled chipboard and small brads.  So you don't need to scroll a lot of shops, but to go to BoBunny shop and to get whatever you need to make the similar project.

BoBunny Supplies:
Double Dot cardstock Licorice
Double Dot cardstock Sugar chevron
Life in Color chipboards
Bella Rosa chipboards
Alphabet gold foil transfers
Backsplash Stencils
Timeless Stencils
Take Note stamp set
Congratulations card dies
Flourish dies
3x4 Ornate frames dies
Tick Tock die
Mandala die
Licorice Glitter Paste
Turquoise Glitter Paste
Bronze Glimmer Spray
Gold gGimmer Spray
Double Dot Aqua Brads
Double Dot Aqua Flourish Jewels
Zinnia Blossoms Clover Zinnia

Pentart Supplies:
Baroque Gold Creamy Acrylic Paint
Graphite Metallic Creamy Acrylic Paint
Teal Metallic Creamy Acrylic Paint
Iron Paste
Black Gesso
Gel Paste
Coarse 3D Powder
Crackle Medium Component 1
Wax Paste Metallic Copper
Wax Paste Metallic Gold
Purplish Silver Delicate Metallic Acrylic Paint
Greenish Gold Glamour Metallic Paint
Dark Gold Delicate Metallic Paint

 Thanks for reading this post and see you in a week!

Friday, June 16, 2017

Fine Arts Friday with Ombretta


Hello and welcome to the BoBunny Blog today!

Today,  I propose to you a cut paper Art Project. This is my creation and I hope you like it!

Cut Paper Art by Ombretta Fusco using Bobunny Weekend Adventures

I drew the subject and started cutting the lines made with the pencil.

Cut Paper Art by Ombretta Fusco using Bobunny Weekend Adventures

Then, I lifted and bent back all the cut pieces of paper...all of them...one by one...to mimic the look of the fish scales and fins.

Cut Paper Art by Ombretta Fusco using Bobunny Weekend Adventures


I created a paper frame for my creation-this shows the back side of the paper:

Cut Paper Art by Ombretta Fusco using Bobunny Weekend Adventures

My next step is painting the fish with metallic acrylic colors, which is the fun part and wehre the whole look comes together. I used a few of my favorite BoBunny and Pentart mixed media goodies to accent certain parts so they would stand out, and contoured others to create depth. You can do even more than I did here if you like a more colorful finished project.

Cut Paper Art by Ombretta Fusco using Bobunny Weekend Adventures

And this is the result! It's a simple work if you have patience! I hope you like it!

See you soon!

Supplies:
Paper BoBunny Weekend Adventures Beachy
Glimmer Spray BoBunny Frost
Creamy Acrylic Metallic colors Pentart: Silver, Teal, Blue, Rose.
Creamy Acrylic Colors Pentart: Blue


Wednesday, May 31, 2017

Designers Choice-Sports and Craft Dies!


Hello BoBunny Fans!

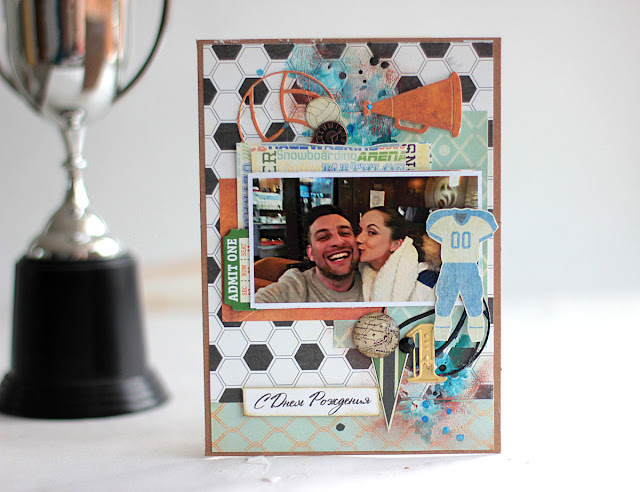
Sometimes I have a request from my friends to create a Birthday Card for their relatives or friends , using a favorite photo. I thought this would be a great shopwase for the blog today, as you create something as a layout while keeping in mind that would also be fabulous as a greeting.  This friend wanted a specifically sports themed card for her soccer fanatic husband.

So I started with the card base at 5 x 7 and starting adding the paper layers from the awesome Game On collection.  I also cranked our and placed the soccer ball and basketball die cuts.  I put them together before started painting everything but didn't adhere them quite yet.

Birthday Card Layout by Elena Olinevich using BoBunny Game On! collection

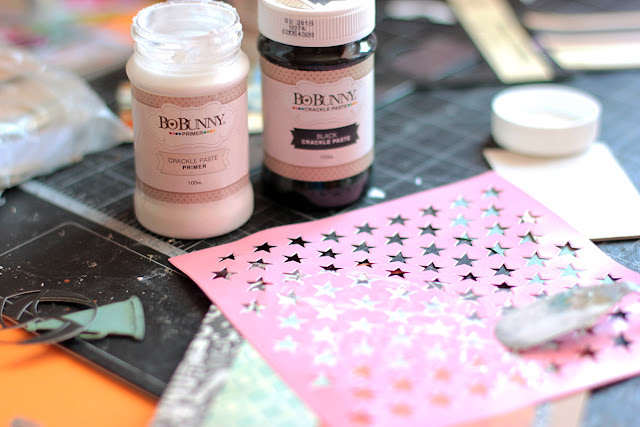
Then I applied Gesso and Crackle Paste, the first layer of Primer and when it dried - the black paste

Birthday Card Layout by Elena Olinevich using BoBunny Game On! collection

Then I added some misting and added the color using Pentart acrylic paints

Birthday Card Layout by Elena Olinevich using BoBunny Game On! collection

  I also decided to try the more light papers for my background and on the side made my own layout using almost the same papers and die cuts.  Easy Peasy! 

Birthday Card Layout by Elena Olinevich using BoBunny Game On! collection

I only changed the composition a bit, and this time instead of using the stars Stencil and the crackle paste - I colored everything with the acrylic paints and wax metallic paste.  I love wax pastes! 

Birthday Card Layout by Elena Olinevich using BoBunny Game On! collection

I finished with some drops of spray.

Birthday Card Layout by Elena Olinevich using BoBunny Game On! collection


BoBunny Supplies:

12" Game On! Jersey

Game On! 6x6 Paper Pad

Game On! Chipboard

Let's Play Dies

Gesso White

Cascade Stickable Stencils

Crackle Primer and Crackle Black

Frost Glimmer Spray

Tuxedo Jewels


Pentart Products:

Teal and Baroque Gold Acrylic Metallic Paint

Wax Paste Copper


Friday, May 26, 2017

Weekend Adventures and mixed Media Fun! with Angela


Hello BoBunny friends!

It's Angela and I'm so excited to be back to share a new Sunday Fun Day project.

Last week we had a party for my hubby's birthday and this is the card I made, and stuck to the gift.

Happy Birthday Card by Angela Tombari using BoBunny Weekend Adventures Collection

I made it using the two big cards you can find in the Weekend Adventures Noteworthy pack.

Happy Birthday Card by Angela Tombari using BoBunny Weekend Adventures Collection

The biggest card holds the smallest one which slides out revealing a first gift, four carnival tickets.

Happy Birthday Card by Angela Tombari using BoBunny Weekend Adventures Collection

These are located inside a vellum pocket sewed on the small card.
I also prepared some fun little cards for my guests, to thank them for coming to celebrate with us!

Thank You Cards by Angela Tombari using BoBunny Weekend Adventures Collection

I had so much fun making them!

I used the new stamp set Woodland Critters, coordinated with the Weekend Adventures collection.

Particularly, I was inspired by the beautiful pattern papers and I made a few kite embellishments.

Thank You Cards by Angela Tombari using BoBunny Weekend Adventures Collection

To add a touch of interest in this already busy card, I painted a piece of white cardstock with Pentart silver acrylic paint and cut it in a cloud shape with the BoBunny cloud die.

Isn't it cute?

Thank you for stopping by. I hope you feel inspired by these two different kinds of cards and hope to see you soon.

Love,

Angela


BoBunny Supplies:

12" Weekend Adventures Stripe

12" Weekend Adventures Play Date

12" Weekend Adventures Blooms

Weekend Adventures Noteworthy

Woodland Critters Stamp Set

Sentiments Stamp Set

Summer Picnic Dies


Pentart Supplies:

Antique Silver Delicate Acrylic Paint Metallic


Friday, February 3, 2017

Life in Color and Pentart Media Inks w Ayumi


Hello Bo Bunny Friends,

Today I will introduce canvas layout using the Life In Color collection from Bo Bunny with Pentart Media Inks.

Love by Ayumi Iwashita


Layered Chipbord of the Life In Color collection is shiny, very beautiful and gorgeous.


3D balls lends a really interesting textured effect because of the variation of shape and size.


This is it . . .

Apply Acrylic Paint Metallic (Blue) around the canvas.

Metallic is shiny and very beautiful.


The next step is spray Glimmer Sprays (Mint, Frost, Gold) closer to the canvas.


Prepare transparent paper (3 sheets) and white paper (1 sheet) and stick on the canvas.
Stick white paper under the transparent paper.


Drop a few drops of media inks on transparent paper.

Stand the canvas so that the ink flows downward, in a kind of dripping pattern.

Also, lay the canvas sideways so that it flows down sideways.


Use the Media Ink Diluent, it blurs the ink and gives a cool variation in the shade and depth of the colors..

Do you see the difference?


`Cut small aluminum foil, then wrinkle it up a bit.

Stick it on the canvas.

Drop the Media inks on the aluminum foil as well.

Doodles Stamp with black ink.


Finally, I paint Glossy Varnish on the canvas and dry it.


When the canvas is completed, you can decorate this further with pattern paper, chipboard, and D balls as shown

Thanks for joining me today.

Have a fabulous day!

BoBunny Supplies:
Patterned paper: Life In Color Utopia
Layered Chipboard: Life In Color
Glimmer Sprays: Frost, Mint, Gold
Stamp: Doodles Stamp

Pentart Supplies:
Acrylic Paint metallic: Blue
Media Inks: Magenta, Morning Glory, Gold
Varnishes: Glossy Varnish
3D Products: 3D Balls Large